How Docker Volumes Work
Posted on 29 Jul 2026
Introduction
This is the fifth article of the Getting Started with Docker series. In the previous article we connected containers over a private network. Now we need to address another fundamental question: what happens to your data when a container is stopped or replaced?
By default, a container’s filesystem is ephemeral — everything written inside it disappears when the container is removed. This is fine for stateless services like a web server, but it is a problem as soon as you have anything that needs to survive: logs, configuration, user data, database files.
Docker solves this with volumes.
The Upgrade Problem
One of Docker’s main benefits is that upgrading an application is as simple as replacing the old container with a new one. But if your data is stored inside the container, replacing it means losing the data.
The solution is to separate the application binaries from the data. Store the binaries in the image and the data in a volume that lives outside the container. When you replace the container, the volume stays where it is and the new container picks it up.
Docker Storage Types
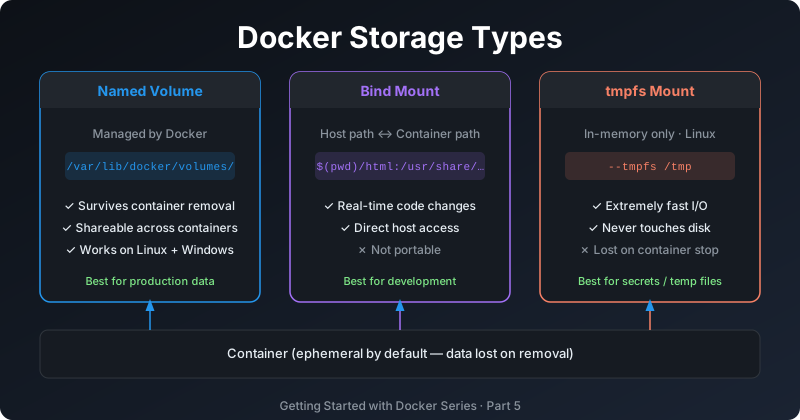
Docker provides three options for persisting data from a container to the host filesystem.
Volumes
Volumes are managed entirely by Docker. They are stored in a directory on the host that Docker controls (typically /var/lib/docker/volumes/ on Linux) and you interact with them through Docker CLI commands — not by poking around the filesystem directly.
Volumes are the recommended way to persist data in Docker. From the official documentation, some of the reasons:
- Easier to back up and migrate than bind mounts
- Manageable through the Docker CLI and API
- Work on both Linux and Windows containers
- Can be safely shared among multiple containers
- Support remote storage drivers (NFS, cloud block storage, etc.)
- New volumes can be pre-populated with data from a container
Bind Mounts
Bind mounts map a specific directory or file on the host filesystem into the container. Unlike volumes, bind mounts are not managed by Docker — any process on the host can read and write them.
Bind mounts are ideal when:
- You want to share source code between your editor on the host and the running container (live reload during development)
- You need the storage to be on a specific filesystem type
- You need direct access to the files from the host without going through Docker
We already used a bind mount in the first article: -v $(pwd)/index.html:/usr/share/nginx/html/index.html:ro.
Tmpfs Mounts
Tmpfs mounts store data in the host’s memory, not on disk. The data is never written to disk and disappears when the container stops. They are useful for sensitive data (secrets, tokens) that should never touch disk, or for temporary scratch space that requires very fast I/O.
Tmpfs mounts are only available on Linux hosts.
The --mount Syntax
Docker has two ways to attach storage to a container: the older -v flag and the newer --mount flag. The --mount syntax is more explicit and is the one recommended by the official documentation today.
Comparison:
# Old syntax (-v)
docker run -v my-volume:/app/data nginx:alpine

# New syntax (--mount) — equivalent
docker run --mount type=volume,source=my-volume,target=/app/data nginx:alpine
The --mount form accepts key-value pairs:
type—volume,bind, ortmpfssource(orsrc) — volume name or host path (for bind mounts)target(ordst) — path inside the containerreadonly— makes the mount read-only
Both syntaxes work; --mount is preferred in scripts and documentation for clarity.
Docker Volumes Cheat Sheet
Create a named volume:
docker volume create my-data
List all volumes:
docker volume ls
Inspect a volume (shows the mount point on the host):
docker volume inspect my-data
Remove a volume:
docker volume rm my-data
Remove all unused volumes:
docker volume prune
Practical Example: Nginx with Persistent Content
Let us demonstrate volumes with our Nginx container. We will create a volume, write content into it from a temporary container, then serve that content with Nginx — and show that the content survives a container replacement.
Create the volume
docker volume create web-content
Populate the volume
docker run --rm \
  --mount type=volume,source=web-content,target=/data \
  alpine sh -c 'echo "<h1>Content from a volume</h1>" > /data/index.html'
This starts a temporary Alpine container, mounts the volume at /data, writes a file, and immediately exits and removes itself (--rm). The volume and its content persist.
Serve the content with Nginx
docker run -d \
  --name nginx-volume \
  -p 8080:80 \
  --mount type=volume,source=web-content,target=/usr/share/nginx/html \
  nginx:alpine
Open http://localhost:8080 — you see the page from the volume.
Replace the container — data survives
docker rm -f nginx-volume

docker run -d \
  --name nginx-volume-new \
  -p 8080:80 \
  --mount type=volume,source=web-content,target=/usr/share/nginx/html \
  nginx:alpine
Open http://localhost:8080 again. The same page is still there. The volume outlived the container.
Clean up
docker rm -f nginx-volume-new
docker volume rm web-content
Volumes vs Bind Mounts: When to Use Which
| Volumes | Bind Mounts | |
|---|---|---|
| Managed by Docker | Yes | No |
| Portable across machines | Yes (with volume drivers) | No (path must exist on host) |
| Best for production data | Yes | No |
| Best for dev code sharing | No | Yes |
| Access from host directly | Via docker volume inspect |
Direct filesystem path |
| Works on Windows containers | Yes | Limited |
Conclusion
In this article we covered:
- Why containers are ephemeral by default and why that matters
- The three Docker storage types: volumes, bind mounts, and tmpfs
- The modern
--mountsyntax vs the older-vflag - Essential volume commands:
create,ls,inspect,rm,prune - A practical example showing that volume data survives container replacement
- A comparison table to decide when to use volumes vs bind mounts
The next article introduces Docker Compose: how to manage a multi-container application with a single YAML file instead of juggling multiple docker run commands.
If you enjoyed this article, don’t forget to give it a clap 👏, share it with your friends 🔗, and follow me for more tips and tutorials on software development 📘. Your support helps me create more content like this — thank you! 🙌