Docker Image Best Practices
Posted on 01 Aug 2026
Introduction
This is the eighth and final article of the Getting Started with Docker series. In the previous article we hardened a container against attacks. Back in Part 3 we wrote our first Dockerfile and learned the basic instructions and the layer cache.
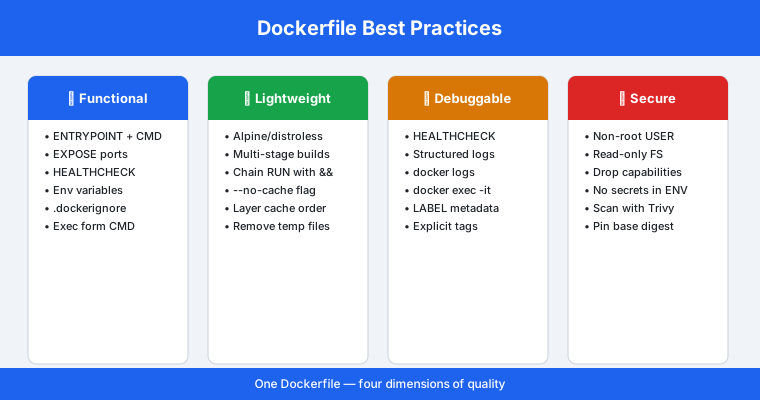
Now it is time to put everything together. A Dockerfile that just “works” is not enough — a well-written image should be:
- Functional — it starts correctly, exposes the right ports, and tells Docker how to check its own health
- Lightweight — it ships only what the application needs to run, nothing else
- Debuggable — when something goes wrong at 2 AM, you can find out why quickly
- Secure — it does not run as root and does not carry unnecessary attack surface
This article collects the practices that matter most for each of these four dimensions, using the Nginx example from the series as a running example.
1. Functional: Make the Image Behave Predictably
Use the exec form for CMD and ENTRYPOINT
# Good — exec form, PID 1, signals delivered directly
CMD ["nginx", "-g", "daemon off;"]

# Avoid — shell form wraps the process, SIGTERM may not reach it
CMD nginx -g daemon off;
The exec form (JSON array) runs your process as PID 1 directly, so docker stop can deliver SIGTERM to it and your application can shut down gracefully instead of being killed after the timeout.
Combine ENTRYPOINT and CMD
Use ENTRYPOINT for the fixed executable and CMD for default arguments the user can override:
ENTRYPOINT ["nginx"]
CMD ["-g", "daemon off;"]
Now docker run my-nginx -v runs nginx -v instead of the default arguments, without anyone needing to know the entrypoint.
Declare a HEALTHCHECK
HEALTHCHECK --interval=30s --timeout=3s --start-period=5s --retries=3 \
  CMD curl -f http://localhost/ || exit 1
Without a HEALTHCHECK, Docker only knows whether the main process is alive — not whether your application is actually serving requests. With it, docker ps shows healthy / unhealthy, and orchestrators (Compose, Swarm, Kubernetes) can restart or stop routing traffic to a broken container automatically.
Use ENV for configuration, not for secrets
ENV NGINX_PORT=80
Environment variables are the standard way to make an image configurable at runtime. Give sensible defaults in the Dockerfile and let users override them with docker run -e or Compose’s environment: — but keep this to configuration, never credentials (see the security article for why).
Add a .dockerignore
.git
node_modules
*.md
Dockerfile
.env
A .dockerignore file works exactly like .gitignore: it keeps unnecessary or sensitive files out of the build context, which makes builds faster and prevents accidentally COPY-ing things like .git history or local .env files into the image.
2. Lightweight: Ship Only What You Need
Start from a minimal base image
FROM nginx:alpine
alpine-based images are a fraction of the size of their Debian/Ubuntu-based equivalents because they use musl libc and busybox instead of a full userland. For runtimes that support it, distroless images go even further — no shell, no package manager, just the runtime and your application.
Use multi-stage builds
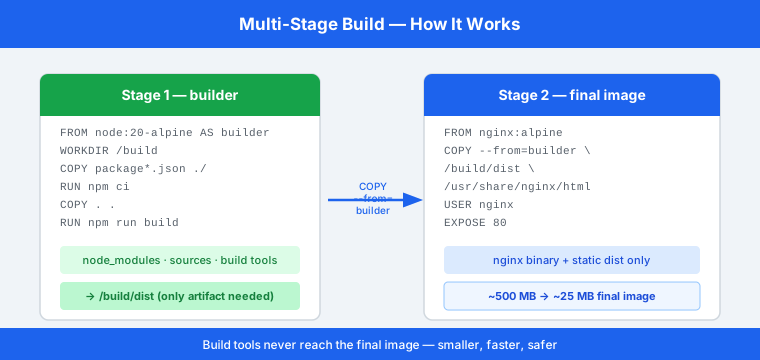
This is the single most effective technique for keeping images small. Build tools, source code, and dependencies stay in an intermediate builder stage that never ships — only the final artifact is copied into the runtime image.
# Stage 1: build the static assets
FROM node:20-alpine AS builder
WORKDIR /build
COPY package*.json ./
RUN npm ci
COPY . .
RUN npm run build

# Stage 2: serve them from a minimal image
FROM nginx:alpine
COPY --from=builder /build/dist /usr/share/nginx/html
USER nginx
EXPOSE 80
The node_modules folder, the TypeScript compiler, and every build dependency exist only in the builder stage. The final image contains just nginx and the compiled static files — often a 20x reduction in size, and a much smaller attack surface as a bonus.
When to reach for it: any time your build step needs tools your runtime does not — a compiler or SDK (Go, Rust, Java/Maven, C/C++), a bundler/transpiler for a front-end app (webpack, vite, tsc), or a test suite you want to run during the build but never ship. As a rule, if docker build needs to install something with apt/apk/npm/pip just to produce an artifact, and the running application never calls that tool again, it belongs in a builder stage. It is also useful to keep build-time secrets (private registry tokens, npm auth) out of the final image’s layer history, since the builder stage is simply discarded.
When it is not worth it: if your image never compiles or bundles anything — say, a Python script that only needs its runtime dependencies installed once, or a set of static files that already exist in the repository — a single stage is simpler and there is no build-only tooling to strip out. Multi-stage solves a specific problem (build tools leaking into the runtime image); do not add a stage just because it looks more sophisticated.
Chain RUN instructions and clean up in the same layer
# Good — one layer, no leftover cache
RUN apk add --no-cache curl \
  && curl -O https://example.com/tool.tar.gz \
  && tar -xzf tool.tar.gz \
  && rm tool.tar.gz

# Avoid — the download persists in an earlier layer even if a later RUN removes it
RUN apk add curl
RUN curl -O https://example.com/tool.tar.gz
RUN tar -xzf tool.tar.gz
RUN rm tool.tar.gz
Each RUN is a layer, and layers are additive — deleting a file in a later layer does not shrink the image, it only hides the file. Install, use, and clean up temporary files within the same RUN instruction. The --no-cache flag on apk add (or rm -rf /var/lib/apt/lists/* on Debian-based images) avoids leaving the package index cached in a layer.
Beware of chown -R in its own layer
A subtler version of the same problem: changing ownership of a large tree after it has already been copied.
# Avoid — chown touches every file, duplicating them into a new layer
COPY app /app
RUN chown -R appuser:appgroup /app

# Good — ownership is set as part of the copy, no extra layer
COPY --chown=appuser:appgroup app /app
chown looks like it only changes metadata, but the overlay filesystem Docker uses has to copy each affected file into the new layer to record that change. Run RUN chown -R over a directory that a previous layer already populated, and you can end up shipping that directory’s contents twice — once in the COPY layer, once again in the RUN chown layer — roughly doubling its footprint in the image.
You can catch this with docker history, which lists the size of every layer in build order:
docker history my-nginx:1.2.0
If a RUN chown -R ... layer is anywhere near the size of the COPY layer above it, that is the tell — a metadata-only change should be close to 0 B. For a more visual, layer-by-layer breakdown (including a wasted-space estimate), the dive tool is built exactly for this:
dive my-nginx:1.2.0
The fix is almost always the same: set ownership with --chown on the COPY (or ADD) instruction that creates the files, instead of a separate RUN chown -R afterwards.
Order instructions from least to most frequently changing
As covered in Part 3, put dependency installation before COPY-ing application code. Dependencies change rarely, code changes often — this ordering keeps the layer cache useful across builds.
3. Debuggable: Make Failures Easy to Diagnose
A lightweight, locked-down image is worth little if nobody can figure out why it crashed. A few practices keep images small and secure without sacrificing debuggability.
Log to stdout/stderr, not to files
# Nginx already does this — logs are symlinked to stdout/stderr
RUN ln -sf /dev/stdout /var/log/nginx/access.log \
  && ln -sf /dev/stderr /var/log/nginx/error.log
Docker captures anything written to stdout/stderr and makes it available through docker logs, which works with every logging driver and log aggregator. Logs written to a file inside the container are invisible unless you exec in and go looking for them.
docker logs -f my-app
Keep a shell available, or know how to add one temporarily
Distroless and scratch images are excellent for production but have no shell, so docker exec -it my-app sh will not work. If you need that debugging path, alpine is usually the right trade-off — it is still tiny but keeps sh, curl, and basic tools available:
docker exec -it my-app sh
If you are committed to a distroless final stage, keep a debug-friendly variant of the same image (many distroless images ship a :debug tag with Busybox included) for troubleshooting.
Add LABEL metadata
LABEL org.opencontainers.image.source="https://github.com/you/my-nginx" \
      org.opencontainers.image.version="1.0" \
      org.opencontainers.image.description="Custom Nginx image with static site"
When an incident happens at 2 AM, docker inspect on a labeled image immediately tells you which commit and which repository it was built from — no guessing which tag maps to which source.
Always use explicit, meaningful tags
Reusing latest makes it impossible to know which build is actually running. Tag every image with a version (and ideally the commit SHA), as shown in Part 3:
docker build -t my-nginx:1.2.0 -t my-nginx:$(git rev-parse --short HEAD) .
4. Secure: Don’t Undo Your Own Work
We covered security in depth in the previous article; here is the short version to keep in mind while writing every Dockerfile:
- Never run as root — add a
USERinstruction, or run with--user - Prefer a read-only filesystem at runtime, with
tmpfsfor the few paths that need writing - Drop Linux capabilities with
--cap-drop=ALLand add back only what is required - Never bake secrets into
ENVor image layers — use secrets managers or untracked.envfiles - Scan images for known CVEs with Docker Scout or Trivy before shipping
- Pin base images to a digest and keep them updated
A lightweight image built with multi-stage builds is already a security win: fewer packages means fewer CVEs to track.
Putting It All Together
Here is the Nginx example from the series, now applying all four dimensions at once:
# ── Stage 1: build ──────────────────────────────────────────────
FROM node:20-alpine AS builder
WORKDIR /build
COPY package*.json ./
RUN npm ci
COPY . .
RUN npm run build

# ── Stage 2: runtime ─────────────────────────────────────────────
FROM nginx:alpine

LABEL org.opencontainers.image.source="https://github.com/you/my-nginx" \
      org.opencontainers.image.version="1.2.0"

# Functional: only the compiled static assets, owned by the runtime user
COPY --from=builder --chown=nginx:nginx /build/dist /usr/share/nginx/html

# Debuggable: send Nginx logs to stdout/stderr
RUN ln -sf /dev/stdout /var/log/nginx/access.log \
  && ln -sf /dev/stderr /var/log/nginx/error.log

# Secure: drop to the non-root user the base image already provides
USER nginx

EXPOSE 80

# Functional: let Docker (and orchestrators) know when we're actually serving traffic
HEALTHCHECK --interval=30s --timeout=3s --retries=3 \
  CMD curl -f http://localhost/ || exit 1

ENTRYPOINT ["nginx"]
CMD ["-g", "daemon off;"]
Run it the same secure way we did in the previous article:
docker build -t my-nginx:1.2.0 .

docker run -d -p 8080:80 \
  --read-only \
  --tmpfs /tmp --tmpfs /var/cache/nginx --tmpfs /var/run \
  --cap-drop=ALL --cap-add=NET_BIND_SERVICE \
  --name my-app \
  my-nginx:1.2.0
Checklist
A quick reference to keep next to your Dockerfile:
- Exec form for
CMD/ENTRYPOINT HEALTHCHECKdefined.dockerignoreexcludes build artifacts, VCS metadata, and secrets- Minimal base image (
alpine,distroless, orscratch) - Multi-stage build separates build tools from the runtime image
- Related
RUNcommands chained and cleaned up in the same layer - Ownership set with
COPY --chownrather than a separateRUN chown -R - Instructions ordered from least to most frequently changing
- Application logs to stdout/stderr
- Image carries
LABELmetadata and an explicit version tag USERset to a non-root user- Runs with a read-only filesystem and dropped capabilities
- No secrets in
ENVor image layers - Scanned for CVEs before shipping
Conclusion
In this article we brought together everything the series covered, organized around four goals for every image you write:
- Functional: exec-form commands,
HEALTHCHECK, sensibleENVdefaults, and a.dockerignore - Lightweight: minimal base images and multi-stage builds to keep build tools out of the final image
- Debuggable: logs to stdout/stderr,
LABELmetadata, explicit tags, and a shell available when you need one - Secure: non-root users, read-only filesystems, dropped capabilities, and vulnerability scanning
This concludes the Getting Started with Docker series. You now have a solid foundation to build, network, persist, orchestrate, secure, and package containerized applications the right way. The natural next step is Docker Swarm for multi-host deployments, or Kubernetes for large-scale container orchestration.
If you enjoyed this article, don’t forget to give it a clap 👏, share it with your friends 🔗, and follow me for more tips and tutorials on software development 📘. Your support helps me create more content like this — thank you! 🙌