How Docker Compose Works
Posted on 30 Jul 2026
Introduction
This is the sixth article of the Getting Started with Docker series. In the previous article we learned how to persist data with volumes. So far, to run our application we have been juggling multiple docker run commands — one for the network, one for each container, one for each volume. This quickly becomes hard to manage and impossible to share reliably with a team.
Docker Compose solves this: you describe your entire application in a single YAML file and launch everything with one command.
What is Docker Compose?
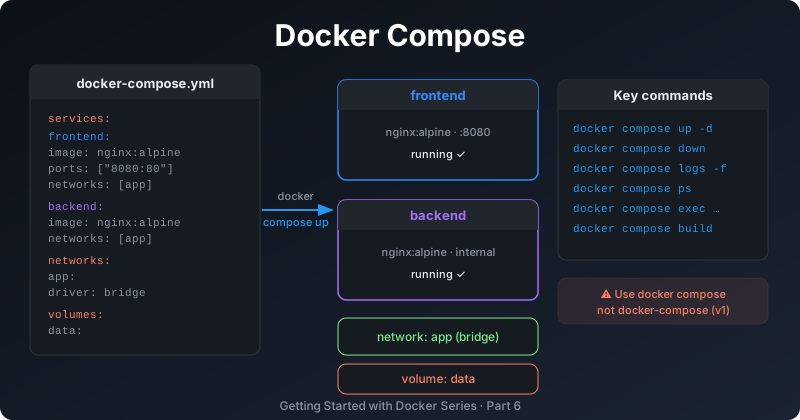
Docker Compose is a tool for defining and running multi-container Docker applications. You describe your services, networks, and volumes in a docker-compose.yml file, and Docker Compose translates that into the correct sequence of docker commands.
Important: the original
docker-composecommand (v1, written in Python) was deprecated in May 2023 and is no longer maintained. The current tool isdocker compose(v2, written in Go), which is a plugin built directly into the Docker CLI. Always usedocker compose(with a space, not a hyphen). If you are on Podman, usepodman composewhich is compatible with the same YAML format.
You can think of docker compose as a wrapper that orchestrates all the docker commands you would otherwise run manually — but declaratively, from a single file.
The docker-compose.yml File
The Compose file is a YAML document. Its top-level keys are:
services— the containers that make up your applicationvolumes— named volumes used by the servicesnetworks— custom networks (if not specified, Compose creates a default bridge network automatically)
A Note on the version Field
Older tutorials and documentation show a version: '3.x' field at the top of the Compose file. This field is deprecated and should be omitted. Modern Docker Compose uses the Compose Specification which does not require a version declaration.
Practical Example: Frontend and Backend with Compose
We will rebuild the two-container application from the networking article using Docker Compose, adding a named volume for the frontend content.
Project structure
my-app/
├── docker-compose.yml
├── frontend/
│   └── index.html
└── backend/
    └── index.html
Create the directories and content:
mkdir -p my-app/frontend my-app/backend
cd my-app

cat > frontend/index.html << 'EOF'
<!DOCTYPE html>
<html>
  <head><title>Frontend</title></head>
  <body>
    <h1>Frontend</h1>
    <p>This app is managed by Docker Compose.</p>
  </body>
</html>
EOF

cat > backend/index.html << 'EOF'
{"status": "ok", "message": "Hello from the backend!"}
EOF
The docker-compose.yml file
services:
  frontend:
    image: nginx:alpine
    container_name: frontend
    ports:
      - "8080:80"
    volumes:
      - ./frontend:/usr/share/nginx/html:ro
    networks:
      - app-network
    depends_on:
      - backend

  backend:
    image: nginx:alpine
    container_name: backend
    volumes:
      - ./backend:/usr/share/nginx/html:ro
    networks:
      - app-network

networks:
  app-network:
    driver: bridge
Key things to notice:
- No
version:field — not needed with modern Compose depends_on— ensures the backend container starts before the frontend. For health-based ordering, you can usecondition: service_healthytogether with ahealthcheckdefinition- Networks are created automatically — Compose creates
app-networkfor you - Bind mounts use relative paths from the directory containing
docker-compose.yml
Docker Compose Commands
The most important commands:
# Start all services (build images if needed, create networks and volumes)
docker compose up -d

# Stop and remove containers, networks (volumes are preserved)
docker compose down

# Stop and remove everything including volumes
docker compose down -v

# View logs of all services
docker compose logs

# Follow logs in real time
docker compose logs -f

# List running containers managed by this Compose file
docker compose ps

# Execute a command inside a running service container
docker compose exec frontend sh

# Rebuild images (useful after changing a Dockerfile)
docker compose build

# Pull the latest versions of all images
docker compose pull

# Restart a single service
docker compose restart frontend
The key difference from docker commands is that all of these act on the entire application defined in the Compose file, not a single container.
Environment Variables
Hard-coded values in docker-compose.yml are fine for development, but for anything sensitive (passwords, API keys) or environment-specific (URLs, port numbers) you should use variables.
Docker Compose automatically reads a file named .env in the same directory:
# .env
NGINX_PORT=8080
APP_ENV=development
Then reference them in docker-compose.yml:
services:
  frontend:
    ports:
      - "${NGINX_PORT}:80"
    environment:
      - APP_ENV=${APP_ENV}
Never commit .env files containing secrets to version control. Add .env to your .gitignore.
Starting the Application
From the my-app/ directory:
docker compose up -d
Compose will:
- Create the
app-networkbridge network - Start the
backendcontainer - Start the
frontendcontainer - Map port 8080 on your host to port 80 on the frontend container
Open http://localhost:8080 — the frontend is running. Check that both services are up:
docker compose ps
Verify the backend is reachable by name from the frontend:
docker compose exec frontend ping -c 3 backend
Clean up
docker compose down
Conclusion
In this article we covered:
- What Docker Compose is and why it replaces manual
docker runscripts - The difference between
docker-composev1 (deprecated) anddocker composev2 (current) - The structure of a
docker-compose.ymlfile:services,volumes,networks - Why the
version:field is no longer needed - Essential Compose commands:
up,down,logs,ps,exec,build - How to manage configuration with environment variables and
.envfiles
The next article closes the series with Docker security best practices: how to run containers safely, limit their privileges, and scan images for vulnerabilities.
If you enjoyed this article, don’t forget to give it a clap 👏, share it with your friends 🔗, and follow me for more tips and tutorials on software development 📘. Your support helps me create more content like this — thank you! 🙌