Dockerfile and Building Custom Images
Posted on 27 Jul 2026
Introduction
This is the third article of the Getting Started with Docker series. In the previous article we explored the differences between containers and virtual machines. In the first article we ran Nginx directly from the official image using a bind mount to serve a custom page.
That approach works well for quick experiments, but in a real project you want a reproducible, self-contained image that already includes your content and configuration — one that anyone on your team (or any CI/CD pipeline) can build and run without manual steps.
This is where Dockerfiles come in.
What is a Dockerfile?
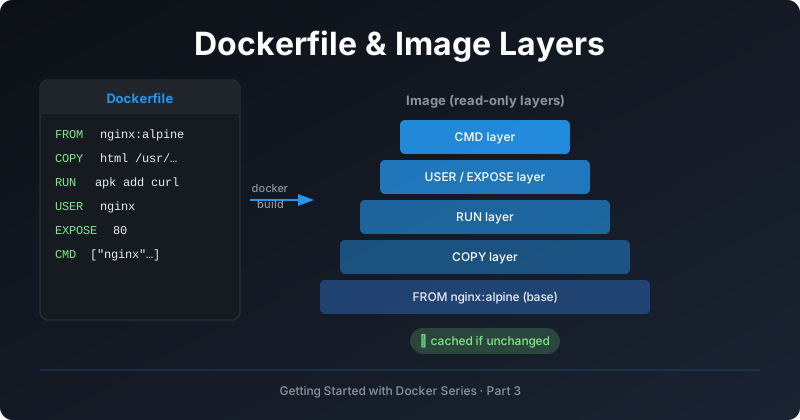
A Dockerfile is a plain-text file containing a sequence of instructions that tell Docker how to build an image. Each instruction creates a new layer on top of the previous one. When you rebuild an image, Docker only rebuilds the layers that changed — everything before the first change is served from the layer cache, making subsequent builds very fast.
Dockerfile Instructions
Here are the most important instructions you will use in every Dockerfile.
FROM
FROM nginx:alpine
Every Dockerfile must start with FROM. It specifies the base image — the starting point. In this series we always start from nginx:alpine, a minimal image that already contains a working Nginx web server.
COPY
COPY ./html /usr/share/nginx/html
Copies files or directories from your build context (the folder where you run docker build) into the image. This is the main instruction for adding your application code or configuration.
ADD
ADD is similar to COPY but with two extra powers: it can automatically unpack compressed archives (.tar.gz, etc.) and it can fetch files from remote URLs. For simply copying local files, prefer COPY — it is explicit and predictable.
RUN
RUN apk add --no-cache curl
Executes a command during the build and commits the result as a new layer. Use it to install packages, compile code, or run any setup step. Each RUN instruction is a layer, so chain related commands with && to minimize layer count.
ENV
ENV APP_ENV=production
Sets an environment variable that is available both during the build and at container runtime.
EXPOSE
EXPOSE 80
Documents which port the container listens on. It does not actually publish the port — that happens at runtime with -p. Think of it as metadata for the image user.
CMD
CMD ["nginx", "-g", "daemon off;"]
Specifies the default command to run when a container starts. It can be overridden at runtime. Use the exec form (JSON array) rather than the shell form to avoid wrapping the process in a shell — this ensures signals like SIGTERM are delivered directly to your process.
ENTRYPOINT
Similar to CMD but not easily overridden. Use ENTRYPOINT when the container has a fixed main executable, and CMD to provide default arguments to it.
USER
USER nginx
Switches to a non-root user for all subsequent instructions and at runtime. This is a security best practice — we will cover it in detail in the security article.
Building a Custom Nginx Image
Let us build a custom image that already includes our HTML page, so anyone can run it with a single docker run — no bind mounts, no extra files needed.
Create a project directory:
mkdir my-nginx && cd my-nginx
Create the HTML content:
mkdir html
cat > html/index.html << 'EOF'
<!DOCTYPE html>
<html>
  <head><title>My Custom Nginx</title></head>
  <body>
    <h1>Hello from my custom image!</h1>
    <p>This page is baked into the Docker image.</p>
  </body>
</html>
EOF
Create the Dockerfile:
FROM nginx:alpine

# Copy our HTML content into the image
COPY html /usr/share/nginx/html

# Document which port Nginx listens on
EXPOSE 80
Build the image:
docker build -t my-nginx:1.0 .
Breaking down the command:
-t my-nginx:1.0— tag the image with a name and version.— the build context (current directory); Docker sends all files here to the build engine
List your images to confirm it was created:
docker image ls
Run a container from your custom image:
docker run -d -p 8080:80 --name my-app my-nginx:1.0
Open http://localhost:8080 — you will see your custom page, served directly from the image without any bind mounts.
Understanding the Layer Cache
Run docker build a second time without changing anything:
docker build -t my-nginx:1.0 .
You will see output like:
 => CACHED [1/2] FROM docker.io/library/nginx:alpine
 => CACHED [2/2] COPY html /usr/share/nginx/html
Both steps are served from cache — the build is instant. Now edit html/index.html and rebuild:
docker build -t my-nginx:1.1 .
Only the COPY layer is rebuilt. The FROM layer (downloading the base image) is still cached.
Rule of thumb: order your Dockerfile instructions from least to most frequently changing. Put RUN commands that install packages near the top, and COPY of your application code near the bottom. This maximises cache reuse and keeps builds fast.
Tagging and Versioning Images
Good image tags tell you exactly what version is inside:
# Tag with a version number
docker build -t my-nginx:1.0 .

# Tag the same image as latest
docker tag my-nginx:1.0 my-nginx:latest
Always use explicit version tags in production. The latest tag is convenient locally but can cause surprises in automated pipelines because it changes silently.
Cleaning Up
Remove the running container:
docker rm -f my-app
Remove the image:
docker image rm my-nginx:1.0 my-nginx:1.1
Remove all unused images and build cache:
docker system prune -a
Conclusion
In this article we covered:
- The purpose of a Dockerfile and how it defines an image
- The most important instructions:
FROM,COPY,RUN,ENV,EXPOSE,CMD,ENTRYPOINT,USER - How to build, tag, and run a custom Nginx image
- How the layer cache works and how to structure a Dockerfile to maximise it
The next article introduces Docker networking: how to connect containers together so they can communicate over a private network.
If you enjoyed this article, don’t forget to give it a clap 👏, share it with your friends 🔗, and follow me for more tips and tutorials on software development 📘. Your support helps me create more content like this — thank you! 🙌