Docker Security Best Practices
Posted on 31 Jul 2026
Introduction
This is the seventh article of the Getting Started with Docker series. In the previous article we orchestrated a multi-container application with Docker Compose. Now we turn our attention to security.
Containers are isolated — but isolation is not the same as security. A container running as root, with a writable filesystem and full Linux capabilities, is a significant risk if it is ever compromised. The good news is that Docker provides several mechanisms to reduce the attack surface, and most of them require only a few lines of configuration.
1. Never Run as Root
By default, processes inside a container run as root (UID 0). This means that if an attacker exploits a vulnerability in your application, they have root access inside the container — and depending on how the container is configured, they may be able to escape to the host.
The fix is simple: add a USER instruction to your Dockerfile.
FROM nginx:alpine

COPY html /usr/share/nginx/html

# Switch to the non-root user that the nginx image already provides
USER nginx

EXPOSE 80
CMD ["nginx", "-g", "daemon off;"]
The official nginx:alpine image already includes a non-root nginx user. For your own images, create a dedicated user:
FROM alpine:3.20

RUN addgroup -S appgroup && adduser -S appuser -G appgroup

COPY --chown=appuser:appgroup app /app

USER appuser

CMD ["/app/start.sh"]
The --chown flag in COPY ensures the files are owned by the correct user from the start.
You can also enforce non-root at runtime without changing the Dockerfile:
docker run --user 1001:1001 nginx:alpine
2. Use a Read-Only Filesystem
If your application does not need to write to its own filesystem, make it read-only:
docker run --read-only -p 8080:80 nginx:alpine
If the application needs to write to specific paths (temp files, logs), mount those paths as tmpfs:
docker run --read-only \
  --tmpfs /tmp \
  --tmpfs /var/cache/nginx \
  --tmpfs /var/run \
  -p 8080:80 \
  nginx:alpine
A read-only filesystem means that even if an attacker gains code execution inside the container, they cannot modify the application binaries or install tools.
In Docker Compose:
services:
  frontend:
    image: nginx:alpine
    read_only: true
    tmpfs:
      - /tmp
      - /var/cache/nginx
      - /var/run
3. Drop Linux Capabilities
Linux capabilities are fine-grained divisions of root privileges. By default, Docker grants a container a subset of them. You can drop all capabilities and add back only what your application actually needs:
docker run --cap-drop=ALL --cap-add=NET_BIND_SERVICE nginx:alpine
NET_BIND_SERVICE allows binding to ports below 1024 (like port 80). Most application containers do not need any other capability.
In Docker Compose:
services:
  frontend:
    image: nginx:alpine
    cap_drop:
      - ALL
    cap_add:
      - NET_BIND_SERVICE
4. Never Put Secrets in Environment Variables (or Images)
A common mistake is passing passwords or API keys through environment variables in docker-compose.yml or baking them into the image with ENV. Both approaches expose secrets in docker inspect output and in image layers.
What to do instead:
- Use Docker secrets (available in Swarm mode) which mount secrets as files in
/run/secrets/ - Use a secrets manager (HashiCorp Vault, AWS Secrets Manager, etc.)
- As a minimum, use a
.envfile that is never committed to version control and reference it in Compose
# docker-compose.yml
services:
  app:
    image: my-app
    env_file:
      - .env.secrets   # never committed to git
Add to .gitignore:
.env
.env.secrets
*.env
Keep in mind what env_file actually protects against: it keeps the secret out of your Dockerfile and out of git. It does not keep the secret out of docker inspect — whatever ends up as a container environment variable, whether set with -e, environment:, or env_file:, is resolved into a real env var at container creation time and shows up in cleartext under Config.Env in docker inspect. Anyone with access to the Docker API or socket sees it — no shell access to the container required. Only file-based secrets (Docker secrets, a mounted volume, a secrets-manager agent) avoid that particular exposure, because they are never turned into an environment variable in the first place.
5. Use Minimal Base Images
Every package in your base image is a potential attack surface. Prefer minimal base images:
alpine— ~5MB, very popular, uses musl libcdistroless(Google) — no shell, no package manager, only the runtime and your appscratch— completely empty, for statically compiled binaries (Go, Rust)
For our Nginx example we already use nginx:alpine. Going even smaller would mean building a custom Nginx binary, which is rarely necessary.
The rule: if it is not needed, it should not be in the image.
6. Scan Images for Known Vulnerabilities
Even minimal images can contain packages with known CVEs. Docker provides a built-in scanner called Docker Scout:
# Quick vulnerability overview
docker scout quickview nginx:alpine

# Full CVE list
docker scout cves nginx:alpine

# Recommendations to fix vulnerabilities
docker scout recommendations nginx:alpine
Docker Scout is available in Docker Desktop and as a CLI plugin. It integrates with Docker Hub and can be added to CI/CD pipelines to fail a build when high-severity vulnerabilities are detected.
An alternative open-source scanner is Trivy:
trivy image nginx:alpine
Make image scanning part of your build pipeline, not an afterthought.
7. Keep Images Up to Date
A scanned image with no vulnerabilities today may have CVEs tomorrow. Pin your base image to a specific digest rather than a floating tag, and automate rebuild checks:
# Pin to a specific digest (reproducible, auditable)
FROM nginx:alpine@sha256:...
Many teams use tools like Renovate or Dependabot to automatically open PRs when a newer base image is available.
Pinning to a digest does not mean your image can never be updated — it means updates stop happening silently and start happening through your normal review process. The two ideas work together like this:
- Tags are mutable, digests are not.
nginx:alpineis just a pointer that the Nginx team can repoint to a new build at any time (for example, to patch a CVE). Today it might resolve tosha256:aaa...; next week the same tag could resolve tosha256:bbb...— different bytes, same tag. Pinning tosha256:aaa...gives you a byte-for-byte reproducible build, wherever and whenever it runs. - Even a fully specific version tag is still mutable. It is tempting to think that a precise tag like
nginx:1.27-alpine3.20is “pinned enough” because it names both the Nginx version and the Alpine version. It is not: that tag only fixes the label, not the contents. Alpine 3.20 is a supported release that keeps receiving security patches to its own packages (musl, OpenSSL, zlib, PCRE2…) for as long as it is maintained. When the Nginx maintainers rebuild the1.27-alpine3.20tag to pick up those patches, the tag name stays identical but the digest underneath it changes. You can see this yourself:docker pull nginx:1.27-alpine3.20 docker inspect nginx:1.27-alpine3.20 --format '{{index .RepoDigests 0}}'Run the same two commands again in a few weeks and there is no guarantee you get the same digest back. This is true of any tag on any registry (Docker Hub, GHCR, ECR…) — a tag is just a “name-to-digest” entry that anyone with push rights can reassign, and most registries do not lock it by default. The version in the tag narrows how much can change under your feet (you will not silently jump from
1.27to1.29), but only the digest gives you a cryptographic guarantee that the bytes never change. - Renovate/Dependabot poll the registry, not your running containers. On a schedule (typically daily), the bot asks the registry what
nginx:alpinecurrently resolves to, and compares it against the digest pinned in your Dockerfile. If they differ, it opens a pull request that changes just that one line —FROM nginx:alpine@sha256:aaa...becomesFROM nginx:alpine@sha256:bbb.... Nothing in production changes yet. - The PR goes through your usual pipeline. CI builds the image at the new digest, runs your tests, and can re-run a vulnerability scan against it before anyone merges. If the new base image breaks something, you find out in the PR, not in production.
- Only after merge does your normal CI/CD build and deploy the image at the new, now-pinned digest.
In other words, a floating tag can silently hand you a different image on every build with no diff to review; a pinned digest plus an update bot turns every base image change into a reviewed, tested commit — you keep the ability to stay current without giving up reproducibility.
Putting It All Together
Here is a Dockerfile for our Nginx image that applies all the practices above:
FROM nginx:alpine

# Copy content
COPY --chown=nginx:nginx html /usr/share/nginx/html

# Drop to non-root
USER nginx

EXPOSE 80

CMD ["nginx", "-g", "daemon off;"]
And the corresponding docker-compose.yml:
services:
  frontend:
    build: .
    image: my-nginx:secure
    container_name: frontend
    ports:
      - "8080:80"
    read_only: true
    tmpfs:
      - /tmp
      - /var/cache/nginx
      - /var/run
    cap_drop:
      - ALL
    cap_add:
      - NET_BIND_SERVICE
    networks:
      - app-network

networks:
  app-network:
    driver: bridge
Conclusion
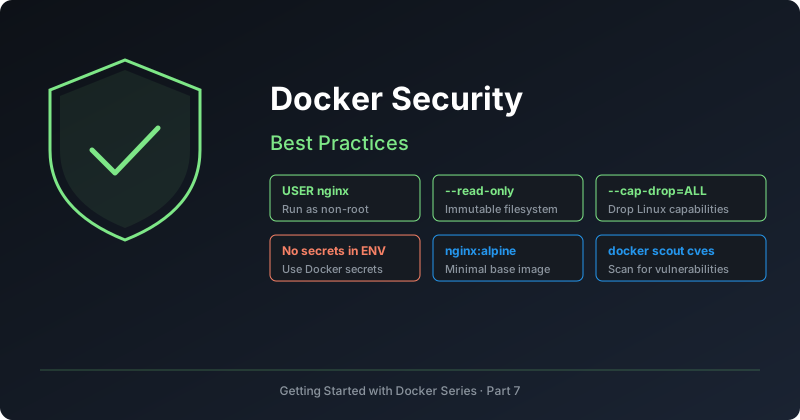
In this article we covered:
- Running containers as a non-root user with
USERin the Dockerfile - Using a read-only filesystem with
--read-onlyandtmpfsfor writable paths - Dropping Linux capabilities with
--cap-drop=ALLand adding back only what is needed - Keeping secrets out of images and environment variables
- Choosing minimal base images to reduce attack surface
- Scanning images for vulnerabilities with Docker Scout or Trivy
- Keeping images up to date with pinned digests and automated updates
The next and final article of the series ties everything together into a single checklist for writing Dockerfiles that are functional, lightweight, debuggable, and secure.
If you enjoyed this article, don’t forget to give it a clap 👏, share it with your friends 🔗, and follow me for more tips and tutorials on software development 📘. Your support helps me create more content like this — thank you! 🙌