Understanding MCP: The Protocol for Agent-Tool Communication
Posted on 10 May 2026
Introduction
In the previous article we explored A2A, Google’s protocol that lets independent AI agents discover each other and collaborate as peers. A2A answered the question: how do agents talk to agents?
But there is a second, equally important question: how does an agent talk to the tools it needs?
Think about what a useful AI assistant actually has to do. It needs to:
- Read and write files on disk
- Query a database
- Call a REST API to fetch live weather data
- Search the web for recent news
- Execute a shell command
Each of these capabilities lives in a completely different place, speaks a different interface, and was written by a different team. Without a standard, every agent developer must write custom glue code for every tool, and that glue code never works with the next agent framework they pick up.
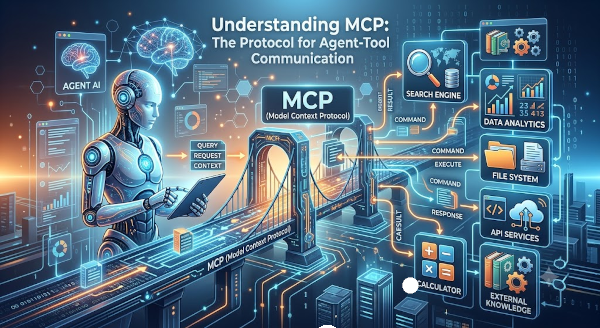
This is exactly the problem that MCP (Model Context Protocol), Anthropic’s open protocol, solves. It gives every tool a standard way to advertise what it can do, and every agent a standard way to call it.
In this article we will see how MCP works, build a minimal filesystem MCP server from scratch, and close with a look at fast-mcp, a FastAPI-based wrapper that makes the whole thing even simpler.
The Problem MCP Solves
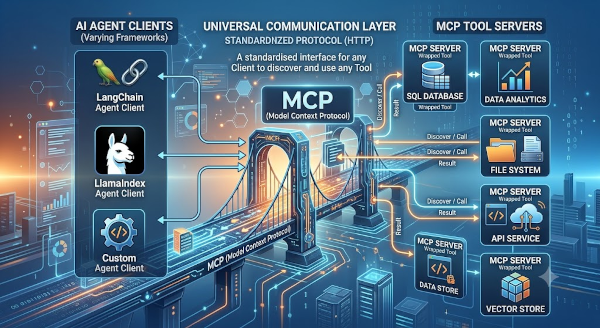
Before MCP, the integration between an LLM and a tool looked like this: the developer hard-coded a Python function, passed its JSON schema to the model via the tools parameter, caught the model’s tool-call in the response, routed it to the right function, and sent the result back. This works — but only for one agent, one framework, and the specific tools that developer wired up.
When a second team builds a different agent using a different framework, all that glue code is thrown away and rewritten from scratch. When a third team wants to reuse the same database tool, they copy-paste code and introduce drift.
MCP breaks the cycle by introducing a server–client contract:
- A tool (database, filesystem, web search, …) is wrapped in an MCP server — a small HTTP service that speaks the MCP protocol.
- An agent becomes an MCP client — it discovers what tools are available by asking the server, then calls them using a standardised interface.
- The MCP server does not know which agent or framework will call it. The agent does not know how the tool is implemented internally.
This is the same idea that made HTTP so powerful: once everyone agreed on the protocol, any browser could talk to any web server.
MCP Architecture
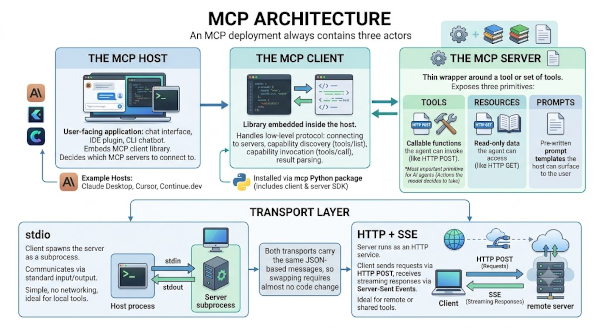
An MCP deployment always contains three actors.
The MCP Host
The host is the user-facing application: a chat interface, an IDE plugin, a CLI chatbot. The host embeds an MCP client library and decides which MCP servers to connect to. Claude Desktop, Cursor, and Continue.dev are real-world examples of MCP hosts.
The MCP Client
The client is the library embedded inside the host. It handles the low-level protocol: connecting to servers, calling tools/list to discover capabilities, calling tools/call to invoke them, and parsing results. When you install the mcp Python package, you get both the client and the server SDK.
The MCP Server
The server is the thin wrapper around a tool or a set of related tools. It exposes three primitives:
| Primitive | Purpose |
|---|---|
| Tools | Callable functions the agent can invoke (like HTTP POST) |
| Resources | Read-only data the agent can access (like HTTP GET) |
| Prompts | Pre-written prompt templates the host can surface to the user |
For an AI agent the most important primitive by far is Tools — these are the actions the model decides to take.
Transport Layer
MCP supports two transport mechanisms:
- stdio — the client spawns the server as a subprocess and communicates via standard input/output. Simple, no networking required, ideal for local tools.
- HTTP + SSE — the server runs as an HTTP service. The client sends requests via HTTP POST and receives streaming responses via Server-Sent Events. Ideal for remote or shared tools.
Both transports carry the same JSON-based messages, so swapping between them requires almost no code change.
What an MCP Tool Looks Like
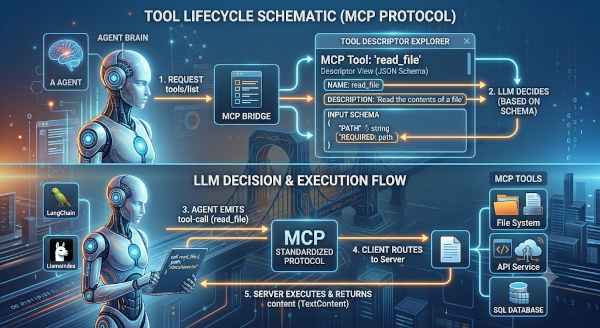
Before writing code, let’s understand the contract. When an MCP client asks a server for its tools (via the tools/list method), the server responds with a list of tool descriptors. Each descriptor contains:
{
  "name": "read_file",
  "description": "Read the contents of a file",
  "inputSchema": {
    "type": "object",
    "properties": {
      "path": {
        "type": "string",
        "description": "The file path to read"
      }
    },
    "required": ["path"]
  }
}
This JSON Schema is what the LLM sees. Based on it, the model decides when and how to call the tool. When the model decides to call read_file, it emits a tool-call with the arguments. The MCP client routes this to the server via tools/call, the server runs the function, and returns a list of TextContent (or other content types) back to the model.
This flow is completely decoupled: the LLM talks to the schema, not to the implementation.
Building a Minimal Filesystem MCP Server
Let us build a real MCP server step by step. Our server will expose three tools: list_directory, read_file, and write_file. It will operate inside a sandbox directory — a security boundary that prevents the agent from reaching paths outside of an allowed root.
The full source code for this project is available at github.com/sasadangelo/filesystem-mcp.
Step 1 — Project Setup
The project structure follows the conventions described in How to Set Up Your Next Python Project. We use uv as the package manager and pyproject.toml as the single source of truth.
filesystem-mcp/
├── src/
│   └── filesystem_mcp/
│       ├── __init__.py
│       └── server.py
├── tests/
│   └── unit/
│       ├── test_read_file.py
│       ├── test_write_file.py
│       ├── test_list_directory.py
│       └── test_validate_path.py
├── sandbox/           ← default sandbox directory
└── pyproject.toml
The only runtime dependency is the official MCP SDK:
[project]
name = "filesystem-mcp"
version = "0.1.0"
requires-python = ">=3.10,<3.15"
dependencies = [
  "mcp>=1.0.0",
]
Install the dependencies with:
uv sync
Step 2 — Initialise the Server
Open src/filesystem_mcp/server.py and start with the imports and the server object:
import os
import sys
import asyncio
from pathlib import Path
from typing import Any, Literal

from mcp.server import Server
from mcp.types import TextContent, Tool
from mcp.server.stdio import stdio_server

# Global sandbox root (set from command-line argument at startup)
SANDBOX_ROOT = ""

# The MCP server instance — its name is what the host will display
app = Server(name="filesystem-mcp")
Server is the core class from the mcp SDK. It handles the protocol handshake, capability negotiation, and message routing. All we do is create an instance and then decorate functions to register handlers.
Step 3 — The Sandbox Guard
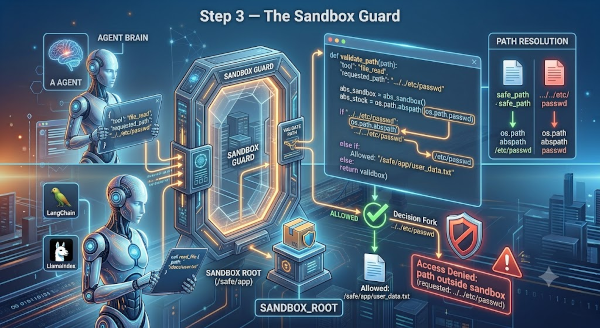
Security first. We never want the agent to escape the sandbox and read arbitrary files from the host filesystem. The validate_path function enforces this invariant:
def validate_path(requested_path: str) -> Path:
    abs_sandbox = os.path.abspath(SANDBOX_ROOT)
    full_path   = os.path.join(abs_sandbox, requested_path)
    abs_requested = os.path.abspath(full_path)   # resolves ".." and symlinks

    if not abs_requested.startswith(abs_sandbox + os.sep) \
       and abs_requested != abs_sandbox:
        raise ValueError(
            f"Access denied: path outside sandbox (requested: {requested_path})"
        )

    return Path(abs_requested)
The trick is os.path.abspath: it resolves all .. traversals and symlinks before we check the prefix. A path like ../../etc/passwd becomes /etc/passwd after resolution, which does not start with the sandbox root, so the check fails immediately.
Step 4 — Registering the Tools
The @app.list_tools() decorator registers the function that returns our tool catalogue. This is what the MCP client calls to populate the LLM’s tool list:
@app.list_tools()
async def list_tools() -> list[Tool]:
    return [
        Tool(
            name="list_directory",
            description="List files and directories in a given path",
            inputSchema={
                "type": "object",
                "properties": {
                    "path": {
                        "type": "string",
                        "description": "Directory path relative to the sandbox",
                    }
                },
                "required": ["path"],
            },
        ),
        Tool(
            name="read_file",
            description="Read the contents of a file",
            inputSchema={
                "type": "object",
                "properties": {
                    "path": {
                        "type": "string",
                        "description": "File path relative to the sandbox",
                    }
                },
                "required": ["path"],
            },
        ),
        Tool(
            name="write_file",
            description="Write content to a file (creates or overwrites)",
            inputSchema={
                "type": "object",
                "properties": {
                    "path": {
                        "type": "string",
                        "description": "File path relative to the sandbox",
                    },
                    "content": {
                        "type": "string",
                        "description": "The text content to write",
                    },
                },
                "required": ["path", "content"],
            },
        ),
    ]
Notice the pattern: every tool descriptor is pure data — a name, a human-readable description, and a JSON Schema for the inputs. No implementation leaks into this layer.
Step 5 — Dispatching Tool Calls
The @app.call_tool() decorator registers the dispatcher that routes incoming tools/call requests to the right Python function:
@app.call_tool()
async def call_tool(name: str, arguments: Any) -> list[TextContent]:
    if name == "list_directory":
        return await list_directory(path=arguments["path"])
    elif name == "read_file":
        return await read_file(path=arguments["path"])
    elif name == "write_file":
        return await write_file(
            path=arguments["path"],
            content=arguments["content"],
        )
    else:
        raise ValueError(f"Unknown tool: {name}")
Step 6 — Implementing the Tools
Each tool follows the same pattern: validate the path, run the operation, return a list[TextContent].
list_directory
async def list_directory(path: str) -> list[TextContent]:
    try:
        target = validate_path(path)

        if not target.exists():
            return [TextContent(type="text", text=f"Error: path does not exist: {path}")]
        if not target.is_dir():
            return [TextContent(type="text", text=f"Error: not a directory: {path}")]

        items: list[str] = []
        for item in sorted(target.iterdir()):
            icon: Literal["📁", "📄"] = "📁" if item.is_dir() else "📄"
            items.append(f"{icon} {item.name}")

        result = f"Contents of {path}:\n" + "\n".join(items)
        return [TextContent(type="text", text=result)]

    except ValueError as e:
        return [TextContent(type="text", text=f"Error: {e}")]
    except PermissionError:
        return [TextContent(type="text", text=f"Error: permission denied: {path}")]
read_file
async def read_file(path: str) -> list[TextContent]:
    try:
        target = validate_path(path)

        if not target.exists():
            return [TextContent(type="text", text=f"Error: file does not exist: {path}")]
        if not target.is_file():
            return [TextContent(type="text", text=f"Error: not a file: {path}")]

        content = target.read_text(encoding="utf-8")
        return [TextContent(type="text", text=content)]

    except UnicodeDecodeError:
        return [TextContent(type="text", text=f"Error: binary file, cannot read as text: {path}")]
    except ValueError as e:
        return [TextContent(type="text", text=f"Error: {e}")]
    except PermissionError:
        return [TextContent(type="text", text=f"Error: permission denied: {path}")]
write_file
async def write_file(path: str, content: str) -> list[TextContent]:
    try:
        target = validate_path(path)
        target.parent.mkdir(parents=True, exist_ok=True)
        target.write_text(content, encoding="utf-8")
        return [TextContent(type="text", text=f"Successfully wrote to {path}")]

    except ValueError as e:
        return [TextContent(type="text", text=f"Error: {e}")]
    except PermissionError:
        return [TextContent(type="text", text=f"Error: permission denied: {path}")]
Step 7 — Starting the Server
The entry point wires everything together. The server communicates over stdio, which keeps things simple: the MCP host launches this process as a subprocess and pipes messages in and out.
async def main() -> None:
    async with stdio_server() as (read_stream, write_stream):
        await app.run(
            read_stream=read_stream,
            write_stream=write_stream,
            initialization_options=app.create_initialization_options(),
        )


if __name__ == "__main__":
    sandbox_path = sys.argv[1] if len(sys.argv) > 1 else "./sandbox"
    globals()["SANDBOX_ROOT"] = sandbox_path

    if not os.path.isdir(sandbox_path):
        print(f"Error: sandbox does not exist: {sandbox_path}", file=sys.stderr)
        sys.exit(1)

    print(f"Filesystem MCP starting, sandbox: {os.path.abspath(sandbox_path)}", file=sys.stderr)
    asyncio.run(main())
A few important details:
stdio_server()returns a pair of async streams connected to the process stdin/stdout. The MCP SDK handles all the JSON framing.- Startup messages go to stderr so they do not corrupt the binary JSON-RPC stream on stdout.
- The sandbox path is passed as a command-line argument, making the server reusable for different directories.
Running the Server
# Create a sandbox and drop some test files in it
mkdir -p sandbox
echo "Hello from MCP" > sandbox/hello.txt

# Run the server (stdio mode — it will wait for a client to connect)
uv run python src/filesystem_mcp/server.py ./sandbox
Because the server speaks stdio, you interact with it through a host like Claude Desktop or MCP Inspector (the official debugging CLI that ships with the SDK). To test it with the inspector:
npx @modelcontextprotocol/inspector uv run python src/filesystem_mcp/server.py ./sandbox
Open http://localhost:5173 in your browser and you will see the three tools listed. You can call them interactively and inspect the raw JSON messages flowing between client and server.
Registering with an MCP Host
The stdio server can be consumed by any MCP-compatible host — Claude Desktop, Cursor, Continue.dev, Bob (IBM’s AI coding assistant), or any tool that implements the MCP client protocol. The registration mechanism is the same in all cases: you provide a command to launch the server process and the host handles the rest.
As a concrete reference, here is how Claude Desktop is configured on macOS (~/Library/Application Support/Claude/claude_desktop_config.json):
{
  "mcpServers": {
    "filesystem": {
      "command": "uv",
      "args": [
        "run",
        "--project", "/path/to/filesystem-mcp",
        "python", "src/filesystem_mcp/server.py",
        "/path/to/your/sandbox"
      ]
    }
  }
}
The same command/args pattern is used by every MCP host — only the config file path differs per application. After registering, restart the host. It will spawn the server process, perform the initialize handshake, call tools/list, and from that moment on the three filesystem tools are available to the LLM running inside that host.
How the Protocol Message Flow Works
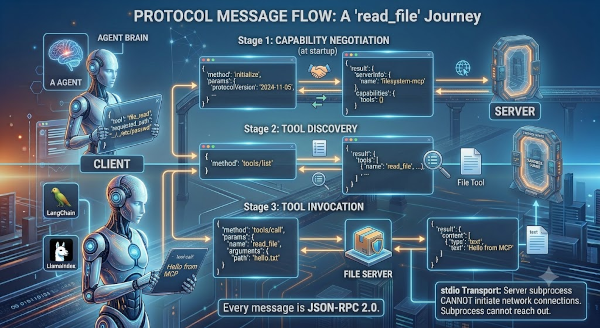
Let us trace a single read_file call end-to-end to make the protocol concrete.
1. Capability negotiation (at startup)
Client → Server:  { "method": "initialize", "params": { "protocolVersion": "2024-11-05", ... } }
Server → Client:  { "result": { "serverInfo": { "name": "filesystem-mcp" }, "capabilities": { "tools": {} } } }
2. Tool discovery
Client → Server:  { "method": "tools/list" }
Server → Client:  { "result": { "tools": [ { "name": "read_file", ... }, ... ] } }
3. Tool invocation
Client → Server:  { "method": "tools/call", "params": { "name": "read_file", "arguments": { "path": "hello.txt" } } }
Server → Client:  { "result": { "content": [ { "type": "text", "text": "Hello from MCP" } ] } }
Every message is JSON-RPC 2.0. The server never initiates a connection — it only responds. This makes stdio transport trivially safe: the subprocess cannot reach out to the network unless it explicitly opens a socket in its own code.
Beyond stdio: The HTTP+SSE Transport
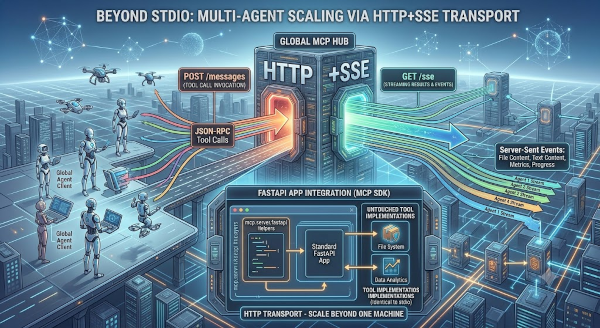
For tools that should be shared across many agents running on different machines, stdio does not scale. MCP supports an HTTP transport where the server exposes two endpoints:
POST /messages— the client sends tool calls here.GET /sse— the client subscribes here to receive streaming results via Server-Sent Events.
Switching our server to HTTP requires only changing the transport; the tool implementations stay identical. The MCP SDK ships mcp.server.fastapi helpers that integrate with a standard FastAPI application.
fast-mcp: MCP on Top of FastAPI
Writing boilerplate for every server quickly becomes repetitive. fast-mcp is a community library that wraps the official SDK and brings a developer experience similar to FastAPI itself.
Instead of defining inputSchema dictionaries by hand and writing a dispatcher, you write plain Python functions and let the library infer everything from type annotations:
from fastmcp import FastMCP

mcp = FastMCP("filesystem-mcp")


@mcp.tool()
def read_file(path: str) -> str:
    """Read the contents of a file inside the sandbox."""
    target = validate_path(path)
    return target.read_text(encoding="utf-8")


@mcp.tool()
def write_file(path: str, content: str) -> str:
    """Write content to a file inside the sandbox."""
    target = validate_path(path)
    target.parent.mkdir(parents=True, exist_ok=True)
    target.write_text(content, encoding="utf-8")
    return f"Written to {path}"


if __name__ == "__main__":
    mcp.run()  # stdio by default; pass transport="http" for HTTP+SSE
fast-mcp inspects the function signatures using Python’s inspect module, generates the inputSchema automatically, and wires up the dispatcher. The docstring becomes the tool description. Pydantic models as parameters are fully supported and produce nested JSON Schemas automatically.
You install it with:
pip install fastmcp
And you can switch to HTTP transport with a single argument:
fastmcp run server.py --transport streamable-http --port 8080
fast-mcp is the right choice when you want to iterate quickly or when you need HTTP transport without the boilerplate. The low-level mcp SDK is the right choice when you need precise control over every protocol detail.
MCP and A2A: The Full Picture
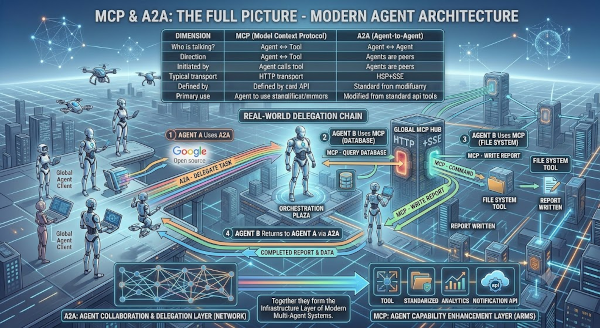
Now that we have covered both protocols, it is worth stepping back and seeing how they fit together.
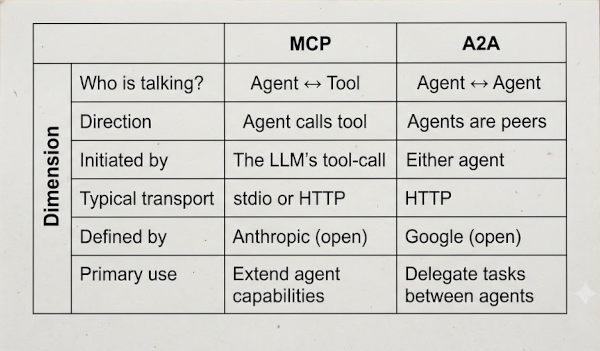
In a real system you use both together:
- Agent A uses A2A to delegate a complex subtask to Agent B.
- Agent B uses MCP to call a database tool to gather data.
- Agent B uses MCP to call a file tool to write a report.
- Agent B returns the result to Agent A over A2A.
- Agent A uses MCP to send the final result to a notification API.
MCP handles the arms (what an agent can do), A2A handles the network (how agents collaborate). Neither protocol depends on the other, but together they form the infrastructure layer of modern multi-agent systems.
Conclusion
MCP solves a deceptively simple problem — how does an agent call a tool? — in a way that is general enough to work for any tool, any agent, and any framework.
The key ideas to remember:
- Tools are just JSON Schemas paired with a handler function. The LLM reasons over the schema, not the code.
- The SDK handles the protocol. You only write the
list_toolscatalogue and thecall_tooldispatcher. - Sandbox your servers. A path-traversal guard is not optional; always resolve absolute paths before checking boundaries.
- stdio for local, HTTP for remote. The two transports are interchangeable; your tool logic stays the same.
fast-mcpfor speed. When you want FastAPI-style ergonomics, let the library generate schemas from type annotations.- MCP + A2A = complete stack. MCP gives agents tools; A2A gives agents collaborators.
The ecosystem around MCP is growing fast. Databases, web browsers, code executors, email clients, cloud APIs — they are all getting MCP wrappers. Once you understand the protocol, you can plug any of them into any agent without writing a line of glue code.
If you enjoyed this article, don’t forget to give it a clap 👏, share it with your friends 🔗, and follow me for more tips and tutorials on software development 📘. Your support helps me create more content like this — thank you! 🙌