<?xml version="1.0" encoding="utf-8"?><feed xmlns="http://www.w3.org/2005/Atom" ><generator uri="https://jekyllrb.com/" version="3.10.0">Jekyll</generator><link href="https://sasadangelo.github.io/code4projects/feed.xml" rel="self" type="application/atom+xml" /><link href="https://sasadangelo.github.io/code4projects/" rel="alternate" type="text/html" /><updated>2026-03-03T17:20:41+00:00</updated><id>https://sasadangelo.github.io/code4projects/feed.xml</id><title type="html">Code4Projects</title><subtitle>Code4Projects is a website about software programming where I write everything I learnt in over 30 years of experience.</subtitle><entry><title type="html">Bridging the Gap: Unleashing the Power of DevOps in Software Development</title><link href="https://sasadangelo.github.io/code4projects/bridging-gap-devops-software-development/" rel="alternate" type="text/html" title="Bridging the Gap: Unleashing the Power of DevOps in Software Development" /><published>2023-06-06T00:00:00+00:00</published><updated>2023-06-06T00:00:00+00:00</updated><id>https://sasadangelo.github.io/code4projects/bridging-gap-devops-software-development</id><content type="html" xml:base="https://sasadangelo.github.io/code4projects/bridging-gap-devops-software-development/"><![CDATA[<p><img src="/code4projects/assets/img/devops-logo.webp" alt="Unleashing the Power of DevOps" width="446" height="200" class="responsive_img" /></p>

<h1 id="bridging-the-gap-unleashing-the-power-of-devops-in-software-development">Bridging the Gap: Unleashing the Power of DevOps in Software Development</h1>
<p><em>Posted on <strong>06 Jun 2023</strong></em></p>

<h2 id="introduction">Introduction</h2>

<p><img src="/code4projects/assets/img/developer-vs-operation.webp" alt="Developer vs Operation" width="450" height="203" class="responsive_img" /></p>

<p>In the fast-paced world of software development, the need for efficient collaboration and seamless integration between development and operations teams has never been more critical. Traditionally, developers would spend months crafting code, only to hand it off to the quality assurance (QA) team for testing, before finally reaching the production environment, where an operations team would take over the management and support. Unfortunately, this siloed approach often led to limited collaboration, and issues encountered in production were resolved with difficulty, requiring modifications to the codebase.</p>

<p>The DevOps methodology was born to fill this gap. DevOps is an agile approach to organizational change that aims to bridge the traditional gaps between developer and IT operations roles. However, it is not simply a combination of developer, tester, and IT operation functions. DevOps represents a broader skill set and a fresh mindset that transcends the conventional silos of development, testing, and IT operations.</p>

<p>
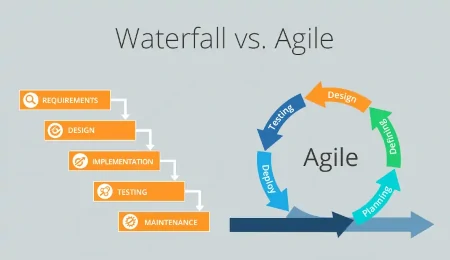
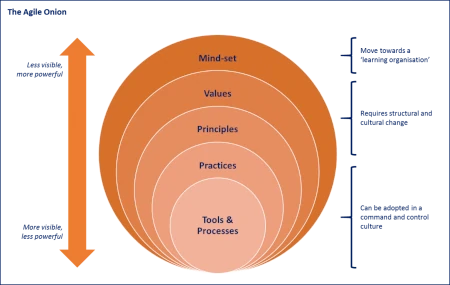
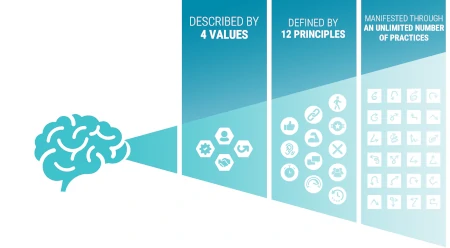
DevOps is one of the practices of Agile, operating at the practices level of the Agile Onion. It shares the Agile mindset, principles, and values with other Agile practices.</p>

<h2 id="devops-extending-agile-values-with-automation-continuous-integration-and-deploy">
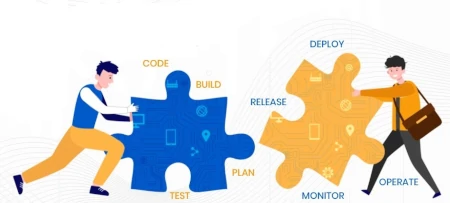
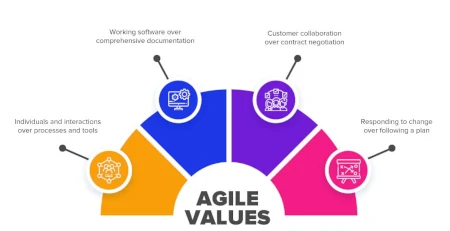
DevOps: Extending Agile Values with Automation, Continuous Integration and Deploy
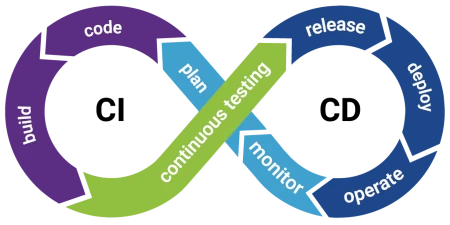
</h2>

<p><img src="/code4projects/assets/img/ci-cd-diagram.webp" alt="CI/CD Diagram vs Operation" width="450" height="225" class="responsive_img" /></p>

<p><em>Photo from <a href="https://www.flagship.io/ci-cd/">https://www.flagship.io</a></em></p>

<p>In the world of software development, the DevOps methodology brings forth a unique culture while aligning with the mindset, values, and principles of Agile. Building upon the insights shared in <a href="/code4projects/demystifying-agile-unleashing-flexibility-project-management/">this article</a>, DevOps introduces specific practices that address collaboration and integration challenges between development and operations teams.</p>

<p><strong>Automation</strong> plays a pivotal role in DevOps, allowing organizations to streamline processes and eliminate manual bottlenecks. By automating tasks such as code testing, infrastructure provisioning, and deployment, DevOps fosters efficiency and reduces the risk of errors.</p>

<p><strong>Continuous integration</strong> is a fundamental practice in DevOps, enabling development teams to regularly merge code changes into a shared repository. This approach promotes early identification of issues and facilitates collaboration among developers, ensuring a reliable and unified codebase.</p>

<p>DevOps also embraces <strong>Continuous Deployment</strong>, which automates the release of software changes directly into production environments. This practice empowers teams to rapidly respond to customer demands, validate new features, and swiftly incorporate feedback. By implementing a <strong>“You Build it, You Run it”</strong> principle, DevOps promotes shared responsibility, encouraging developers and operations teams to take ownership of the software throughout its lifecycle.</p>

<p>Through the adoption of these distinctive DevOps practices, complemented by the Agile mindset, values, and principles, organizations can achieve heightened efficiency, faster feedback loops, and improved collaboration across teams. Embracing automation, continuous integration, continuous deployment, and the sharing of responsibilities unlocks the full potential of DevOps and facilitates impactful software delivery.</p>

<h2 id="streamlining-efficiency-and-scaling-with-automation-in-devops">Streamlining Efficiency and Scaling with Automation in DevOps</h2>

<p><img src="/code4projects/assets/img/devops-automation.webp" alt="DevOps Automation" width="450" height="277" class="responsive_img" /></p>

<p><em>Photo from <a href="https://it.fiverr.com/jayabalr/build-automation-with-javascript-selenium">https://it.fiverr.com</a></em></p>

<p>Automation lies at the heart of DevOps and plays a pivotal role in enabling organizations to scale seamlessly on large infrastructures. For many years, the IT industry relied on manual modifications and maintenance across development, testing, and production systems, leading to various challenges. These challenges include:</p>

<ul>
  <li>configuration drift;</li>
  <li>difficulty in scaling on extensive infrastructures;</li>
  <li>managing disaster recovery scenarios;</li>
  <li>an increased risk of errors.</li>
</ul>

<p>The fundamental idea behind automation is to eliminate repetitive tasks through the use of code, such as scripts or programs. While the initial effort required to create these automations should be considered, the benefits are substantial, particularly when operations are repeated frequently. Automation not only saves time but also ensures consistency and accuracy in executing tasks.</p>

<p>Furthermore, automation empowers continuous monitoring of systems, enabling timely notifications in case of malfunctions or security compliance breaches. By automating routine activities, DevOps teams can free up valuable time and resources, allowing system engineers and other team members to focus on more critical tasks.</p>

<p>For instance, consider the scenario where a system engineer is tasked with performing a backup of a system twice a day. Automating this process would bring significant benefits, enabling the system engineer to allocate time towards more strategic activities.</p>

<p>In the realm of IT infrastructure management, several recurring activities form the backbone of operations, including infrastructure and software provisioning, configuration management, application deployment, incident management, change management, and more. Over time, these challenges have prompted the development of specialized tools to streamline and address these complexities. DevOps teams leverage a range of powerful tools such as Chef, Puppet, Ansible, Terraform, and others to tackle these infrastructure hurdles head-on.</p>

<h2 id="streamlining-development-and-ensuring-code-quality-with-continuous-integration">Streamlining Development and Ensuring Code Quality with Continuous Integration
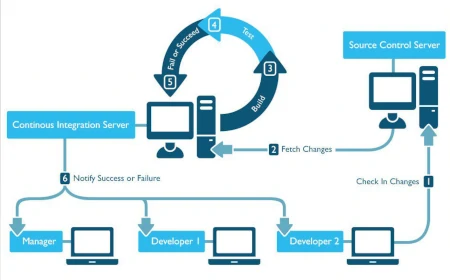
</h2>

<p><img src="/code4projects/assets/img/devops-continuous-integration.webp" alt="DevOps Continuous Integration" width="450" height="280" class="responsive_img" /></p>

<p><em>Photo from <a href="https://insights.sei.cmu.edu/media/images/image_for_continuous_integration_and_devops_012.original.jpg">https://insights.sei.cmu.edu</a></em></p>

<p>Having worked as a software developer for over 30 years in large teams, I have experienced firsthand the challenges of maintaining a single repository as the single source of truth for code. Throughout the years, I have used various tools like CMVC, Rational Jazz, CVS, and eventually witnessed the rise of Git as the de facto standard for code management, with Linus Torvalds creating it specifically for managing the Linux codebase.</p>

<p>Today, Git is often complemented by its sibling, GitHub, which provides additional useful tools such as Wiki, collaboration features, and pull requests.</p>

<p>However, one of the most significant challenges has always been merging changes from dozens of developers and ensuring a functional system. I still remember the lengthy merge sessions that could last for weeks to integrate changes made by each developer.</p>

<p>
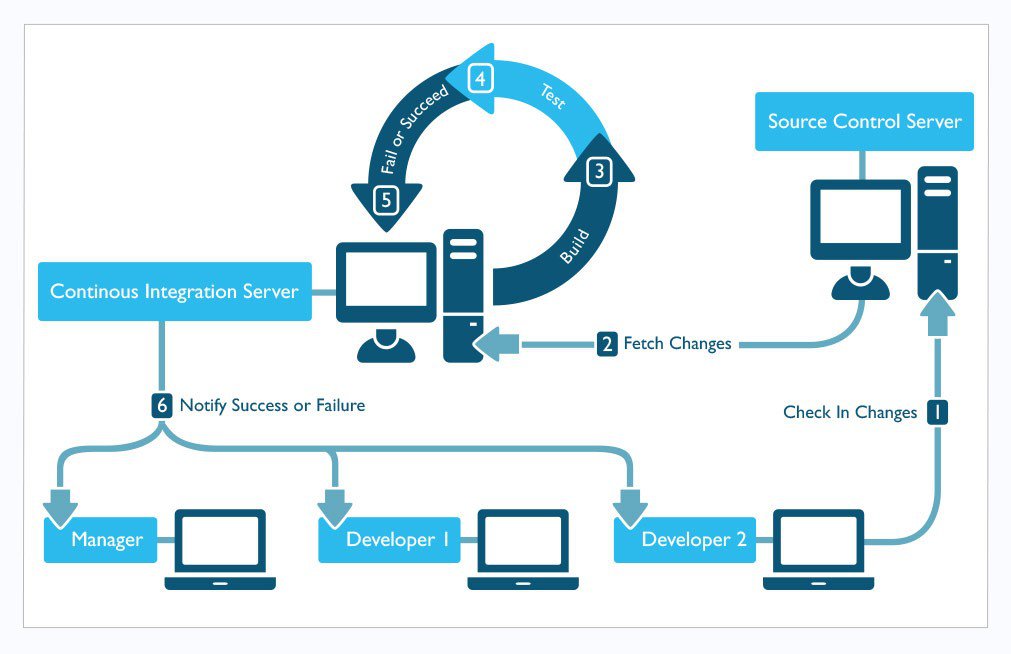
Over time, Continuous Integration (CI) practices have emerged to address these challenges. The CI approach dictates that each developer works on their feature branch in Git, making incremental changes and attempting to break down larger features into smaller, manageable pieces that can be developed within one or two days. These changes are then submitted to the maintainer via pull requests for code review. Once the code is approved, it is merged into a single commit. Following this process, an automated build and test system kicks off, where a suite of tests validates the integrity of the produced code. Developers not only maintain the application code but also the code related to building and testing.</p>

<p>It’s important to note that this testing is primarily acceptance testing, which ensures that core functionalities continue to function correctly. It should not be confused with QA testing, which can also be automated and covers a broader range of scenarios.</p>

<p>In the realm of Continuous Integration, alongside Git and GitHub, several tools have emerged to automate the build and test processes. Popular tools like Jenkins, CircleCI, Travis, and many others have become essential components of the CI workflow, streamlining development, ensuring code quality, and enabling efficient collaboration among development teams.</p>

<h2 id="streamlined-delivery-and-rapid-feedback-loops-with-continuous-deployment">Streamlined Delivery and Rapid Feedback Loops with Continuous Deployment
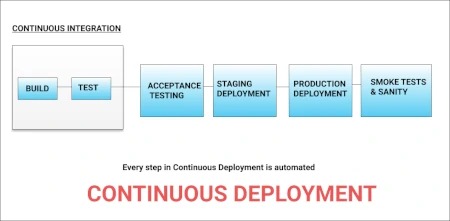
</h2>

<p><img src="/code4projects/assets/img/devops-continuous-deployment.webp" alt="DevOps Continuous Deployment" width="450" height="221" class="responsive_img" /></p>

<p><em>Photo from <a href="https://www.dotnettricks.com/learn/devops/continuous-delivery-vs-continuous-deployment">https://www.dotnettricks.com</a></em></p>

<p>Following the Continuous Integration phase, the software product becomes available to the QA team, which, in the world of DevOps, is typically the same team involved in development. The QA team is responsible for creating comprehensive test suites that cover a broader range of scenarios beyond the basic functionalities. From personal experience, achieving 100% test coverage with automated tests can be challenging, if not impossible, due to factors such as the difficulty of automation or time constraints. Consequently, it becomes necessary to have a subset of tests that are frequently executed under normal circumstances.</p>

<p>In the past, different phases of testing were commonly employed, including:</p>

<ul>
  <li>functional tests;</li>
  <li>system tests (simulating real customer environments);</li>
  <li>performance tests for critical features;</li>
  <li>scalability tests;</li>
  <li>global verification tests for multiple language support.</li>
</ul>

<p>Automation was often introduced to varying degrees within each testing phase, always considering the return on investment required to produce and maintain these test suites.</p>

<p>Moreover, with the advent of the Internet and the Cloud, the paradigm of product delivery to customers has shifted. Instead of selling products for customers to install in their own environments, companies now have the opportunity to offer products as Software as a Service (SaaS). As a result, the deployment process is managed directly by the product’s manufacturing company, utilizing dedicated operations teams.</p>

<p>The concept behind continuous deployment is that with every successful change passing through the build, verification, QA testing, and other stages, it can be automatically deployed across different environments, following a pipeline that includes development, staging, and production environments.</p>

<p>By implementing continuous deployment, even small changes can be quickly identified and any potential issues can be addressed promptly. This approach fosters a rapid feedback loop, allowing developers and operations teams to work closely together, detect problems early on, and make necessary corrections swiftly.</p>

<h2 id="essential-skills-for-effective-devops-engineering">Essential Skills for Effective DevOps Engineering
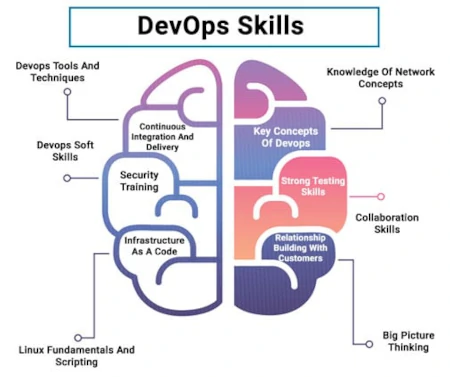
</h2>

<p><img src="/code4projects/assets/img/devops-skills.webp" alt="Essentials DevOps Skills" width="450" height="377" class="responsive_img" /></p>

<p><em>Photo from <a href="https://www.janbasktraining.com/blog/devops-skills/">https://www.janbasktraining.com/</a></em></p>

<p>A successful DevOps engineer possesses a diverse skill set that enables them to navigate the complex landscape of infrastructure management, automation, and software delivery. Their proficiency in various technical domains is crucial for building robust and scalable systems. Let’s explore the key skills that a DevOps engineer should possess.</p>

<ul>
  <li><strong>Sysadmin Expertise:</strong></li>
</ul>

<p>A DevOps engineer must have strong system administration skills, encompassing both Unix and Windows environments. This knowledge is essential for building the infrastructure that will host the applications. While Infrastructure as Code (IaC) techniques automate infrastructure provisioning, the DevOps engineer must understand the underlying administration concepts to create effective automation scripts. Infrastructure construction is a highly automatable process, allowing quick recovery and recreation of resources when issues arise.</p>

<ul>
  <li><strong>Experience in Virtualization:</strong></li>
</ul>

<p>Managing cloud infrastructure often involves virtualization technologies such as OpenStack or VMWare. A DevOps engineer should be proficient in creating and managing virtual machines and understanding how they integrate with the overall infrastructure. Knowledge of virtualization is instrumental in efficiently utilizing hardware resources and optimizing infrastructure performance.</p>

<ul>
  <li><strong>Varied Technical Background:</strong></li>
</ul>

<p>A DevOps engineer should possess a diverse technical background, encompassing knowledge of virtualization, networking, storage systems, and more. This broad expertise allows them to design and implement reliable and resilient solutions. Understanding the underlying technologies and their interactions is crucial for creating robust architectures that can scale and adapt to evolving business needs.</p>

<ul>
  <li><strong>
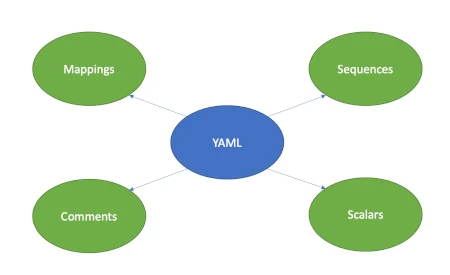
Proficiency in Programming and Scripting:</strong></li>
</ul>

<p>A strong command of programming and scripting languages is vital for a DevOps engineer. They must be able to leverage these skills to build infrastructure using technologies like YAML, Terraform, CloudFormation, and others. Additionally, they should be capable of developing applications using languages such as C, C++, Java, Python, PHP, JavaScript, and more.</p>

<ul>
  <li><strong>Experience with Automation Tools:</strong></li>
</ul>

<p>A DevOps engineer leverages tools like Git and GitHub to automate code management. Automation tools like CircleCI and Travis are widely used for implementing continuous integration and conducting build and acceptance testing. With robust testing pipelines in place, the DevOps engineer can ensure that every code change undergoes thorough testing, reducing the risk of introducing bugs and ensuring the overall quality of the software. DevOps engineers rely on a range of tools for efficient and automated application deployment. Platforms like Chef, Puppet, Jenkins, and Ansible offer powerful capabilities for managing infrastructure, configuring servers, and deploying applications across various environments.</p>

<ul>
  <li>
    <p><strong>Testing Skills:</strong>
A DevOps engineer should possess competencies in testing methodologies and practices. While DevOps emphasizes continuous integration and delivery, it is essential to ensure the quality of the software being deployed. Familiarity with various testing techniques, such as unit testing, integration testing, and performance testing, enables the engineer to design and implement effective testing strategies. By incorporating testing into the CI/CD pipeline, they can validate the functionality and performance of applications, identify potential issues, and ensure a high level of software quality.</p>
  </li>
  <li>
    <p><strong>Team-First Mindset:</strong>
Collaboration and teamwork are at the core of DevOps culture. A DevOps engineer should have a team-first mindset, emphasizing cooperation and effective communication within cross-functional teams. They should actively engage with developers, operations personnel, and other stakeholders to understand their requirements and challenges, fostering a collaborative and productive work environment. By promoting knowledge sharing, empathy, and a willingness to assist others, the DevOps engineer contributes to a cohesive and efficient team dynamic.</p>
  </li>
  <li>
    <p><strong>Strong Communication Skills:</strong>
Effective communication is vital for a DevOps engineer to collaborate with team members, stakeholders, and clients. They should be able to clearly articulate complex technical concepts, listen actively, and provide concise and accurate information. By effectively communicating project status, challenges, and proposed solutions, the DevOps engineer ensures alignment and transparency across all parties involved. Additionally, their communication skills play a crucial role in documenting processes, sharing knowledge, and facilitating efficient problem-solving.</p>
  </li>
  <li>
    <p><strong>Creation of Resilient Infrastructures:</strong>
A key responsibility of a DevOps engineer is to design and build resilient infrastructures. They should possess the ability to anticipate and address potential failures and bottlenecks, ensuring high availability and fault tolerance. Through the application of techniques such as redundancy, load balancing, and disaster recovery planning, the DevOps engineer strengthens the overall stability and reliability of the systems they manage. They should also have a deep understanding of monitoring and alerting systems to proactively identify and address performance issues.</p>
  </li>
</ul>

<h2 id="devops-is-the-right-career-for-me">DevOps is the Right Career for Me?
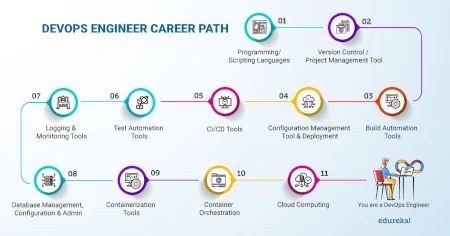
</h2>

<p><img src="/code4projects/assets/img/devops-career.webp" alt="DevOps Career Path" width="450" height="236" class="responsive_img" /></p>

<p><em>Photo from <a href="https://twitter.com/edurekain/status/1274224845560205318?lang=zh-Hant">https://twitter.com/</a></em></p>

<p>If you possess strong coding skills, even if you don’t reach the level of a software engineer, and are willing to get your hands dirty by building both applications and infrastructure, then a career in DevOps may be a perfect fit for you. It requires a diverse skill set, as discussed earlier, and entails problem-solving abilities and adaptability to changing methodologies and technologies. Embracing automation is essential, and having a mindset geared towards streamlining and optimizing processes is crucial. Additionally, the ability to transcend the traditional silos of development, testing, and operations and work effectively in a team environment is highly valued by companies seeking DevOps engineers.</p>

<p>Choosing a career in DevOps means you’ll need to continuously study and update your knowledge to stay ahead in this rapidly evolving field. Pursuing certifications can be beneficial in showcasing your skills to potential employers or advancing your career. However, it’s important to note that certifications often represent only a fraction of the knowledge required for a particular methodology or tool. What truly matters is hands-on experience and the ability to solve problems using those tools effectively.</p>

<p>By continuously honing your skills and gaining practical experience, you can increase your chances of finding employment or advancing in your DevOps career. The demand for skilled DevOps professionals is consistently high, as organizations increasingly recognize the value of efficient and reliable software delivery processes. DevOps engineers play a critical role in bridging the gap between development and operations, improving collaboration, and enabling rapid and frequent software releases. As a result, career growth opportunities are abundant, and DevOps professionals often find themselves in high-demand positions within the industry.</p>

<h2 id="conclusion">Conclusion</h2>

<p>Embarking on a career in DevOps can be an exciting and rewarding path for those who possess coding skills, a willingness to tackle infrastructure challenges, and a diverse technical skill set. DevOps engineers play a crucial role in bridging the gap between development and operations, fostering collaboration, and enabling efficient software delivery processes. Their ability to automate tasks, solve problems, and adapt to evolving methodologies and technologies is highly valued in today’s fast-paced IT landscape.</p>

<p>Employers seek professionals who can transcend the boundaries of traditional silos, work well in teams, and drive positive change within organizations. So, if you have a passion for coding, enjoy building infrastructure, possess problem-solving abilities, and are ready to embrace the ever-evolving nature of technology, DevOps may be the perfect career choice for you. Embrace the journey, nurture your skills, and embark on an exciting adventure at the forefront of software development and delivery.</p>]]></content><author><name></name></author><category term="Project Management" /><summary type="html"><![CDATA[Bridging the gap between development and operations, DevOps revolutionizes software lifecycle management with unified teams and streamlined processes.]]></summary><media:thumbnail xmlns:media="http://search.yahoo.com/mrss/" url="https://sasadangelo.github.io/code4projects/assets/img/devops-logo.webp" /><media:content medium="image" url="https://sasadangelo.github.io/code4projects/assets/img/devops-logo.webp" xmlns:media="http://search.yahoo.com/mrss/" /></entry><entry><title type="html">Demystifying Agile: Unleashing the Power of Flexibility in Project Management</title><link href="https://sasadangelo.github.io/code4projects/demystifying-agile-unleashing-flexibility-project-management/" rel="alternate" type="text/html" title="Demystifying Agile: Unleashing the Power of Flexibility in Project Management" /><published>2023-06-03T00:00:00+00:00</published><updated>2023-06-03T00:00:00+00:00</updated><id>https://sasadangelo.github.io/code4projects/demystifying-agile-unleashing-flexibility-project-management</id><content type="html" xml:base="https://sasadangelo.github.io/code4projects/demystifying-agile-unleashing-flexibility-project-management/"><![CDATA[<p><img src="/code4projects/assets/img/agile.webp" alt="Agile" width="295" height="200" class="responsive_img" /></p>

<h1 id="demystifying-agile-unleashing-the-power-of-flexibility-in-project-management">Demystifying Agile: Unleashing the Power of Flexibility in Project Management</h1>
<p><em>Posted on <strong>03 Jun 2023</strong></em></p>

<h2 id="introduction">Introduction</h2>

<p><img src="/code4projects/assets/img/what-is-agile.webp" alt="What is Agile?" width="450" height="189" class="responsive_img" /></p>

<p>Agile methodology is a project management approach that emphasizes flexibility, collaboration, and adaptability. Unlike traditional models, Agile takes an iterative and incremental approach, breaking projects into shorter development cycles. Cross-functional teams work collaboratively, embracing change and prioritizing customer feedback throughout the process. Agile fosters teamwork, transparency, and frequent communication, enabling organizations to deliver high-quality products or services that meet evolving customer needs. Agile principles are not limited to software development but can be applied to various industries.</p>

<h2 id="waterfall-vs-agile">Waterfall vs Agile</h2>

<p><img src="/code4projects/assets/img/waterfall-vs-agile.webp" alt="Waterfall vs Agile" width="450" height="260" class="responsive_img" /></p>

<p><em>Photo from <a href="https://www.nimblework.com/blog/waterfall-to-agile-with-kanban/">https://www.nimblework.com/</a></em></p>

<p>In this section, we will compare the traditional Waterfall model with Agile methodology. The Waterfall model is a sequential and linear approach to project management, while Agile offers a more flexible and adaptive approach.</p>

<p>The Waterfall model follows well-defined phases such as analysis, design, development, testing, and implementation, which are executed in a predetermined order. However, this approach comes with several challenges.</p>

<ul>
  <li>
    <p><strong>Rigid Planning</strong>: The Waterfall model requires detailed planning at the beginning of the project, which can be problematic when requirements change or new information emerges during development.</p>
  </li>
  <li>
    <p><strong>Limited Adaptability</strong>: Once a phase is completed, it is difficult to go back without revisiting the entire process, slowing down response to changes and innovation.</p>
  </li>
  <li>
    <p><strong>Lack of Customer Involvement</strong>: Customer involvement mainly occurs at the end of the project when the results are already produced. This can lead to delayed feedback or misinterpretation of customer needs.</p>
  </li>
</ul>

<p>Agile methodology, on the other hand, offers a more flexible and adaptive approach to project management. It addresses the limitations of the Waterfall model by incorporating the following key elements:</p>

<ul>
  <li>
    <p><strong>Iterative and Incremental Development</strong>: Agile breaks projects into short iterations allowing for regular feedback, continuous improvement, and the ability to adapt to changing requirements.</p>
  </li>
  <li>
    <p><strong>Collaboration and Customer Engagement</strong>: Agile promotes frequent collaboration among team members and involves customers throughout the development process. This ensures that the product meets their needs and reduces the risk of misalignment.</p>
  </li>
  <li>
    <p><strong>Embracing Change</strong>: Agile embraces the reality of changing requirements and priorities. It allows for flexibility, enabling teams to respond quickly to new information or customer feedback.</p>
  </li>
  <li>
    <p><strong>Continuous Delivery</strong>: Agile focuses on delivering incremental value throughout the project, allowing for faster time-to-market and early feedback from stakeholders.</p>
  </li>
</ul>

<p>Overall, Agile methodology provides a more responsive and customer-centric approach, enabling teams to deliver high-quality products while adapting to evolving needs and market dynamics. It fosters collaboration, adaptability, and continuous improvement, leading to better project outcomes.</p>

<h2 id="journey-to-the-agile-manifesto">Journey to the Agile Manifesto</h2>

<p><img src="/code4projects/assets/img/journey.webp" alt="Journey towards the Agile Manifesto" width="450" height="278" class="responsive_img" /></p>

<p><em>Photo from <a href="https://www.istockphoto.com/it/illustrazioni/new-journey">https://www.istockphoto.com/</a></em></p>

<p>In February 2001, seventeen software practitioners gathered at a ski resort in Utah. Despite having different opinions on software development approaches, they agreed on one thing: <strong>the status quo was not acceptable</strong>. There was a need for a different approach to documentation-driven processes and heavy development methodologies.</p>

<p>The group formed what came to be known as the <strong>Agile Alliance</strong>. From their meeting emerged the <strong>Agile Manifesto</strong>, which consisted of four core values and twelve principles.</p>

<p>The Agile Manifesto provided a new direction for software development, promoting agility, adaptability, and customer-centricity. It has since become a guiding framework for Agile methodologies such as Scrum, Kanban, DevOps, and Extreme Programming (XP), revolutionizing the way projects are managed and executed in the software industry.</p>

<h2 id="unveiling-the-agile-onion-exploring-the-five-layers-of-agile-transformation">Unveiling the Agile Onion: Exploring the Five Layers of Agile Transformation</h2>

<p><img src="/code4projects/assets/img/agile-onion.webp" alt="Agile Onion" width="450" height="285" class="responsive_img" /></p>

<p><em>Photo from <a href="https://www.linkedin.com/pulse/agile-onion-jonathan-bowes/">https://www.linkedin.com</a></em></p>

<p>Before delving into the intricacies of Agile methodology, it is crucial to understand the foundational concept of the “Agile Onion.” The Agile Onion represents a holistic framework for Agile transformation, consisting of five interconnected layers. These layers encompass the fundamental aspects of Agile methodology, including mindset, values, principles, practices, and tools and processes. In this section, we will peel back each layer of the Agile Onion to delve into its significance and its role in fostering Agile practices.</p>

<ul>
  <li>
    <p><strong>Mindset</strong>:
At the core of the Agile Onion lies the mindset, which serves as the driving force behind the Agile philosophy.</p>
  </li>
  <li>
    <p><strong>Values</strong>:
The second layer of the Agile Onion comprises the core values that guide Agile practitioners.</p>
  </li>
  <li>
    <p><strong>Principles</strong>:
Building upon the Agile values, the principles layer provides a set of guidelines to achieve Agile success. The Agile principles, derived from the Agile Manifesto, offer practical insights and approaches for effective project management.</p>
  </li>
  <li>
    <p><strong>Practices</strong>:
The practices layer of the Agile Onion encompasses a wide array of techniques and methodologies used in Agile project execution. Practices such as Scrum, Kanban, DevOps, and Extreme Programming (XP) enable Agile teams to plan, execute, and deliver value incrementally.</p>
  </li>
  <li>
    <p><strong>Tools and Processes</strong>:
The outermost layer of the Agile Onion encompasses the tools and processes that support Agile implementation. These include project management tools, collaboration platforms, version control systems, and continuous integration and delivery pipelines. Agile teams leverage these tools and processes to enhance communication, streamline workflow, and automate repetitive tasks. While these tools are valuable, it is important to remember that they are enablers and should align with Agile mindset, values, principles, and practices.</p>
  </li>
</ul>

<h2 id="nurturing-the-agile-mindset-cultivating-a-foundation-for-success">Nurturing the Agile Mindset: Cultivating a Foundation for Success</h2>

<p><img src="/code4projects/assets/img/agile-mindset.webp" alt="Agile Mindset" width="450" height="248" class="responsive_img" /></p>

<p><em>Photo from <a href="https://www.icagile.com/media/resources/agile-is-a-mindset-icagile-no-title-or-bottom-line.png">https://www.icagile.com</a></em></p>

<p>The Agile mindset embraces change fearlessly, promotes transparency, cultivates a learning culture, encourages collaboration, and values self-organization. It is described by <strong>four core values</strong> and defined by <strong>twelve principles</strong>. This mindset can be applied through a wide range of practices such as Scrum, Lean, DevOps, Extreme Programming, and more. By adopting the Agile mindset, teams can adapt swiftly, communicate openly, continuously learn, collaborate effectively, and deliver valuable results. It forms the foundation for successful Agile transformations, enabling organizations to thrive in an ever-changing business landscape.</p>

<h2 id="revealing-the-4-core-values-guiding-cornerstones-for-agile-triumph">Revealing the 4 Core Values: Guiding Cornerstones for Agile Triumph</h2>

<p><img src="/code4projects/assets/img/agile-values.webp" alt="Agile Values" width="450" height="231" class="responsive_img" /></p>

<p><em>Photo from <a href="https://www.questionpro.com/blog/agile-values/">https://www.questionpro.com</a></em></p>

<p>The Agile Manifesto is built upon four core values that provide the foundation for Agile methodologies. These values emphasize the importance of people, collaboration, customer satisfaction, and adaptability in software development. They represent a shift in focus from rigid processes and documentation to a more flexible and customer-centric approach. These are the 4 values upon which the Agile Manifesto is based:</p>

<ul>
  <li>
    <p><strong>Individuals and Interactions over Processes and Tools</strong>
This value emphasizes the importance of people and effective collaboration within the team, recognizing that relationships and interactions are crucial to project success.</p>
  </li>
  <li>
    <p><strong>Working Software over Comprehensive Documentation</strong>
This value highlights the significance of delivering functional software that meets customer needs, rather than focusing extensively on exhaustive documentation.</p>
  </li>
  <li>
    <p><strong>Customer Collaboration over Contract Negotiation</strong>
This value promotes active engagement and collaboration with customers throughout the development process, emphasizing the value of understanding and meeting their evolving requirements.</p>
  </li>
  <li>
    <p><strong>Responding to Change over Following a Plan</strong>
This value acknowledges the inevitability of change and prioritizes the ability to adapt and respond quickly to changes in requirements, technology, or market dynamics.</p>
  </li>
</ul>

<h2 id="unearthing-the-12-principles-guiding-foundations-for-agile-mastery">Unearthing the 12 Principles: Guiding Foundations for Agile Mastery</h2>

<p><img src="/code4projects/assets/img/agile-principles.webp" alt="Agile Principles" width="450" height="338" class="responsive_img" /></p>

<p><em>Photo from <a href="https://twitter.com/OlgaHeismann/status/1364857111201656835">https://twitter.com</a></em></p>

<p>In addition to the core values, the Agile Manifesto consists of twelve principles that further guide the application of Agile methodologies. These principles highlight the significance of early and continuous delivery of value, the embrace of changing requirements, close collaboration with customers, and the empowerment of motivated individuals. They emphasize the importance of working software, technical excellence, simplicity, and continuous improvement. These are the 12 principles upon which the Agile Manifesto is based:</p>

<ol>
  <li>Satisfy the customer through early and continuous delivery of valuable software.</li>
  <li>Welcome changing requirements, even late in the development process. Agile processes harness change for the customer’s competitive advantage.</li>
  <li>Deliver working software frequently, with a preference for shorter timescales.</li>
  <li>Collaborate closely with customers and stakeholders throughout the project.</li>
  <li>Build projects around motivated individuals. Give them the environment and support they need and trust them to get the job done.</li>
  <li>The most efficient and effective method of conveying information within a development team is face-to-face conversation.</li>
  <li>Working software is the primary measure of progress.</li>
  <li>Agile processes promote sustainable development. The sponsors, developers, and users should be able to maintain a constant pace indefinitely.</li>
  <li>Continuous attention to technical excellence and good design enhances agility.</li>
  <li>Simplicity, as the art of maximizing the amount of work not done, is essential.</li>
  <li>The best architectures, requirements, and designs emerge from self-organizing teams.</li>
  <li>Regularly reflect on how to become more effective and adjust behavior accordingly.</li>
</ol>

<p>In conclusion, the four core values and twelve principles of the Agile Manifesto provide a solid foundation for organizations and teams embracing Agile methodologies. By prioritizing individuals, collaboration, customer satisfaction, and adaptability, Agile practices enable teams to deliver valuable software in a more responsive and efficient manner. These values and principles foster a culture of continuous improvement, innovation, and customer-centricity, driving project success in today’s dynamic and ever-changing business landscape. By adhering to these guiding principles, organizations can unleash the true potential of Agile and achieve better outcomes for their projects and customers.</p>

<h2 id="unlocking-success-key-benefits-of-agile-methodology">Unlocking Success: Key Benefits of Agile Methodology</h2>

<p><img src="/code4projects/assets/img/agile-benefits.webp" alt="Agile Benefits" width="450" height="338" class="responsive_img" /></p>

<p><em>Photo from <a href="https://www.planbox.com/benefits-of-implementing-agile-in-your-digital-transformation/">https://www.planbox.com</a></em></p>

<p>Adopting Agile methodology brings numerous advantages that empower organizations to thrive in today’s fast-paced and dynamic business landscape. Let’s explore some of the key benefits that Agile offers:</p>

<ul>
  <li>
    <p><strong>Improved Product Quality</strong>:
By emphasizing continuous testing, collaboration, and frequent feedback, Agile ensures a relentless focus on delivering high-quality products. Regular inspections and adaptations lead to early identification and resolution of issues, resulting in a superior end product.</p>
  </li>
  <li>
    <p><strong>Increased Customer Engagement</strong>:
Agile methodologies prioritize customer involvement throughout the development process. By engaging customers regularly and seeking their feedback, Agile ensures that the final product meets their evolving expectations. This customer-centric approach fosters stronger relationships and enhances customer satisfaction.</p>
  </li>
  <li>
    <p><strong>Risk Mitigation</strong>:
Agile’s iterative approach enables early identification and mitigation of risks. By breaking projects into smaller increments, teams can evaluate potential risks and challenges more frequently, allowing for proactive measures and timely adjustments.</p>
  </li>
  <li>
    <p><strong>Improved Team Satisfaction</strong>:
The Agile methodology values the input and autonomy of team members, providing opportunities for skill development, personal growth, and decision-making. This leads to higher levels of job satisfaction and employee engagement, fostering a positive and motivated team environment.</p>
  </li>
  <li>
    <p><strong>Enhanced Adaptability</strong>:
Agile enables organizations to quickly respond and adapt to changing market conditions, customer needs, and emerging opportunities. The iterative and flexible nature of Agile allows teams to embrace change and adjust their course of action efficiently.</p>
  </li>
  <li>
    <p><strong>Enhanced Team Productivity</strong>:
Agile practices promote collaboration, transparency, and self-organization within teams. By encouraging cross-functional collaboration and empowering team members, Agile creates an environment that nurtures creativity, innovation, and productivity.</p>
  </li>
  <li>
    <p><strong>Faster Time-to-Market</strong>:
Agile’s iterative and incremental approach enables faster delivery of working software, allowing organizations to gain a competitive edge. By delivering value in shorter cycles, businesses can seize market opportunities more quickly and respond to customer demands promptly.</p>
  </li>
</ul>

<p>Embracing Agile methodology brings a multitude of benefits to organizations. By harnessing these advantages, organizations can achieve better project outcomes, drive innovation, and establish a competitive advantage in today’s rapidly evolving business landscape.</p>

<h2 id="exploring-agile-practices">Exploring Agile Practices</h2>

<p><img src="/code4projects/assets/img/agile-practices.webp" alt="Agile Practices" width="450" height="359" class="responsive_img" /></p>

<p>In the realm of Agile, several methodologies have emerged as effective practices for achieving project success. These methodologies, situated at the level of practices within the Agile Onion, are tailored to specific project requirements and team dynamics. Let’s delve into some of the most commonly used Agile methodologies:</p>

<ul>
  <li>
    <p><strong>Scrum</strong>:
Scrum stands as one of the most popular and widely adopted Agile methodologies. It emphasizes iterative development and collaboration within self-organizing cross-functional teams. Utilizing short iterations called sprints, Scrum enables the delivery of incremental value. With daily stand-up meetings, sprint planning, sprint review, and retrospective sessions, Scrum facilitates transparency, communication, and continuous improvement.</p>
  </li>
  <li>
    <p><strong>Kanban</strong>:
Kanban focuses on visualizing and optimizing workflow. Through the use of a visual board with columns representing different stages of work, such as “To Do,” “In Progress,” and “Done,” teams can streamline their processes. By limiting work in progress (WIP) to enhance flow and efficiency, Kanban emphasizes a steady and balanced workflow, allowing teams to prioritize and pull work based on capacity.</p>
  </li>
  <li>
    <p><strong>Lean</strong>:
Lean principles, originating from the Toyota Production System, have integrated into Agile methodologies. Lean Agile concentrates on eliminating waste, optimizing value delivery, and empowering teams to continuously improve processes. By maximizing customer value, minimizing defects, and fostering a culture of continuous learning and improvement, Lean Agile promotes efficient and effective project outcomes.</p>
  </li>
  <li>
    <p><strong>Extreme Programming (XP)</strong>:
Extreme Programming promotes high-quality software development through practices such as test-driven development (TDD), continuous integration, pair programming, and frequent releases. With a strong emphasis on customer involvement, feedback, and rapid adaptation to changing requirements, XP encourages close collaboration between developers, testers, and customers throughout the development lifecycle.</p>
  </li>
  <li>
    <p><strong>DevOps</strong>:
In addition to the aforementioned methodologies, DevOps plays a vital role in Agile practices. DevOps focuses on bridging the gap between development and operations teams, promoting collaboration, automation, and continuous delivery. By integrating development and operations processes, DevOps enables rapid and reliable software releases, fostering agility, efficiency, and improved product quality.</p>
  </li>
</ul>

<p>These Agile methodologies—Scrum, Kanban, Lean, Extreme Programming, and DevOps—offer diverse approaches to implementing Agile principles and practices. Selecting the most suitable methodology depends on project requirements, team dynamics, and organizational context. By leveraging the strengths of these methodologies, organizations can effectively embrace Agile principles and drive successful project outcomes.</p>

<h2 id="enhancing-agility-tools-and-processes-for-effective-agile-implementation">Enhancing Agility: Tools and Processes for Effective Agile Implementation</h2>

<p><img src="/code4projects/assets/img/agile-tools.webp" alt="Agile Tools" width="450" height="338" class="responsive_img" /></p>

<p><em>Photo from <a href="https://fuel.york.ie/news/article/owned-best-16-agile-tools-for-project-management-in-2023">https://fuel.york.ie/</a></em></p>

<p>Agile methodologies are supported by a variety of tools and processes that enable teams to effectively implement and manage their agile practices. The specific tools and processes utilized can vary depending on the chosen agile framework or practice. For example, Scrum, one of the popular agile frameworks, incorporates specific processes to create value through successive iterations, known as Sprints.</p>

<p>In Scrum, teams utilize a set of tools and processes that are highly visible and integral to the overall agile process. These include: Daily Scrum, Sprint Planning, Retrospective, Backlog, etc.</p>

<p>It’s important to note that while Scrum has its specific set of tools and processes, other agile practices such as Kanban, Extreme Programming (XP), and Lean, among others, have their own unique tools and processes tailored to their respective methodologies. The selection of tools and processes depends on the specific needs and context of the project and the preferences of the agile team.</p>

<h2 id="conclusion">Conclusion:</h2>

<p>In conclusion, Agile methodology offers a flexible, collaborative, and customer-centric approach to project management. By embracing Agile principles, organizations can reap numerous benefits, including enhanced adaptability, improved product quality, increased customer engagement, risk mitigation, improved team productivity and satisfaction, and faster time-to-market. The Agile Manifesto, with its four core values and twelve principles, provides a solid foundation for Agile practices and guides teams in delivering high-quality software while responding to change. Additionally, Agile methodologies such as Scrum, Kanban, Lean, Extreme Programming (XP), and DevOps offer effective practices tailored to specific project requirements and team dynamics. By adopting Agile methodologies and fostering an Agile mindset, organizations can achieve project success, drive innovation, and gain a competitive edge in today’s rapidly evolving business landscape.</p>]]></content><author><name></name></author><category term="Project Management" /><summary type="html"><![CDATA[Discover how Agile methodology revolutionizes project management by embracing flexibility and empowering teams to deliver continuous value. Explore the key principles, benefits, and best practices behind Agile's success in this comprehensive guide.]]></summary><media:thumbnail xmlns:media="http://search.yahoo.com/mrss/" url="https://sasadangelo.github.io/code4projects/assets/img/agile.webp" /><media:content medium="image" url="https://sasadangelo.github.io/code4projects/assets/img/agile.webp" xmlns:media="http://search.yahoo.com/mrss/" /></entry><entry><title type="html">Top Tools Every Software Developer Should Consider in 2023</title><link href="https://sasadangelo.github.io/code4projects/top-tools-software-developers/" rel="alternate" type="text/html" title="Top Tools Every Software Developer Should Consider in 2023" /><published>2023-02-22T00:00:00+00:00</published><updated>2023-02-22T00:00:00+00:00</updated><id>https://sasadangelo.github.io/code4projects/top-tools-software-developers</id><content type="html" xml:base="https://sasadangelo.github.io/code4projects/top-tools-software-developers/"><![CDATA[<p><img src="/code4projects/assets/img/top-software-development-tools.webp" alt="Top Software Developer Tools" width="402" height="200" class="responsive_img" /></p>

<h1 id="top-tools-every-software-developer-should-consider-in-2023">Top Tools Every Software Developer Should Consider in 2023</h1>
<p><em>Posted on <strong>22 Feb 2023</strong></em></p>

<h2 id="introduction">Introduction</h2>

<p>In a constantly evolving world of technology, software developers need to stay ahead of the curve by keeping up with the latest tools and technologies. In 2023 it’s a good time to explore some of the best tools that developers can use to make their work more efficient, effective, and enjoyable. In this article, I’ll explore some of the top tools I use today that developers should consider, providing pros and cons to help you decide which ones to integrate into your workflow.</p>

<h2 id="boost-your-productivity-with-these-top-text-editors-for-software-development">Boost Your Productivity with These Top Text Editors for Software Development</h2>

<h3 id="visual-studio-code">Visual Studio Code</h3>

<p><img src="/code4projects/assets/img/visual-studio-code-logo.webp" alt="Visual Studio Code" width="300" height="225" class="responsive_img" /></p>

<p>As a software developer, one of the most important tools in my toolkit is <a href="https://code.visualstudio.com/">Visual Studio Code</a>. It is a versatile and lightweight code editor that comes with a wide range of features, including support for multiple programming languages, debugging tools, and intelligent code completion.</p>

<p>One of the biggest advantages of Visual Studio Code is its extensive plugin system, which enables developers to customize the editor to their specific needs. The editor’s extensive community has created a lot of plugins that can help streamline the development process and improve productivity. Additionally, Visual Studio Code seamlessly integrates with many other development tools, such as Git, making it an excellent choice for teams that use version control.</p>

<p>On the downside, the extensive plugin system can also be a double-edged sword, as the large number of plugins can make it challenging to navigate and find the right ones for your needs. Additionally, some users have reported performance issues when using large or complex projects, although these issues can often be resolved by tweaking the editor’s settings.</p>

<p>Overall, Visual Studio Code is an excellent choice for developers of all skill levels and backgrounds, thanks to its versatility, customizability, and extensive feature set. Whether you’re a seasoned developer or just getting started, Visual Studio Code is a tool that can help streamline your development workflow and boost productivity.</p>

<h3 id="eclipse">Eclipse</h3>

<p><img src="/code4projects/assets/img/eclipse-logo.webp" alt="Eclipse" width="300" height="71" class="responsive_img" /></p>

<p>As a software developer who primarily works with Java, <a href="https://www.eclipse.org/downloads/">Eclipse</a> is one of the most important tools in my toolkit. It is a highly extensible and customizable IDE that comes with a wide range of features, making it an excellent choice for developing Java applications.</p>

<p>One of the biggest advantages of Eclipse is its plugin system, which enables developers to customize the IDE to their specific needs. The Eclipse Marketplace has a vast collection of plugins, including those for web development, database connectivity, and version control, among others. Additionally, Eclipse seamlessly integrates with many other development tools, such as Git, which makes it an excellent choice for teams that use version control.</p>

<p>Another advantage of Eclipse is its support for multiple programming languages, including Java, C/C++, and Python. This makes it a versatile tool that can be used for various projects, depending on your specific needs.</p>

<p>On the downside, Eclipse can be a bit challenging to set up, and its interface may not be as intuitive as some of the other IDEs on the market. Additionally, some users have reported performance issues when working on large or complex projects, although these issues can often be resolved by tweaking the IDE’s settings.</p>

<p>Overall, Eclipse is an excellent choice for Java developers who value extensibility, customization, and integration with other development tools. Whether you’re working on a small project or a large, complex application, Eclipse’s wide range of features and support for multiple programming languages make it a tool that you should consider in 2023.</p>

<h3 id="android-studio">Android Studio</h3>

<p><img src="/code4projects/assets/img/android-studio-logo.webp" alt="Android Studio" width="300" height="322" class="responsive_img" /></p>

<p>If you’re an Android developer, <a href="https://developer.android.com/studio">Android Studio</a> is a must-have tool in your toolkit. It is an official Integrated Development Environment (IDE) developed by Google and is designed specifically for building Android applications.</p>

<p>One of the biggest advantages of Android Studio is its rich set of features and tools that make Android app development more comfortable and efficient. The IDE comes with an emulator that allows developers to test their apps on various Android devices, making it easier to identify and fix issues before deploying the app.</p>

<p>Another advantage of Android Studio is its integration with other Google tools, such as Firebase and Google Cloud Platform, which makes it easier to build, test, and deploy Android apps. Additionally, Android Studio comes with a code editor that supports various programming languages, including Kotlin and Java, making it a versatile tool that can be used for developing different types of Android apps.</p>

<p>On the downside, Android Studio can be resource-intensive and may require a high-performance computer to run smoothly. Additionally, beginners may find it challenging to navigate and set up the IDE, but there are many tutorials and resources available to help overcome these challenges.</p>

<p>Overall, if you’re an Android developer, Android Studio is a tool that you should consider in 2023. Its rich set of features, integration with other Google tools, and support for multiple programming languages make it an excellent choice for building high-quality Android apps.</p>

<h3 id="pycharm">PyCharm</h3>

<p><img src="/code4projects/assets/img/pycharm-logo.webp" alt="PyCharm" width="300" height="167" class="responsive_img" /></p>

<p>If you’re a Python developer, <a href="https://www.jetbrains.com/pycharm/download">PyCharm</a> is one of the best Integrated Development Environments (IDEs) that you can use in 2023. Developed by JetBrains, PyCharm is a powerful tool that offers many features designed specifically for Python development.</p>

<p>One of the biggest advantages of PyCharm is its support for Python frameworks and libraries, including Django, Flask, and NumPy, among others. This makes it easier for developers to work with these frameworks and libraries, as PyCharm provides many tools and features designed to help manage and optimize them.</p>

<p>Additionally, PyCharm comes with many other useful features, including intelligent code completion, code analysis, and debugging tools. These features help developers write cleaner, more efficient code, which can save time and reduce the likelihood of errors.</p>

<p>Another advantage of PyCharm is its integration with other development tools, such as Git, which makes it easy to manage version control and collaborate with other developers.</p>

<p>On the downside, PyCharm can be resource-intensive, which may require a high-performance computer to run smoothly. Additionally, its interface may be overwhelming for beginners who are not familiar with its features, although there are many tutorials and resources available to help overcome these challenges.</p>

<p>Overall, PyCharm is an excellent choice for Python developers who value the IDE’s support for Python frameworks and libraries, as well as its many features designed to help optimize Python code. Whether you’re working on a small project or a large, complex application, PyCharm’s versatility and powerful tools make it a tool to consider in 2023.</p>

<h3 id="vim">Vim</h3>

<p><img src="/code4projects/assets/img/vim-logo.webp" alt="Vim" width="300" height="300" class="responsive_img" /></p>

<p><a href="https://www.vim.org/">Vim</a> is a text editor that has been around for over 30 years, and it’s still a popular choice for many developers in 2023. While it may seem archaic at first glance, Vim’s power lies in its customizability and its vast array of keyboard shortcuts that can help you work faster and more efficiently.</p>

<p>One of the most significant advantages of Vim is its ability to work with large files quickly. Vim can load and manipulate large files with ease, and it also comes with many features designed to help you navigate through files quickly, such as search and replace functions and regular expressions.</p>

<p>Additionally, Vim’s customizable nature makes it an ideal choice for developers who want to personalize their development environment. With the right plugins and configurations, you can turn Vim into a powerful IDE that supports multiple programming languages and comes with many useful tools.</p>

<p>However, Vim’s keyboard-centric approach may be challenging for beginners who are not used to working with keyboard shortcuts. Additionally, Vim’s interface may appear outdated compared to newer IDEs, and it may not be as user-friendly as other modern text editors.</p>

<p>Overall, if you’re a developer who values speed and efficiency in your workflow, Vim is a tool that you should consider in 2023. Its keyboard-centric approach and customizability make it an excellent choice for developers who want to optimize their workflow and work with large files.</p>

<h2 id="git-and-github">Git and GitHub</h2>

<p><img src="/code4projects/assets/img/git-logo.webp" alt="Git and GitHub" width="300" height="125" class="responsive_img" /></p>

<p><a href="https://git-scm.com/downloads">Git</a> is a distributed version control system that allows developers to track changes to their code over time. It’s a powerful tool that can help you manage your codebase, collaborate with others, and track issues and bugs.</p>

<p>One of the most significant advantages of Git is its ability to work offline. Because Git is a distributed version control system, developers can work on their code without needing to be connected to a network. Additionally, Git’s branching and merging capabilities make it easy to experiment with new features and bug fixes without affecting the main codebase.</p>

<p><a href="https://github.com/">GitHub</a> is a web-based platform that allows developers to host their Git repositories and collaborate with others on projects. GitHub offers many features that can help developers manage their codebase, including issue tracking, code reviews, and pull requests.</p>

<p>One of the most significant advantages of GitHub is its social aspect. Because GitHub is a community-driven platform, developers can collaborate with other developers from around the world, learn new skills, and contribute to open-source projects. Additionally, GitHub’s integration with other tools, such as continuous integration and deployment services, can help streamline the development process and make it more efficient.</p>

<p>However, one potential downside of using GitHub is the risk of dependency on a third-party platform. If GitHub were to experience an outage or shut down, it could cause significant disruptions to a project’s development process. Additionally, GitHub’s pricing model may be a concern for some developers, especially those who work on small or personal projects.</p>

<p>Overall, Git and GitHub are essential tools for developers in 2023. Their ability to track changes, collaborate with others, and manage code repositories make them a must-have for any software development project.</p>

<h2 id="dbvisualizer">DBVisualizer</h2>

<p><img src="/code4projects/assets/img/db-visualizer-logo.webp" alt="DB Visualizer" width="300" height="78" class="responsive_img" /></p>

<p><a href="https://www.dbvis.com/">DBVisualizer</a> is a universal database tool that allows developers to explore and interact with multiple databases simultaneously. With support for a wide range of databases, including Oracle, MySQL, and PostgreSQL, DBVisualizer provides a unified interface for managing data across different database systems.</p>

<p>One of the most significant advantages of DBVisualizer is its ability to connect to multiple databases at the same time. This feature is particularly useful for developers who work with multiple databases or need to manage data across different systems. Additionally, DBVisualizer’s advanced features, such as SQL autocompletion and schema visualization, can help streamline the development process and make it more efficient.</p>

<p>However, one potential downside of using DBVisualizer is its learning curve. Because DBVisualizer is a feature-rich tool, it can take some time to learn how to use all of its features effectively. Additionally, the cost of the tool may be a concern for some developers, especially those who work on small or personal projects.</p>

<p>Overall, DBVisualizer is an excellent tool for developers who work with multiple databases or need to manage data across different systems. Its advanced features and support for multiple database systems make it a valuable asset for any software development project.</p>

<h2 id="enhance-your-web-development-workflow-with-these-top-tools-for-debugging-and-testing-web-services">Enhance Your Web Development Workflow with These Top Tools for Debugging and Testing Web Services</h2>

<h3 id="chrome-developer-tools">Chrome Developer Tools</h3>

<p><img src="/code4projects/assets/img/chrome-developer-tools-logo.webp" alt="Chrome Developer Tools" width="300" height="180" class="responsive_img" /></p>

<p><a href="https://developer.chrome.com/docs/devtools/">Chrome Developer Tools</a> is a set of web development and debugging tools built directly into the Google Chrome browser. It provides a comprehensive set of features for developers to analyze, debug, and optimize web applications. Chrome Developer Tools can help developers identify and fix issues with their web applications quickly and efficiently.</p>

<p>One of the most significant advantages of Chrome Developer Tools is its ease of use. Since it is built directly into the Chrome browser, developers can access it quickly and easily. The tool also offers an extensive range of features, including real-time performance monitoring, network analysis, and debugging tools. These features can help streamline the development process and ensure that web applications are optimized for speed and performance.</p>

<p>However, one potential downside of using Chrome Developer Tools is that it may not be as robust as some other web development tools. Additionally, since it is browser-based, developers may experience some limitations when working with other browsers or testing for cross-browser compatibility.</p>

<p>Overall, Chrome Developer Tools is an excellent tool for developers who want to optimize their web applications quickly and efficiently. Its comprehensive set of features and ease of use make it an essential tool for web development in 2023.</p>

<h3 id="postman">Postman</h3>

<p><img src="/code4projects/assets/img/postman-logo.webp" alt="Postman" width="300" height="300" class="responsive_img" /></p>

<p><a href="https://www.postman.com/">Postman</a> is a popular API development and testing tool that allows developers to design, test, and manage APIs easily. It offers an intuitive user interface that enables users to create and manage complex requests, workflows, and environments. Postman provides an efficient way for developers to test APIs and verify their functionality, as well as to automate API testing and integration testing.</p>

<p>One of the main advantages of Postman is its ability to simplify API testing and debugging. It enables developers to test APIs quickly and easily, which can help speed up the development process. Additionally, Postman provides a comprehensive set of features, including automated testing, documentation, and monitoring. These features can help developers streamline their workflow and ensure the quality of their APIs.</p>

<p>However, one potential disadvantage of using Postman is that its advanced features may be overwhelming for novice developers. The tool also requires an understanding of API development and testing, which can be a steep learning curve for some users.</p>

<p>Overall, Postman is a valuable tool for API development and testing. Its user-friendly interface, comprehensive features, and efficient workflow make it an essential tool for developers in 2023.</p>

<h3 id="httpie">Httpie</h3>

<p><img src="/code4projects/assets/img/httpie-logo.webp" alt="Httpie" width="300" height="86" class="responsive_img" /></p>

<p><a href="https://httpie.io/">Httpie</a> is a powerful command-line HTTP client that can be used to test and debug web services. With its user-friendly syntax, Httpie makes it easy for developers to send HTTP requests, inspect responses, and perform other tasks without having to use a web browser or more complex tools.</p>

<p>One of the main advantages of using Httpie is its simplicity. Httpie’s syntax is intuitive and easy to use, making it accessible to developers of all skill levels. With Httpie, developers can quickly test APIs, debug issues, and perform other tasks, all from the command line.</p>

<p>Another advantage of using Httpie is its support for advanced features, such as JSON formatting, file uploads, and authentication. Httpie also supports HTTPS and HTTP/2, making it a versatile tool for working with a variety of web services.</p>

<p>However, one potential disadvantage of using Httpie is its lack of a graphical user interface. While Httpie’s command-line interface is powerful, it may not be as accessible or visually appealing as other tools with graphical interfaces.</p>

<p>Overall, Httpie is a valuable tool for developers in 2023. Its user-friendly syntax, support for advanced features, and versatility make it a great choice for testing and debugging web services from the command line.</p>

<h2 id="optimize-your-team-collaboration-and-project-management-with-these-top-tools">Optimize Your Team Collaboration and Project Management with These Top Tools</h2>

<h3 id="zenhub">ZenHub</h3>

<p><img src="/code4projects/assets/img/zenhub-logo.webp" alt="ZenHub" width="300" height="300" class="responsive_img" /></p>

<p><a href="https://www.zenhub.com/">ZenHub</a> is a project management tool that is designed to integrate directly into GitHub, making it an ideal choice for developers who use GitHub as their primary source code repository. With ZenHub, developers can manage their development workflows and collaborate more effectively with their team members.</p>

<p>One of the main advantages of ZenHub is its ability to provide a range of useful features, such as Kanban boards, burndown charts, and custom reports. These features can help developers manage their projects more effectively and improve their team’s productivity.</p>

<p>Another advantage of ZenHub is its seamless integration with GitHub, which allows developers to manage their projects directly from the GitHub interface. This can help streamline the development process and make it easier for developers to collaborate and share code with their team members.</p>

<p>However, one potential disadvantage of using ZenHub is the learning curve associated with its features and interface. Developers who are not familiar with ZenHub may find it challenging to learn and use effectively.</p>

<p>Overall, ZenHub is a valuable project management tool for developers in 2023. Its ability to integrate with GitHub, provide useful features, and improve team collaboration can help developers manage their projects more effectively and efficiently.</p>

<h3 id="slack">Slack</h3>

<p><img src="/code4projects/assets/img/slack-logo.webp" alt="Slack" width="300" height="169" class="responsive_img" /></p>

<p><a href="https://slack.com/">Slack</a> is a popular team communication tool that is used by many development teams to collaborate and stay connected. With its ability to create different channels for specific topics and projects, Slack makes it easy for developers to stay organized and communicate more effectively.</p>

<p>One of the main advantages of using Slack is its ease of use and flexibility. With Slack, developers can communicate in real-time, share files and code snippets, and even make voice or video calls, all from one central platform. This can help reduce the need for email and other communication tools, making it easier for teams to stay on the same page.</p>

<p>Another advantage of using Slack is its ability to integrate with other tools commonly used by developers, such as GitHub and Jira. This integration can help developers stay updated on changes to code and projects without having to constantly check multiple tools.</p>

<p>However, one potential disadvantage of using Slack is its potential to become a distraction. With its real-time messaging, notifications, and constant flow of information, it can be challenging to stay focused and avoid getting sidetracked by non-essential messages.</p>

<p>Overall, Slack is a valuable tool for developers in 2023. Its ability to centralize communication, integrate with other tools, and promote collaboration can help development teams stay connected and work more efficiently.</p>

<h3 id="trello">Trello</h3>

<p><img src="/code4projects/assets/img/trello-logo.webp" alt="Trello" width="300" height="62" class="responsive_img" /></p>

<p><a href="https://trello.com/">Trello</a> is a web-based project management tool that is popular among developers for its ease of use and flexibility. With Trello, developers can create boards, lists, and cards to manage projects, track tasks, and collaborate with team members.</p>

<p>One of the main advantages of using Trello is its simplicity. Trello’s intuitive user interface and drag-and-drop functionality make it easy for developers to organize tasks, collaborate with team members, and track progress on projects. With Trello, developers can quickly create and assign tasks, set deadlines, and communicate with team members, all in one central location.</p>

<p>Another advantage of using Trello is its flexibility. Trello can be customized to fit the specific needs of a development team, with features such as custom labels, checklists, and power-ups. Trello also integrates with a variety of other tools, such as GitHub, Slack, and Google Drive, making it a versatile tool for managing development projects.</p>

<p>However, one potential disadvantage of using Trello is its limited reporting capabilities. While Trello provides basic reporting features, it may not be as robust as other project management tools in terms of reporting and analytics.</p>

<p>Overall, Trello is a valuable tool for developers in 2023. Its ease of use, flexibility, and integrations make it a great choice for managing projects, tracking tasks, and collaborating with team members.</p>

<h3 id="todoist">Todoist</h3>

<p><img src="/code4projects/assets/img/todoist-logo.webp" alt="Todoist" width="300" height="82" class="responsive_img" /></p>

<p><a href="https://todoist.com/app/">Todoist</a> is a popular task management app that allows you to create and manage to-do lists with ease. It has a simple and intuitive interface, making it easy to organize tasks, set due dates and priorities, and add notes or comments. Todoist also has several useful features, including the ability to set recurring tasks, create sub-tasks, and integrate with other tools such as Google Calendar and Slack.</p>

<p>One of the main advantages of Todoist is its flexibility. The app can be used for personal task management, team collaboration, or project management. It is available on multiple platforms, including desktop, web, and mobile, so you can access your tasks and lists from anywhere.</p>

<p>However, Todoist is not without its downsides. The app’s free version is somewhat limited, with a maximum of 80 active projects and 5 team members. To unlock additional features, such as reminders and productivity tracking, you will need to subscribe to a premium plan.</p>

<p>Overall, Todoist is a powerful and versatile tool that can help you stay organized and productive. Whether you’re a solo freelancer or part of a large team, Todoist is worth considering for your task management needs.</p>

<h2 id="wireshark">Wireshark</h2>

<p><img src="/code4projects/assets/img/wireshark-logo.webp" alt="Wireshark" width="300" height="83" class="responsive_img" /></p>

<p><a href="https://www.wireshark.org/download.html">Wireshark</a> is a powerful network protocol analyzer that lets you capture and analyze network traffic in real-time. As a developer, it can be an incredibly useful tool for debugging network-related issues, including analyzing performance problems, identifying security vulnerabilities, and troubleshooting network-related bugs.</p>

<p>One of the major benefits of Wireshark is its ability to capture and display network traffic from a wide variety of different protocols. This includes everything from simple HTTP requests to more complex protocols like TCP, DNS, and SIP. Wireshark also offers a comprehensive set of filters and other analysis tools, allowing you to dig deep into network traffic and quickly identify potential issues.</p>

<p>Another advantage of Wireshark is its wide range of customization options. For example, you can choose from a variety of different display formats, including both ASCII and hexadecimal, and you can even define your own custom display filters. Additionally, Wireshark has a large and active community of developers, which means that there are many third-party plugins and extensions available that can further extend the tool’s functionality.</p>

<p>On the downside, Wireshark can be quite complex and overwhelming for beginners. The user interface can be difficult to navigate at times, and it can take some time to learn how to use the various analysis tools effectively. Additionally, the tool requires a certain level of technical expertise to be used effectively, which may make it less accessible for some developers.</p>

<p>Overall, Wireshark is an excellent tool for network analysis and a must-have for any developer working with network protocols. If you’re willing to invest the time to learn how to use it effectively, Wireshark can be an incredibly powerful tool for debugging and analyzing network issues.</p>

<h2 id="simplify-your-containerized-application-development-and-deployment-with-docker-and-kubernetes">Simplify Your Containerized Application Development and Deployment with Docker and Kubernetes</h2>

<h3 id="docker">Docker</h3>

<p><img src="/code4projects/assets/img/docker-logo.webp" alt="Docker" width="300" height="215" class="responsive_img" /></p>

<p><a href="https://www.docker.com/">Docker</a> is a platform for developing, distributing, and running containerized applications. It simplifies the process of developing and distributing applications, reducing the risk of errors and compatibility issues. With Docker, developers can create consistent environments across different machines and operating systems, ensuring that their applications work reliably and consistently.</p>

<p>One of the biggest advantages of Docker is that it allows developers to easily create, share, and manage containers, which are isolated runtime environments in which applications can be reliably run on different infrastructures. Docker is lightweight and efficient, making it easy to deploy applications quickly and scale them up or down as needed.</p>

<p>However, running applications in containers can add some overhead in terms of memory and processing requirements, which can impact performance in some cases. Docker can also be challenging to configure and secure, and misconfigurations or security vulnerabilities can expose sensitive data or compromise the integrity of the application. While Docker makes it easy to manage and distribute applications, it can also add complexity to the development process, especially for developers who are new to containerization.</p>

<p>You can learn more about Docker reading my <a href="/code4projects/getting-started-with-docker/">Getting Started with Docker</a> guide.</p>

<h3 id="kubernetes">Kubernetes</h3>

<p><img src="/code4projects/assets/img/kubernetes-logo.webp" alt="Kubernetes" width="300" height="291" class="responsive_img" /></p>

<p><a href="https://kubernetes.io/">Kubernetes</a> is an open-source system for managing and automating containers. It simplifies the deployment and scaling of containerized applications across a wide range of infrastructures, including on-premises data centers, public and private clouds.</p>

<p>One of the biggest advantages of Kubernetes is that it allows developers to easily deploy and manage containerized applications across different environments, with built-in support for scaling, monitoring, and rolling updates. With Kubernetes, developers can create consistent environments for their applications, ensuring that they work reliably and consistently across different machines and operating systems.</p>

<p>Kubernetes supports a wide range of container runtimes and platforms, making it easy to deploy applications on any infrastructure, including hybrid and multi-cloud environments. Additionally, Kubernetes is highly customizable and extensible, with a rich ecosystem of plugins and tools that allow developers to tailor the system to their specific needs.</p>

<p>However, Kubernetes can be complex and challenging to set up and maintain, particularly for developers who are new to containerization or distributed systems. In addition, running applications in containers can add some overhead in terms of memory and processing requirements, which can impact performance in some cases. Nevertheless, Kubernetes is a powerful tool for managing containerized applications at scale, and can provide significant benefits in terms of automation, scalability, and reliability.</p>

<p>You can learn more about Kubernetes reading my <a href="/code4projects/getting-started-with-kubernetes/">Getting Started with Kubernetes</a> guide.</p>

<h2 id="conclusion">Conclusion</h2>

<p>Choosing the right tools can make a significant difference in the productivity and efficiency of a software developer. The tools we’ve covered in this article can help developers write better code, collaborate more effectively, and streamline their workflows. Whether you’re an experienced developer or just starting in the field, exploring these tools can give you a competitive edge in the ever-evolving world of software development.</p>]]></content><author><name></name></author><category term="Programming" /><summary type="html"><![CDATA[Discover the top software development tools to take your coding game to the next level in 2023. From code editors to network analyzers, this article highlights the must-have tools for developers.]]></summary><media:thumbnail xmlns:media="http://search.yahoo.com/mrss/" url="https://sasadangelo.github.io/code4projects/assets/img/top-software-development-tools.webp" /><media:content medium="image" url="https://sasadangelo.github.io/code4projects/assets/img/top-software-development-tools.webp" xmlns:media="http://search.yahoo.com/mrss/" /></entry><entry><title type="html">Mastering the Basics of CSS: A Beginner’s Guide</title><link href="https://sasadangelo.github.io/code4projects/mastering-basics-css/" rel="alternate" type="text/html" title="Mastering the Basics of CSS: A Beginner’s Guide" /><published>2023-02-13T00:00:00+00:00</published><updated>2023-02-13T00:00:00+00:00</updated><id>https://sasadangelo.github.io/code4projects/mastering-basics-css</id><content type="html" xml:base="https://sasadangelo.github.io/code4projects/mastering-basics-css/"><![CDATA[<p><img src="/code4projects/assets/img/css-logo.webp" alt="CSS Logo" width="200" height="200" class="responsive_img" /></p>

<h1 id="mastering-the-basics-of-css-a-beginners-guide">Mastering the Basics of CSS: A Beginner’s Guide</h1>

<p><em>Posted on <strong>13 Feb 2023</strong></em></p>

<h2 id="introduction">Introduction</h2>

<p>In this article, we will continue to build our website with HTML and CSS. I am going to show you how to style the website we created in the <a href="/code4projects/getting-started-with-html/">previous article</a> improving its look and feel.</p>

<h2 id="what-is-css">What is CSS?</h2>

<p><img src="/code4projects/assets/img/html-and-css.webp" alt="HTML + CSS" width="450" height="401" class="responsive_img" /></p>

<p><em>Photo from <a href="https://www.scaler.com/topics/difference-between-html-and-css/">https://www.scaler.com</a></em></p>

<p>CSS (Cascading Style Sheets) is a styling language used to control the presentation of web pages. It is used to define the layout, colors, typography, and other visual elements of a web page. CSS allows you to separate the presentation of a web page from its structure, which is defined using HTML.</p>

<p>CSS has become an essential part of web development, as it allows you to create visually appealing and responsive designs that adapt to different screen sizes and devices. With CSS, you can control the position and layout of elements, create animations and transitions, and define the typography and colors of a web page.</p>

<p>In this article, we will explore the basics of CSS and how it can be used to enhance the visual design of web pages. We will cover topics such as selectors, cascading, the box model, layout, typography, color and background, transitions and animations, and responsive design. By the end of this article, you will have a solid understanding of how to use CSS to create visually stunning and responsive web pages.</p>

<h2 id="css-rules-and-declarations">CSS Rules and Declarations</h2>

<p><img src="/code4projects/assets/img/css-rules.webp" alt="CSS Rules and Declarations" width="450" height="401" class="responsive_img" /></p>

<p><em>Photo from <a href="https://www.coderepublics.com/CSS/CSS%20Images/css-syntax.webp">https://www.coderepublics.com</a></em></p>

<p>A CSS file is essentially a list of CSS rules, where each rule consists of a selector and a declaration block. A selector determines which HTML elements on a page will be affected by the styles defined in the rule. For example, an h1 selector would apply styles to all h1 headings on a page. A declaration block is a set of styles to be applied to the selected element. It consists of a property and a value, separated by a colon and surrounded by curly braces. For example:</p>

<figure class="highlight"><pre><code class="language-css" data-lang="css"><span class="nt">h1</span> <span class="p">{</span>
    <span class="nl">color</span><span class="p">:</span> <span class="no">blue</span><span class="p">;</span>
    <span class="nl">font-size</span><span class="p">:</span> <span class="m">36px</span><span class="p">;</span>
    <span class="nl">text-align</span><span class="p">:</span> <span class="nb">center</span><span class="p">;</span>
<span class="p">}</span>
    </code></pre></figure>

<p>In this example, the selector h1 applies the styles to all h1 headings on the page. The declaration block sets the text color to blue, the font size to 36 pixels, and the text alignment to the center. It’s important to note that multiple CSS rules can apply to a single HTML element, and the order of the rules in the CSS file determines which styles will take priority (known as the cascading effect). The last style declared for a given property wins and overrides any previous styles.</p>

<h2 id="css-inheritance">CSS Inheritance</h2>

<p><img src="/code4projects/assets/img/css-inheritance.webp" alt="CSS Inheritance" width="450" height="316" class="responsive_img" /></p>

<p><em>Photo from <a href="https://sites.google.com/site/csstricksandtips/home/css-progression">https://sites.google.com/site/csstricksandtips</a></em></p>

<p>In CSS, inheritance refers to the mechanism by which certain CSS property values are passed from a parent element to its children. This allows for a more efficient and organized way to apply styles to elements in an HTML document.</p>

<p>For example, if you set the font-size property on a body element, all its child elements will also inherit that font-size property value. If you then set the font-size property on a child element, it will override the inherited value and apply its unique font-size value.</p>

<p>It’s important to note that not all CSS properties are inherited. For example, the padding and margin properties are not inherited.</p>

<p>Inheritance can be a useful tool for maintaining consistency in styling and reducing the amount of code that needs to be written. However, it can also lead to unintended consequences if not used carefully. For example, if you have a large number of nested elements, inheritance can make it difficult to understand the styling of a particular element without carefully examining the hierarchy of elements in the HTML document.</p>

<h2 id="css-selectors-and-cascading-the-building-blocks-of-web-design">CSS Selectors and Cascading: The Building Blocks of Web Design</h2>

<p><img src="/code4projects/assets/img/css-selectors.webp" alt="CSS Selectors" width="450" height="225" class="responsive_img" /></p>

<p><em>Photo from <a href="https://www.coderepublics.com/CSS/css-selector.php">https://www.atatus.com</a></em></p>

<p>In CSS, selectors are used to select elements on a web page that you want to apply styles. There are several types of selectors, including:</p>

<ul>
  <li><strong>Element selectors</strong>: Select elements based on their tag name, such as “p” for paragraphs or “a” for links.</li>
  <li><strong>Class selectors</strong>: Select elements based on their class attributes, using a period (.) before the class name. For example, “.my-class” would select all elements with the class “my-class”.</li>
  <li><strong>ID selectors</strong>: Select elements based on their id attribute, using a hash (#) before the id name. For example, “#my-id” would select the element with the id “my-id”.</li>
  <li><strong>Attribute selectors</strong>: Select elements based on their attributes and attribute values. For example, “[href=’https://example.com’]” would select all elements with an href attribute equal to “https://example.com”.</li>
</ul>

<p>Cascading refers to how styles are applied to elements when multiple stylesheets and/or styles are conflicting. When multiple styles apply to the same element, the browser uses the following rules to determine which style to use:</p>

<ul>
  <li><strong>Specificity</strong>: Styles with a higher specificity are given priority. For example, an ID selector has a higher specificity than a class selector.</li>
  <li><strong>Origin</strong>: Styles that are defined in the user’s browser have lower priority than those defined in the author’s stylesheet.</li>
  <li><strong>Importance</strong>: Styles that are marked as “!important” have higher priority than those that are not.</li>
</ul>

<p>Finally, cascading also works with the order of styles in the CSS file, styles defined later on in the file will overwrite previous styles.</p>

<p>It’s important to keep in mind specificity and cascading rules when working with CSS to avoid unexpected results.</p>

<p><strong>Element Selector</strong>:</p>

<figure class="highlight"><pre><code class="language-css" data-lang="css"><span class="c">/* This will select all &lt;p&gt; elements and make their text color red */</span>
<span class="nt">p</span> <span class="p">{</span>
    <span class="nl">color</span><span class="p">:</span> <span class="no">red</span><span class="p">;</span>
<span class="p">}</span>
    </code></pre></figure>

<p><strong>Class selector</strong>:</p>

<figure class="highlight"><pre><code class="language-css" data-lang="css"><span class="c">/* This will select all elements with the class "my-class" and make their background color yellow */</span>
<span class="nc">.my-class</span> <span class="p">{</span>
    <span class="nl">background-color</span><span class="p">:</span> <span class="no">yellow</span><span class="p">;</span>
<span class="p">}</span>
    </code></pre></figure>

<p><strong>ID Selector</strong>:</p>

<figure class="highlight"><pre><code class="language-css" data-lang="css"><span class="c">/* This will select the element with the ID "my-id" and make it's font-size 20px */</span>
<span class="nf">#my-id</span> <span class="p">{</span>
    <span class="nl">font-size</span><span class="p">:</span> <span class="m">20px</span><span class="p">;</span>
<span class="p">}</span>
    </code></pre></figure>

<p><strong>Attribute Selector</strong>:</p>

<figure class="highlight"><pre><code class="language-css" data-lang="css"><span class="c">/* This will select all &lt;a&gt; elements with an href attribute equal to "https://example.com" and make their text color blue */</span>
<span class="nt">a</span><span class="o">[</span><span class="nt">href</span><span class="o">=</span><span class="s2">'https://example.com'</span><span class="o">]</span> <span class="p">{</span>
    <span class="nl">color</span><span class="p">:</span> <span class="no">blue</span><span class="p">;</span>
<span class="p">}</span>
    </code></pre></figure>

<p>It’s also possible to use attribute selectors to match elements with a specific attribute value prefix, suffix, or substring by using “^”, “$”, “*” respectively.</p>

<figure class="highlight"><pre><code class="language-css" data-lang="css"><span class="c">/* This will select all &lt;input&gt; elements with a name attribute that starts with "user" and make their border red */</span>
<span class="nt">input</span><span class="o">[</span><span class="nt">name</span><span class="o">^=</span><span class="s2">'user'</span><span class="o">]</span> <span class="p">{</span>
    <span class="nl">border</span><span class="p">:</span> <span class="m">1px</span> <span class="nb">solid</span> <span class="no">red</span><span class="p">;</span>
<span class="p">}</span>
    </code></pre></figure>

<p>It’s important to note that attribute selectors are more performance-intensive than the other types of selectors, so it’s best to use them sparingly and with caution.</p>

<p>Also, it’s good practice to use class and ID selectors to select elements, instead of element selectors because it makes the CSS more reusable and less specific, avoiding the risk of changing the visual of unintended elements.</p>

<h2 id="the-box-model">The Box Model</h2>

<p><img src="/code4projects/assets/img/box-model.webp" alt="CSS Box Model" width="450" height="308" class="responsive_img" /></p>

<p><em>Photo from <a href="https://www.geeksforgeeks.org/css-box-model/">https://www.geeksforgeeks.org/</a></em></p>

<p>The box model is a concept in CSS that describes the layout of an HTML element as a rectangular box. Each box has four main parts: the content, padding, border, and margin.</p>

<ul>
  <li>
    <p><strong>Content</strong>: This is the area where the element’s content is displayed, such as text or images. A Content element has a size expressed by the properties’ width and height. You can also use properties like min-width, min-heigth, max-width, and max-height to declare the minimum and maximum size.</p>
  </li>
  <li>
    <p><strong>Padding</strong>: This is the space between the content and the border. You can control the padding using the padding property and its related properties such as padding-top, padding-right, padding-bottom, padding-left.</p>
  </li>
  <li>
    <p><strong>Border</strong>: This is the line that surrounds the padding and content. You can control the border using the border property and its related properties such as border-width, border-color, border-style.</p>
  </li>
  <li>
    <p><strong>Margin</strong>: This is the space outside of the border. You can control the margin using the margin property and its related properties such as margin-top, margin-right, margin-bottom, margin-left.</p>
  </li>
</ul>

<p>When you set the width and height of an element, by default, it’s the width and height of the content area. However, you can include the padding, border, and margin by using the box-sizing property with the value “border-box”. The box-sizing property in CSS determines how the dimensions of an element are calculated. It specifies whether the width and height of an element should include the border and padding or not. There are two possible values for box-sizing:</p>

<ol>
  <li>
    <p><strong>content-box</strong> (the default value): the dimensions of an element are determined only by its content, excluding the border and padding.</p>
  </li>
  <li>
    <p><strong>border-box</strong>: the dimensions of an element include both the content and the border and padding.</p>
  </li>
</ol>

<p>For example, if you specify a width of 200 pixels for an element with a 10-pixel border and 20-pixel padding, the element will have a total width of 250 pixels with box-sizing: content-box and 200 pixels with box-sizing: border-box. The box-sizing property can be useful for managing layout issues when working with fixed dimensions, as it allows for a more precise prediction of how spaces will be distributed.</p>

<figure class="highlight"><pre><code class="language-css" data-lang="css"><span class="c">/* This will make the width and height properties include the padding and border */</span>
<span class="nc">.my-class</span> <span class="p">{</span>
    <span class="nl">box-sizing</span><span class="p">:</span> <span class="n">border-box</span><span class="p">;</span>
    <span class="nl">width</span><span class="p">:</span> <span class="m">200px</span><span class="p">;</span>
    <span class="nl">height</span><span class="p">:</span> <span class="m">100px</span><span class="p">;</span>
    <span class="nl">padding</span><span class="p">:</span> <span class="m">10px</span><span class="p">;</span>
    <span class="nl">border</span><span class="p">:</span> <span class="m">1px</span> <span class="nb">solid</span> <span class="m">#000</span><span class="p">;</span>
    <span class="nl">margin</span><span class="p">:</span> <span class="m">20px</span><span class="p">;</span>
<span class="p">}</span>
    </code></pre></figure>

<p>It’s important to understand the box model and how the different parts interact with each other because it affects the layout and spacing of elements on a web page. Additionally, the box-sizing property can be very useful to control the dimensions of an element in a more intuitive way.</p>

<h2 id="layout-in-css">Layout in CSS</h2>

<p><img src="/code4projects/assets/img/css-layout.webp" alt="CSS Layouts" width="450" height="541" class="responsive_img" /></p>

<p><em>Photo from <a href="https://www.reddit.com/r/webdev/comments/ubng4c/css_layout_algorithms_at_a_glance/">https://www.reddit.com</a></em></p>

<p>Layout in CSS refers to the positioning and arrangement of elements on a web page. There are several layout techniques that you can use to control the position of elements, such as:</p>

<ul>
  <li>
    <p><strong>display</strong> property: This property is used to specify the type of box an element should generate. The most common values are block, inline, and inline-block. Block elements take up the full width of their parent container, and create a new line after them. Inline elements only take up as much width as their content and do not create a new line after them. Inline-block elements are similar to inline elements, but they can have dimensions set with width and height properties, and they also create a new line after them.</p>
  </li>
  <li>
    <p><strong>position</strong> property: This property is used to specify the positioning of an element. The possible values are static, relative, absolute, and fixed. Static is the default value and means that the element will be positioned according to the normal flow of the document. Relative means that the element will be positioned relative to its normal position, using the left, right, top, and bottom properties. Absolute means that the element will be positioned relative to its nearest positioned ancestor, using the same properties. Fixed means that the element will be positioned relative to the viewport, and it will remain in the same position even when the page is scrolled.</p>
  </li>
  <li>
    <p><strong>float</strong> property: This property is used to make an element float to the left or right of its parent container. The possible values are left and right. When an element is floated, it will move to the left or right of its parent container, and other elements will flow around it.</p>
  </li>
  <li>
    <p><strong>flexbox</strong> and <strong>grid</strong> layout: These are advanced layout techniques that are used to create flexible and responsive layouts. Flexbox is used to create a layout in one dimension, either a row or a column, and grid is used to create a layout in two dimensions, rows, and columns. Both flexbox and a grid provide powerful layout capabilities that allow you to control the size, alignment, and positioning of elements on a web page in a more flexibly and efficiently way.</p>
  </li>
</ul>

<p>It’s important to keep in mind that the layout techniques should be used in combination to make the layout of a webpage more optimal and adaptable to different viewports. Additionally, it’s good practice to use semantic HTML and to style according to the meaning of the elements, as this will make the layout more robust and maintainable.</p>

<h2 id="typography-in-css">Typography in CSS</h2>

<p><img src="/code4projects/assets/img/css-typography.webp" alt="CSS Typography" width="450" height="338" class="responsive_img" /></p>

<p><em>Photo from <a href="https://wpdaddy.com/10-best-examples-of-css-for-amazing-typography-designs/">https://wpdaddy.com</a></em></p>

<p>Typography in CSS refers to the control of the font, size, and spacing of text on a web page. Here are some key concepts in typography:</p>

<ul>
  <li>
    <p><strong>font-family</strong>: This property is used to specify the font for an element. The value can be a specific font name, such as “Arial” or “Times New Roman”, or a generic font family, such as “serif” or “sans-serif”. It’s also possible to specify a list of fonts, in case the first one is not available on the client device, the next one will be used.</p>
  </li>
  <li>
    <p><strong>font-size</strong>: This property is used to specify the size of the text. The value can be specified in different units, such as pixels (px), points (pt), or ems (em).</p>
  </li>
  <li>
    <p><strong>font-weight</strong>: This property is used to specify the boldness of the text. The possible values are normal and bold. It’s also possible to use numeric values from 100 to 900, where 400 is the same as normal and 700 is the same as bold.</p>
  </li>
  <li>
    <p><strong>line-height</strong>: This property is used to specify the spacing between lines of text. The value can be specified in different units, such as pixels or ems.</p>
  </li>
  <li>
    <p><strong>letter-spacing</strong> and <strong>word-spacing</strong>: These properties are used to specify the spacing between letters and words, respectively. The value can be specified in different units, such as pixels or ems.</p>
  </li>
  <li>
    <p><strong>text-align</strong>: This property is used to specify the alignment of text within an element. The possible values are left, right, center, and justify.</p>
  </li>
  <li>
    <p><strong>text-transform</strong>: This property is used to specify the capitalization of text. The possible values are none, uppercase, lowercase, and capitalize.</p>
  </li>
  <li>
    <p><strong>text-decoration</strong>: This property is used to specify the decoration of text. The possible values are none, underline, overline, line-through, and blink (this one is not widely supported, use it with caution)</p>
  </li>
</ul>

<p>It’s important to keep in mind that typography is an important aspect of web design, and it can greatly impact the readability and aesthetics of a web page. Additionally, it’s good practice to use web-safe fonts and consider the accessibility guidelines when choosing the font family and size to ensure that the text is legible for users with visual impairments.</p>

<h2 id="color-and-background-in-css">Color and Background in CSS</h2>

<p><img src="/code4projects/assets/img/css-colors.webp" alt="CSS Colors" width="450" height="338" class="responsive_img" /></p>

<p><em>Photo from <a href="https://edu.gcfglobal.org/en/basic-css/colors-in-css/1/">https://edu.gcfglobal.org</a></em></p>

<p>Color and background in CSS refer to the control of the color and background of elements on a web page. Here are some key concepts in color and background:</p>

<ul>
  <li>
    <p><strong>color</strong>: This property is used to specify the text color of an element. The value can be specified in several ways, such as using color names (e.g. “red”), RGB values (e.g. “rgb(255, 0, 0)”), or hexadecimal values (e.g. “#ff0000”).</p>
  </li>
  <li>
    <p><strong>background-color</strong>: This property is used to specify the background color of an element. The value can be specified in the same ways as the color property.</p>
  </li>
  <li>
    <p><strong>background-image</strong>: This property is used to specify an image as the background of an element. The value is the URL of the image file.</p>
  </li>
  <li>
    <p><strong>background-repeat</strong>: This property is used to specify how the background image should be repeated. The possible values are repeat, repeat-x, repeat-y, and no-repeat.</p>
  </li>
  <li>
    <p><strong>background-position</strong>: This property is used to specify the position of the background image. The value can be specified in several ways, such as using keywords (e.g. “center”), length units (e.g. “10px 20px”), or percentages (e.g. “50% 50%”).</p>
  </li>
  <li>
    <p><strong>background-size</strong>: This property is used to specify the size of the background image. The value can be specified in several ways, such as using keywords (e.g. “cover”), length units (e.g. “200px 100px”), or percentages (e.g. “50% 50%”).</p>
  </li>
  <li>
    <p><strong>background-clip</strong> and <strong>background-origin</strong>: These properties are used to specify the area where the background image and color should be applied. The possible values of background-clip are border-box, padding-box, and content-box, and the possible values of background-origin are padding-box and content-box.</p>
  </li>
</ul>

<p>It’s important to keep in mind that color and background can greatly impact the aesthetics of a web page, and they should be used in a harmonious way to create a visually pleasing design. Also, it’s good practice to consider the accessibility guidelines when choosing color combinations and contrasts to ensure that the text is legible for users with visual impairments.</p>

<h2 id="transitions-and-animations-in-css">Transitions and animations in CSS</h2>

<p><img src="/code4projects/assets/img/css-animations.webp" alt="CSS Animations" width="450" height="338" class="responsive_img" /></p>

<p><em>Photo from <a href="https://edu.gcfglobal.org/en/basic-css/colors-in-css/1/">https://edu.gcfglobal.org</a></em></p>

<p>Transitions and animations in CSS are used to create smooth and fluid visual effects when elements change their state.</p>

<ul>
  <li><strong>transition</strong>: This property is used to specify the transition effect that should be applied to an element when its state changes. The property takes several values, such as the property that will be transitioned (e.g. “color”), the duration of the transition (e.g. “1s”), the timing function (e.g. “ease-in-out”), and the delay before the transition starts (e.g. “0.5s”).</li>
</ul>

<figure class="highlight"><pre><code class="language-css" data-lang="css"><span class="c">/* This will make the transition of the color property to last 1 second, with an ease-in-out timing function and a delay of 0.5s */</span>
<span class="nc">.my-class</span> <span class="p">{</span>
    <span class="nl">transition</span><span class="p">:</span> <span class="n">color</span> <span class="m">1s</span> <span class="n">ease-in-out</span> <span class="m">0.5s</span><span class="p">;</span>
<span class="p">}</span>
    </code></pre></figure>

<ul>
  <li><strong>animation</strong>: This property is used to specify a series of keyframes that define the animation effect. The property takes several values, such as the name of the animation (e.g. “my-animation”), the duration of the animation (e.g. “1s”), the timing function (e.g. “ease-in-out”), the number of times the animation should be played (e.g. “infinite”), and the delay before the animation starts (e.g. “0.5s”).</li>
</ul>

<figure class="highlight"><pre><code class="language-css" data-lang="css"><span class="c">/* This will make the animation to be named 'my-animation', last 1 second, with an ease-in-out timing function, to be played infinite times and a delay of 0.5s */</span>
<span class="nc">.my-class</span> <span class="p">{</span>
    <span class="nl">animation</span><span class="p">:</span> <span class="n">my-animation</span> <span class="m">1s</span> <span class="n">ease-in-out</span> <span class="n">infinite</span> <span class="m">0.5s</span><span class="p">;</span>
<span class="p">}</span>
    </code></pre></figure>

<p>The keyframes need to be defined separately, usually in a different CSS file or in a style tag. The keyframes rule is used to define the styles that the animation should have at different points in time.</p>

<figure class="highlight"><pre><code class="language-css" data-lang="css"><span class="k">@keyframes</span> <span class="n">my-animation</span> <span class="p">{</span>
    <span class="err">0</span><span class="o">%</span> <span class="p">{</span>
        <span class="nl">transform</span><span class="p">:</span> <span class="n">rotate</span><span class="p">(</span><span class="m">0deg</span><span class="p">);</span>
    <span class="p">}</span>
    <span class="err">100</span><span class="o">%</span> <span class="p">{</span>
        <span class="nl">transform</span><span class="p">:</span> <span class="n">rotate</span><span class="p">(</span><span class="m">360deg</span><span class="p">);</span>
    <span class="p">}</span>
<span class="p">}</span>
    </code></pre></figure>

<p>This animation will rotate the element from 0 degrees to 360 degrees in 1 second, with an ease-in-out timing function, and will repeat infinitely with a delay of 0.5s.</p>

<p>It’s important to keep in mind that transitions and animations can greatly enhance the user experience and make a web page more interactive. However, it’s good practice to use them in a subtlly and appropriatly way, to avoid overwhelming the user and to make sure that the animation does not interfere with the functionality of the page.</p>

<h2 id="responsive-design-in-css">Responsive design in CSS</h2>

<p><img src="/code4projects/assets/img/responsive-design.webp" alt="CSS Responsive Design" width="450" height="338" class="responsive_img" /></p>

<p><em>Photo from <a href="https://www.tutorialspoint.com/css/css_responsive.htm">https://www.tutorialspoint.com</a></em></p>

<p>Responsive design in CSS is used to create web pages that adapt to different screen sizes and resolutions. The main idea behind responsive design is to use flexible grids, flexible images, and media queries to create a layout that adjusts to the size of the viewport.</p>

<ul>
  <li><strong>media queries</strong>: This is a CSS technique that allows you to apply different styles based on the characteristics of the device and the viewport. Media queries use a set of CSS rules that are only applied when certain conditions are met, such as the width or height of the viewport, the resolution of the screen, or the type of device.</li>
</ul>

<figure class="highlight"><pre><code class="language-css" data-lang="css"><span class="c">/* This media query will apply the styles inside of it when the width of the viewport is less than 600px */</span>
<span class="k">@media</span> <span class="n">only</span> <span class="n">screen</span> <span class="n">and</span> <span class="p">(</span><span class="n">max-width</span><span class="p">:</span> <span class="m">600px</span><span class="p">)</span> <span class="p">{</span>
    <span class="c">/* styles go here */</span>
<span class="p">}</span>
    </code></pre></figure>

<ul>
  <li>
    <p><strong>flexbox</strong> and <strong>grid layout</strong>: These layout techniques are very useful for responsive design because they allow you to create flexible and adaptive layouts that adjust to the size of the viewport. Flexbox is used to create a layout in one dimension, either a row or a column, and a grid is used to create a layout in two dimensions, rows, and columns.</p>
  </li>
  <li>
    <p><strong>viewport</strong>: This is the area of the browser window where the web page is displayed. The viewport can be controlled using the viewport meta tag, this will allow you to set the width and initial scale of the viewport, and it will affect the layout of the page and the sizes of elements on the page.</p>
  </li>
</ul>

<figure class="highlight"><pre><code class="language-css" data-lang="css"><span class="o">&lt;</span><span class="nt">meta</span> <span class="nt">name</span><span class="o">=</span><span class="s1">"viewport"</span> <span class="nt">content</span><span class="o">=</span><span class="s1">"width=device-width, initial-scale=1"</span><span class="o">&gt;</span>
    </code></pre></figure>

<p>It’s important to keep in mind that responsive design is crucial for creating a good user experience in today’s web, where people access the internet from a wide range of devices and screen sizes. Additionally, it’s good practice to test the layout on different devices and screen sizes during the development process to ensure that the layout is consistent and adaptable across different platforms.</p>

<h2 id="how-to-include-css-in-a-web-page">How to Include CSS in a web page</h2>

<p><img src="/code4projects/assets/img/css-link-html.webp" alt="How to Include CSS in web page" width="450" height="197" class="responsive_img" /></p>

<p><em>Photo from <a href="https://www.hostinger.com/tutorials/website/how-to-link-a-stylesheet-css-file-to-your-html-file">https://www.hostinger.com</a></em></p>

<p>CSS can be included in a web page in three different ways: inline, internal, and external.</p>

<p>Inline CSS refers to writing CSS styles directly within an HTML element using the “style” attribute. This method is useful for applying styles to a specific element but is not recommended for larger stylesheets as it makes the HTML code cluttered. For example:</p>

<figure class="highlight"><pre><code class="language-css" data-lang="css"><span class="o">&lt;</span><span class="nt">p</span> <span class="nt">style</span><span class="o">=</span><span class="s1">"color: blue; font-size: 16px;"</span><span class="o">&gt;</span><span class="nt">This</span> <span class="nt">is</span> <span class="nt">a</span> <span class="nt">paragraph</span> <span class="nt">with</span> <span class="nt">inline</span> <span class="nt">CSS</span><span class="o">&lt;/</span><span class="nt">p</span><span class="o">&gt;</span>
    </code></pre></figure>

<p>Internal CSS refers to writing CSS styles within the head section of an HTML document, within a “style” tag. This method is better than inline CSS as it keeps the CSS styles separated from the HTML content but is still not recommended for larger stylesheets as it requires the same CSS code to be duplicated in each HTML file. For example:</p>

<figure class="highlight"><pre><code class="language-css" data-lang="css"><span class="o">&lt;</span><span class="nt">head</span><span class="o">&gt;</span>
    <span class="o">&lt;</span><span class="nt">style</span><span class="o">&gt;</span>
        <span class="nt">p</span> <span class="p">{</span>
            <span class="nl">color</span><span class="p">:</span> <span class="no">blue</span><span class="p">;</span>
            <span class="nl">font-size</span><span class="p">:</span> <span class="m">16px</span><span class="p">;</span>
        <span class="p">}</span>
    <span class="o">&lt;/</span><span class="nt">style</span><span class="o">&gt;</span>
<span class="o">&lt;/</span><span class="nt">head</span><span class="o">&gt;</span>
    </code></pre></figure>

<p>External CSS refers to writing CSS styles in a separate file with a .css extension and linking it to an HTML document. This method is the best way to implement CSS in a web page as it separates the styles from the HTML content and allows for a single stylesheet to be used across multiple pages. This reduces the amount of code duplication and makes it easier to maintain the styles. To include an external CSS file, the “link” tag is used within the head section of the HTML document. For example:</p>

<figure class="highlight"><pre><code class="language-css" data-lang="css"><span class="o">&lt;</span><span class="nt">head</span><span class="o">&gt;</span>
  <span class="o">&lt;</span><span class="nt">link</span> <span class="nt">rel</span><span class="o">=</span><span class="s1">"stylesheet"</span> <span class="nt">type</span><span class="o">=</span><span class="s1">"text/css"</span> <span class="nt">href</span><span class="o">=</span><span class="s1">"style.css"</span><span class="o">&gt;</span>
<span class="o">&lt;/</span><span class="nt">head</span><span class="o">&gt;</span>
    </code></pre></figure>

<p>In conclusion, while inline and internal CSS are quick and easy to implement, it is best practice to use external CSS in web development for the maintainability and organization of code.</p>

<h2 id="applying-css-principles-to-create-a-website-style">Applying CSS Principles to Create a Website Style</h2>

<p><img src="/code4projects/assets/img/css-programmer.webp" alt="Applying CSS Principles" width="450" height="268" class="responsive_img" /></p>

<p><em>Photo from <a href="https://fronty.com/how-long-does-it-take-to-learn-html-css/">https://fronty.com</a></em></p>

<p>In order to enhance the look and feel of the 5 pages created in the previous article <a href="https://www.code4projects.net/getting-started-with-html/">Getting Started with HTML</a>, we will now create a CSS stylesheet that will apply the principles discussed earlier to these pages.</p>

<p>First, it is necessary to include the following line of code in each of the 5 HTML pages:</p>

<figure class="highlight"><pre><code class="language-css" data-lang="css"><span class="o">&lt;</span><span class="nt">link</span> <span class="nt">rel</span><span class="o">=</span><span class="s1">"stylesheet"</span> <span class="nt">type</span><span class="o">=</span><span class="s1">"text/css"</span> <span class="nt">href</span><span class="o">=</span><span class="s1">"style.css"</span><span class="o">&gt;</span>
    </code></pre></figure>

<p>This line of code associates the HTML file with the new CSS file “style.css”.</p>

<p>Next, in the CSS file, we will define a basic layout for the page by applying the following code to the “body” element:</p>

<figure class="highlight"><pre><code class="language-css" data-lang="css"><span class="nt">body</span> <span class="p">{</span>
    <span class="nl">margin</span><span class="p">:</span> <span class="m">0</span> <span class="nb">auto</span><span class="p">;</span>
    <span class="nl">font-family</span><span class="p">:</span> <span class="s2">'Helvetica Neue'</span><span class="p">;</span>
    <span class="nl">font-size</span><span class="p">:</span> <span class="m">13px</span><span class="p">;</span>
    <span class="nl">max-width</span><span class="p">:</span> <span class="m">1080px</span><span class="p">;</span>
<span class="p">}</span>
    </code></pre></figure>

<p>This code tells the browser to set the top and bottom margins to 0, and to calculate the left and right margins automatically based on the page size and the size of the browser screen. The maximum width of the text is set to 1080px. Additionally, the code sets the default font size to 13px and the font type to ‘Helvetica Neue’.</p>

<p>For the headings (h1, h2, h3, h4, h5, h6), we set the following styles:</p>

<figure class="highlight"><pre><code class="language-css" data-lang="css"><span class="nt">h1</span><span class="o">,</span> <span class="nt">h2</span><span class="o">,</span> <span class="nt">h3</span><span class="o">,</span> <span class="nt">h4</span><span class="o">,</span> <span class="nt">h5</span><span class="o">,</span> <span class="nt">h6</span> <span class="p">{</span>
    <span class="nl">color</span><span class="p">:</span> <span class="m">#3b3b3b</span><span class="p">;</span>
    <span class="nl">text-align</span><span class="p">:</span> <span class="nb">left</span><span class="p">;</span>
<span class="p">}</span>

<span class="nt">h1</span> <span class="p">{</span>
    <span class="nl">font-size</span><span class="p">:</span> <span class="m">28px</span><span class="p">;</span>
<span class="p">}</span>

<span class="nt">h2</span> <span class="p">{</span>
   <span class="nl">font-size</span><span class="p">:</span> <span class="m">24px</span><span class="p">;</span>
<span class="p">}</span>

<span class="nt">h3</span> <span class="p">{</span>
    <span class="nl">font-size</span><span class="p">:</span> <span class="m">20px</span><span class="p">;</span>
<span class="p">}</span>

<span class="nt">h4</span> <span class="p">{</span>
    <span class="nl">font-size</span><span class="p">:</span> <span class="m">18px</span><span class="p">;</span>
<span class="p">}</span>

<span class="nt">h5</span> <span class="p">{</span>
    <span class="nl">font-size</span><span class="p">:</span> <span class="m">16px</span><span class="p">;</span>
<span class="p">}</span>

<span class="nt">h6</span> <span class="p">{</span>
    <span class="nl">font-size</span><span class="p">:</span> <span class="m">14px</span><span class="p">;</span>
<span class="p">}</span>
    </code></pre></figure>

<p>The heading font sizes range from 14px for h6 to 28px for h1, and all headings will have a color of #3b3b3b and be left-aligned.</p>

<p>For the paragraphs, we set the text alignment to justify:</p>

<figure class="highlight"><pre><code class="language-css" data-lang="css"><span class="nt">p</span> <span class="p">{</span>
    <span class="nl">text-align</span><span class="p">:</span> <span class="nb">justify</span>
<span class="p">}</span>
    </code></pre></figure>

<p>For ordered lists, we set the list style position to be inside the text:</p>

<figure class="highlight"><pre><code class="language-css" data-lang="css"><span class="nt">ol</span> <span class="p">{</span>
    <span class="nl">list-style-position</span><span class="p">:</span> <span class="nb">inside</span><span class="p">;</span>
<span class="p">}</span>
    </code></pre></figure>

<p>For blockquotes, we set the following styles:</p>

<figure class="highlight"><pre><code class="language-css" data-lang="css"><span class="nt">blockquote</span> <span class="p">{</span>
    <span class="nl">background</span><span class="p">:</span> <span class="m">#f5f7f9</span><span class="p">;</span>
    <span class="nl">border-bottom</span><span class="p">:</span> <span class="m">1px</span> <span class="nb">solid</span> <span class="m">#d8dee9</span><span class="p">;</span>
    <span class="nl">padding</span><span class="p">:</span> <span class="m">10px</span> <span class="m">10px</span> <span class="m">10px</span> <span class="m">10px</span><span class="p">;</span>
<span class="p">}</span>
    </code></pre></figure>

<p>The background color is set to #f5f7f9, the bottom border is set to 1px solid and colored #d8dee9, and there is a padding of 10px around the entire quote.</p>

<p>For images, we want them to alternate between appearing on the left and right of the text, with the text flowing around them. To achieve this, we will apply the following code:</p>

<figure class="highlight"><pre><code class="language-css" data-lang="css"><span class="nt">img</span><span class="nc">.img-left</span> <span class="p">{</span>
    <span class="nl">padding</span><span class="p">:</span> <span class="m">10px</span> <span class="m">10px</span> <span class="m">10px</span> <span class="m">0px</span><span class="p">;</span>
    <span class="nl">float</span><span class="p">:</span><span class="nb">left</span>
<span class="p">}</span>

<span class="nt">img</span><span class="nc">.img-right</span> <span class="p">{</span>
    <span class="nl">padding</span><span class="p">:</span> <span class="m">10px</span> <span class="m">0px</span> <span class="m">10px</span> <span class="m">10px</span><span class="p">;</span>
    <span class="nl">float</span><span class="p">:</span><span class="nb">right</span>
<span class="p">}</span>
    </code></pre></figure>

<p>As you can see, the images have a padding of 10px all around except on the side where they are aligned. The float attribute expresses how the text should flow.</p>

<p>The entire code can be found here:
https://github.com/sasadangelo/html-hero/tree/master/part-1/lesson-11</p>

<h2 id="conclusion">Conclusion</h2>

<p>In conclusion, CSS is an essential tool for web design, allowing for the creation of beautiful and functional websites. From understanding selectors and cascading to exploring the box model, typography, color and background, transitions and animations, and responsive design, this article has covered the fundamental concepts and techniques of CSS. By mastering CSS, you have the power to transform your web pages and bring your vision to life. Happy styling!</p>]]></content><author><name></name></author><category term="Programming" /><summary type="html"><![CDATA[In this article, we will continue to build our website with HTML and CSS. Reading it you will learn how to style your website.]]></summary><media:thumbnail xmlns:media="http://search.yahoo.com/mrss/" url="https://sasadangelo.github.io/code4projects/assets/img/css-logo.webp" /><media:content medium="image" url="https://sasadangelo.github.io/code4projects/assets/img/css-logo.webp" xmlns:media="http://search.yahoo.com/mrss/" /></entry><entry><title type="html">Exploring the Depths of YAML: Advanced Features and Functionality</title><link href="https://sasadangelo.github.io/code4projects/yaml-advanced-feature/" rel="alternate" type="text/html" title="Exploring the Depths of YAML: Advanced Features and Functionality" /><published>2023-02-07T00:00:00+00:00</published><updated>2023-02-07T00:00:00+00:00</updated><id>https://sasadangelo.github.io/code4projects/yaml-advanced-feature</id><content type="html" xml:base="https://sasadangelo.github.io/code4projects/yaml-advanced-feature/"><![CDATA[<p><img src="/code4projects/assets/img/yaml-advanced.webp" alt="YAML" width="356" height="200" class="responsive_img" /></p>

<h1 id="exploring-the-depths-of-yaml-advanced-features-and-functionality">Exploring the Depths of YAML: Advanced Features and Functionality</h1>

<p><em>Posted on <strong>07 Feb 2023</strong></em></p>

<h2 id="introduction">Introduction</h2>

<p>In a <a href="/code4projects/getting-started-with-yaml/">previous article</a>, we covered the basics of YAML, a popular human-readable data serialization format that is widely used in various applications and technologies. However, there is much more to YAML than just the basics. In this article, we will take a deeper dive into advanced YAML concepts. This comprehensive guide will cover tips, techniques, and best practices for fully leveraging the power and functionality of YAML, making it a valuable resource for both new and experienced users alike.</p>

<h2 id="multi-line-strings-in-yaml-representing-large-blocks-of-text-or-data">Multi-Line Strings in YAML: Representing Large Blocks of Text or Data</h2>

<p>Strings are an important data type in YAML and were discussed briefly in the <a href="/code4projects/getting-started-with-yaml/">previous article</a>. As a reminder, strings are sequences of characters that don’t necessarily have to be enclosed in quotes or single quotes. However, if you use special characters such as "{, }, [, ], ,, &amp;, :, *, #, ?, |, -, &lt;, &gt;, =, !, %, @, " you will need to enclose the string in quotes.</p>

<p>String values can span more than one line. YAML supports three types of multi lines string:</p>

<ul>
  <li><strong>Folding Strings</strong></li>
  <li><strong>Block Strings</strong></li>
  <li><strong>Chomp characters</strong></li>
</ul>

<p>Let’s explore them in detail.</p>

<h3 id="folding-strings">Folding Strings</h3>

<p>With the fold (greater than) character, you can specify a string in a block. But it’s interpreted without the trailing newlines. New lines are converted into spaces. We can use the Fold style to remove new lines within a string.</p>

<figure class="highlight"><pre><code class="language-yaml" data-lang="yaml"><span class="na">text</span><span class="pi">:</span> <span class="pi">&gt;</span>
  <span class="s">this text will be considered on a</span>
  <span class="s">single line</span>


  <span class="no">  </span></code></pre></figure>

<p>The above YAML snippet is interpreted as below. Notice how only a single new line remains at the end of the string.</p>

<figure class="highlight"><pre><code class="language-yaml" data-lang="yaml"><span class="na">text</span><span class="pi">:</span> <span class="s2">"</span><span class="s">this</span><span class="nv"> </span><span class="s">text</span><span class="nv"> </span><span class="s">will</span><span class="nv"> </span><span class="s">be</span><span class="nv"> </span><span class="s">considered</span><span class="nv"> </span><span class="s">on</span><span class="nv"> </span><span class="s">a</span><span class="nv"> </span><span class="s">single</span><span class="nv"> </span><span class="s">line</span><span class="se">\n</span><span class="s">"</span>
    </code></pre></figure>

<h3 id="block-strings">Block strings</h3>

<p>The block (pipe) character has a similar function, but YAML interprets the field exactly as is.</p>

<figure class="highlight"><pre><code class="language-yaml" data-lang="yaml"><span class="na">text</span><span class="pi">:</span> <span class="pi">|</span>
  <span class="s">this text will be considered </span>
  <span class="s">on multiple</span>
  <span class="s">lines</span>


  <span class="no">  </span></code></pre></figure>

<p>This is interpreted with the new lines (\n) in the middle preserved and only one new line at the end.</p>

<figure class="highlight"><pre><code class="language-yaml" data-lang="yaml"><span class="na">text</span><span class="pi">:</span> <span class="s2">"</span><span class="s">this</span><span class="nv"> </span><span class="s">text</span><span class="nv"> </span><span class="s">will</span><span class="nv"> </span><span class="s">be</span><span class="nv"> </span><span class="s">considered</span><span class="se">\n</span><span class="s">on</span><span class="nv"> </span><span class="s">multiple</span><span class="se">\n</span><span class="s">lines</span><span class="se">\n</span><span class="s">"</span>
    </code></pre></figure>

<h3 id="chomp-characters">Chomp characters</h3>

<p>The chomp characters define how YAML will interpret trailing newlines at the end of your block and can be one of the following: Clip, Strip and Keep modes.</p>

<p><strong>Clip mode</strong>: this is the default behavior, the one used when you don’t specify any specific chomp character in your header. It is the Fold or Block style above.</p>

<p><strong>Strip mode</strong>: indicated by a - in the block header. When used with the Fold character (&gt;) it will behave like in the Fold style but remove the final new line.</p>

<figure class="highlight"><pre><code class="language-yaml" data-lang="yaml"><span class="na">text</span><span class="pi">:</span> 
  <span class="na">strip</span><span class="pi">:</span> <span class="pi">&gt;-</span>
    <span class="s">this text will be considered </span>
    <span class="s">on a single line </span>
    <span class="s">with no new line</span>
    </code></pre></figure>

<p>The above YAML snippet is interpreted as below. Notice the new line is not present at the end of the string like  in the Fold style. Notice the removal of the trailing new line.</p>

<figure class="highlight"><pre><code class="language-yaml" data-lang="yaml"><span class="na">text</span><span class="pi">:</span> <span class="s2">"</span><span class="s">this</span><span class="nv"> </span><span class="s">text</span><span class="nv"> </span><span class="s">will</span><span class="nv"> </span><span class="s">be</span><span class="nv"> </span><span class="s">considered</span><span class="nv"> </span><span class="s">on</span><span class="nv"> </span><span class="s">a</span><span class="nv"> </span><span class="s">single</span><span class="nv"> </span><span class="s">line</span><span class="nv"> </span><span class="s">with</span><span class="nv"> </span><span class="s">no</span><span class="nv"> </span><span class="s">new</span><span class="nv"> </span><span class="s">line"</span>
    </code></pre></figure>

<table>
  <tbody>
    <tr>
      <td>In the same way, if you want to have a string in Block mode without the trailing newlines you can use the chomp character “</td>
      <td>-“.</td>
    </tr>
  </tbody>
</table>

<p><strong>Keep mode</strong>: indicated by a + in the block header, this will keep both the final new line and any potential trailing empty lines too.</p>

<figure class="highlight"><pre><code class="language-yaml" data-lang="yaml"><span class="na">text</span><span class="pi">:</span> 
  <span class="na">keep</span><span class="pi">:</span> <span class="pi">&gt;+</span>
    <span class="s">this text will be considered </span>
    <span class="s">on a single line </span>
    <span class="s">with a new line at the end.</span>


    </code></pre></figure>

<p>The text is interpreted in this way:</p>

<figure class="highlight"><pre><code class="language-yaml" data-lang="yaml"><span class="na">text</span><span class="pi">:</span> <span class="s2">"</span><span class="s">this</span><span class="nv"> </span><span class="s">text</span><span class="nv"> </span><span class="s">will</span><span class="nv"> </span><span class="s">be</span><span class="nv"> </span><span class="s">considered</span><span class="nv"> </span><span class="s">on</span><span class="se">\n</span><span class="s">multiple</span><span class="nv"> </span><span class="s">lines</span><span class="se">\n</span><span class="s">with</span><span class="nv"> </span><span class="s">a</span><span class="nv"> </span><span class="s">new</span><span class="nv"> </span><span class="s">line</span><span class="nv"> </span><span class="s">and</span><span class="nv"> </span><span class="s">trailing</span><span class="nv"> </span><span class="s">newlines</span><span class="se">\n\n\n</span><span class="s">"</span>
    </code></pre></figure>

<p>A good way to check how the YAML parser interprets your string is to use this <a href="https://www.json2yaml.com/">online tool</a>. Insert your YAML file on the right and see its equivalent in JSON which will show you the strings with new lines.</p>

<h2 id="implicit-vs-explicit-typing-in-yaml-understanding-how-to-use-them">Implicit vs. Explicit Typing in YAML: Understanding How to Use Them</h2>

<p>YAML supports both implicit and explicit typing of values, allowing you to specify the type of data you are working with. Implicit typing, also known as automatic typing, uses the structure of the data to determine the type, while explicit typing, also known as tagged typing, uses tags to specify the type of data.</p>

<p>In implicit typing, the type of a value is determined by the way it is represented in the YAML document. For example, a string that starts with a digit is interpreted as a number, and a string that is enclosed in quotes is interpreted as a string.</p>

<p>In explicit typing, you use tags to specify the type of data you are working with. Tags are added to the value by prefixing it with !, followed by the tag name. For example, the tag !str specifies that the value is a string, while the tag !int specifies that the value is an integer.</p>

<p>Here’s an example of implicit typing in YAML:</p>

<figure class="highlight"><pre><code class="language-yaml" data-lang="yaml"><span class="na">implicit_typing</span><span class="pi">:</span>
  <span class="pi">-</span> <span class="m">123</span>                     <span class="c1"># This is an integer</span>
  <span class="pi">-</span> <span class="m">456.78</span>                  <span class="c1"># This is a float</span>
  <span class="pi">-</span> <span class="no">true</span>                    <span class="c1"># This is a boolean</span>
  <span class="pi">-</span> <span class="s">This is a string</span>        <span class="c1"># This is a string</span>
  <span class="pi">-</span> <span class="no">null</span>                    <span class="c1"># This is null</span>
    </code></pre></figure>

<p>And here’s an example of explicit typing in YAML:</p>

<figure class="highlight"><pre><code class="language-yaml" data-lang="yaml"><span class="na">explicit_typing</span><span class="pi">:</span>
  <span class="pi">-</span> <span class="kt">!int</span> <span class="m">123</span>                <span class="c1"># This is an integer</span>
  <span class="pi">-</span> <span class="kt">!float</span> <span class="m">456.78</span>           <span class="c1"># This is an integer</span>
  <span class="pi">-</span> <span class="kt">!bool</span> <span class="no">true</span>              <span class="c1"># This is a boolean</span>
  <span class="pi">-</span> <span class="kt">!str</span> <span class="s">This is a string</span>   <span class="c1"># This is a string</span>
  <span class="pi">-</span> <span class="kt">!null</span> <span class="no">null</span>              <span class="c1"># This is null</span>
    </code></pre></figure>

<p>In general, it’s a good idea to use explicit typing in YAML whenever possible, as it makes the data more self-describing and can help to prevent unintended type conversions.</p>

<p>In YAML there are two types of type tags: specific tags and non-specific tags. A specific tag, indicated by an exclamation mark (!), specifies the exact type of a value. For example, the tag !int indicates that the value is an integer, and the tag !float indicates that the value is a floating-point number.</p>

<p>On the other hand, non-specific tags, indicated by a double exclamation mark (!!), provide a more general indication of the type of a value, without specifying the exact type. For example, the tag !!int indicates that the value is some kind of integer, without specifying whether it’s a 32-bit integer, a 64-bit integer, or any other type of integer. The exact type of integer is then determined by the parser based on the data itself.</p>

<p>The use of specific tags is generally recommended, as it allows you to explicitly specify the type of a value. This helps to prevent potential type mismatches and makes it easier to understand the structure of the data.</p>

<h2 id="representing-time-and-dates-in-yaml-understanding-timestamp-formats">Representing Time and Dates in YAML: Understanding Timestamp Formats</h2>

<p>Timestamps in YAML are used to represent dates and times. There are several ways to represent timestamps in YAML:</p>

<ul>
  <li>canonical: 2022-02-05T10:30:00.1Z</li>
  <li>ISO 8601: 2022-02-05t10:30:00.10-05:00</li>
  <li>space sepaarated: 2022-02-05 10:30:00.10 -5</li>
  <li>no time zone (Z): 2022-02-05 10:30:00.10</li>
  <li>date (00:00:00Z): 2022-02-05</li>
  <li>human-friendly: February 5, 2023 12:00 PM</li>
</ul>

<p>ISO 8601 timestamps are the most common and widely used format for representing timestamps in YAML. They are written in the format YYYY-MM-DDTHH:mm:ss.sssZ, where YYYY represents the year, MM represents the month, DD represents the day, HH represents the hour, mm represents the minute, ss represents the second, sss represents the fractional part of the second, and Z represents the time zone offset. For example, the ISO 8601 timestamp 2023-02-04T12:00:00.000Z represents the time 12:00:00 PM on February 4, 2023 in the UTC zone.</p>

<p>Human-readable timestamp are a more human-friendly representation of timestamps, and can be written in a variety of formats. For example, the human-readable timestamp February 4, 2023 12:00 PM is equivalent to the ISO 8601 timestamp 2023-02-04T12:00:00.000Z.</p>

<p>YAML supports explicit type declaration for date and timestamps, here are some examples:</p>

<figure class="highlight"><pre><code class="language-yaml" data-lang="yaml"><span class="na">birthday</span><span class="pi">:</span> <span class="kt">!date</span> <span class="s">2020-10-11</span>
<span class="na">timeoftheday</span><span class="pi">:</span> <span class="kt">!timestamp</span> <span class="s1">'</span><span class="s">2023-02-07T08:30:00Z'</span>
    </code></pre></figure>

<h2 id="anchors-and-aliases-in-yaml-reusing-complex-data-structures">Anchors and Aliases in YAML: Reusing Complex Data Structures</h2>

<p>YAML allows for the creation of reusable elements through the use of anchors and aliases. An anchor is a label attached to a specific piece of data, and an alias is a reference to that anchor. This allows for the creation of complex data structures with repetitive elements. Anchors and Aliases can be considered if we have repeated sections inside our YAML file. They can reduce effort and make updating in bulk easier. The Aliases essentially act as a “see above” command.</p>

<p>Here’s an example of using Anchors and Aliases in YAML:</p>

<figure class="highlight"><pre><code class="language-yaml" data-lang="yaml"><span class="na">person</span><span class="pi">:</span> <span class="nl">&amp;person</span>
  <span class="na">name</span><span class="pi">:</span> <span class="s">John Doe</span>
  <span class="na">age</span><span class="pi">:</span> <span class="m">30</span>

<span class="na">other_person</span><span class="pi">:</span> <span class="nv">*person</span>
    </code></pre></figure>

<p>In this example, an anchor &amp;person is attached to a dictionary of key-value pairs representing a person. An alias *person is then created to reference this data. The result is two variables, person and other_person, that both refer to the same dictionary of data.</p>

<p>Anchors and aliases are a powerful feature in YAML, allowing for the reuse of complex data structures and reducing the need for duplication in YAML files. They can be especially useful for creating templates or for sharing common data between multiple parts of an application.</p>

<p>Anchors and Aliases cannot contain the “{, }, [. ], ,” characters.</p>

<h2 id="overriding-yaml-values-with-anchor-and-aliases">Overriding YAML Values with Anchor and Aliases</h2>

<p>YAML provides a way to reuse values through anchors and aliases and to override values using the “«:” operator. This allows you to define common values in a single place, and then use or override them in different parts of your configuration.</p>

<p>Here’s an example to show how you can use anchors and aliases to override values in YAML:</p>

<figure class="highlight"><pre><code class="language-yaml" data-lang="yaml"><span class="c1"># common values</span>
<span class="na">defaults</span><span class="pi">:</span> <span class="nl">&amp;defaults</span>
  <span class="na">color</span><span class="pi">:</span> <span class="s">red</span>
  <span class="na">size</span><span class="pi">:</span> <span class="s">medium</span>

<span class="c1"># first configuration</span>
<span class="na">first</span><span class="pi">:</span>
  <span class="na">&lt;&lt;</span><span class="pi">:</span> <span class="nv">*defaults</span>
  <span class="na">color</span><span class="pi">:</span> <span class="s">blue</span>

<span class="c1"># second configuration</span>
<span class="na">second</span><span class="pi">:</span>
  <span class="na">&lt;&lt;</span><span class="pi">:</span> <span class="nv">*defaults</span>
  <span class="na">size</span><span class="pi">:</span> <span class="s">large</span>
    </code></pre></figure>

<p>In this example, the defaults section defines common values for color and size. The first and second sections then use these values with the “«:” operator and the *defaults alias. The first section overrides the value of the color key, while the second section overrides the value of the size key. The final result would be:</p>

<figure class="highlight"><pre><code class="language-yaml" data-lang="yaml"><span class="na">first</span><span class="pi">:</span>
  <span class="na">color</span><span class="pi">:</span> <span class="s">blue</span>
  <span class="na">size</span><span class="pi">:</span> <span class="s">medium</span>

<span class="na">second</span><span class="pi">:</span>
  <span class="na">color</span><span class="pi">:</span> <span class="s">red</span>
  <span class="na">size</span><span class="pi">:</span> <span class="s">large</span>
    </code></pre></figure>

<p>Overriding is also called Merging.</p>

<h2 id="multi-document-support-in-yaml">Multi-Document Support in YAML</h2>

<p>YAML supports the concept of multi-document, which allows you to store multiple separate documents in a single YAML file. Each document is separated by “—” on a line by itself and is treated as a separate entity. Optionally, you can use three dots to indicate the end of a YAML document.</p>

<p>Here’s an example to show how you can use multi-document support in YAML:</p>

<figure class="highlight"><pre><code class="language-yaml" data-lang="yaml"><span class="nn">---</span>
<span class="c1"># Document 1</span>
<span class="na">name</span><span class="pi">:</span> <span class="s">John Doe</span>
<span class="na">age</span><span class="pi">:</span> <span class="m">30</span>
<span class="nn">...</span>

<span class="nn">---</span>
<span class="c1"># Document 2</span>
<span class="na">name</span><span class="pi">:</span> <span class="s">Jane Doe</span>
<span class="na">age</span><span class="pi">:</span> <span class="m">25</span>
<span class="nn">...</span>
    </code></pre></figure>

<p>Some YAML processors require the document start operator. For example, Java’s Jackson will not process a YAML document without the start operator, and Python’s PyYAML will.</p>

<h2 id="complex-keys-in-yaml">Complex Keys in YAML</h2>

<p>In YAML, you can also use multiline complex keys, which are keys that span multiple lines and are denoted by a ? followed by a space. This type of key is useful when you want to create long and descriptive keys, or when you need to represent nested data structures.</p>

<p>Here’s an example of a multiline complex key in YAML:</p>

<figure class="highlight"><pre><code class="language-yaml" data-lang="yaml"><span class="c1"># Multiline complex key example</span>
<span class="pi">?</span>
  <span class="s">This is a complex</span>
  <span class="s">key with multiple</span>
  <span class="s">lines</span>
<span class="pi">:</span> <span class="s">value</span>
    </code></pre></figure>

<p>YAML interprets the key as a single line string as follows:</p>

<figure class="highlight"><pre><code class="language-yaml" data-lang="yaml"><span class="c1"># Multiline complex key example</span>
<span class="na">This is a complex key with multiple lines</span><span class="pi">:</span> <span class="s">value</span>
    </code></pre></figure>

<p>This feature is useful when you want to use more descriptive keys.</p>

<h2 id="conclusion">Conclusion</h2>

<p>In conclusion, YAML is a highly flexible and readable data serialization format that supports a wide range of advanced features and functionality. From custom data types and complex keys to multi-document support and inheritance with anchors and aliases, YAML provides developers with a powerful tool for representing and exchanging data in a meaningful and concise way. Whether you are working with configuration files, data structures, or even cloud templates, YAML is a versatile and flexible solution that is well worth exploring. By taking the time to learn about its advanced features and functionality, you can leverage the full power of YAML to meet your unique data needs and requirements.</p>

<p>On the Internet there are a lot of tutorials you can use to get more details on YAML files, here few of my favorites:</p>

<ul>
  <li><a href="https://levelup.gitconnected.com/yaml-tutorial-everything-you-need-to-know-in-5-mins-14f333a23ed1">YAML Tutorial: Everything You Need to Know in 5 Mins</a></li>
  <li><a href="https://spacelift.io/blog/yaml">YAML Tutorial: A Complete Language Guide with Examples</a></li>
  <li><a href="https://medium.com/globant/yaml-basic-to-advance-36a3046e3bf6">YAML Basic to Advance</a></li>
</ul>]]></content><author><name></name></author><category term="Programming" /><summary type="html"><![CDATA[Dive deeper into YAML with this comprehensive guide to advanced concepts. Learn tips and techniques to fully unlock its power and functionality.]]></summary><media:thumbnail xmlns:media="http://search.yahoo.com/mrss/" url="https://sasadangelo.github.io/code4projects/assets/img/yaml-advanced.webp" /><media:content medium="image" url="https://sasadangelo.github.io/code4projects/assets/img/yaml-advanced.webp" xmlns:media="http://search.yahoo.com/mrss/" /></entry><entry><title type="html">Getting Started with YAML: An Introduction to the Basics</title><link href="https://sasadangelo.github.io/code4projects/getting-started-with-yaml/" rel="alternate" type="text/html" title="Getting Started with YAML: An Introduction to the Basics" /><published>2023-02-02T00:00:00+00:00</published><updated>2023-02-02T00:00:00+00:00</updated><id>https://sasadangelo.github.io/code4projects/getting-started-with-yaml</id><content type="html" xml:base="https://sasadangelo.github.io/code4projects/getting-started-with-yaml/"><![CDATA[<p><img src="/code4projects/assets/img/yaml-logo.webp" alt="YAML" width="200" height="200" class="responsive_img" /></p>

<h1 id="getting-started-with-yaml-an-introduction-to-the-basics">Getting Started with YAML: An Introduction to the Basics</h1>

<p><em>Posted on <strong>02 Feb 2023</strong></em></p>

<h2 id="introduction">Introduction</h2>

<p>This article explores the fundamental concepts of YAML (YAML Ain’t Markup Language), a popular data serialization format. The topics covered include comments, on what YAML is, the difference between YAML, JSON, and XML, and the main data structures including scalars, mappings, sequences, and objects. The aim is to provide a comprehensive introduction to the basics of YAML.</p>

<h2 id="understanding-yaml-what-it-is-and-why-it-matters">Understanding YAML: What it is and Why it Matters</h2>

<p><img src="/code4projects/assets/img/what-is-yaml.webp" alt="What is YAML" width="450" height="253" class="responsive_img" /></p>

<p><em>Photo from <a href="https://www.youtube.com/watch?v=8zOkCl3kgcg">Youtube</a></em></p>

<p>YAML is a lightweight, human-readable data-serialization language. It is primarily designed to make the format easy to read while including advanced features. Its simple and clean syntax, human-friendly design, and support for complex data structures make it a versatile choice for many use cases.</p>

<p>YAML is similar to XML and JSON but it is less verbose, more readable, and easy to use. Many products like Ansible, Kubernetes, Puppets, Jenkins, Docker, AWS, and others use YAML for managing configuration files because it is much easier to read and less verbose than JSON and XML.</p>

<p>YAML files have “.yaml” or “.yml” extensions and you can edit them in whatever text editor.</p>

<p>YAML is similar to JSON inline style, from this point of view it can be considered a superset of JSON. For example, JSOn doesn’t support comments while YAML does.</p>

<p>In addition, YAML is very easy and simple to represent complex objects and data structures. Due to this, it is heavily used in configuration management.</p>

<p>You can find more information about YAML on its <a href="https://yaml.org/">official website</a>.</p>

<h2 id="comparing-yaml-to-xml-and-json-key-differences-and-use-cases">Comparing YAML to XML and JSON: Key Differences and Use Cases</h2>

<p><img src="/code4projects/assets/img/yaml-json-xml.webp" alt="YAML vs JSON vs XML" width="450" height="238" class="responsive_img" /></p>

<p><em>Photo from <a href="https://medium.com/geekculture/yaml-vs-json-vs-xml-in-go-bf4ebd1066f2">https://medium.com/</a></em></p>

<p>XML was introduced in 1996 as a format “… for storing, transmitting, and reconstructing arbitrary data” according to Wikipedia. It is an extensible markup language that, through a Document Type Definition (DTD), allows the definition of documents that match the different grammar. For many years it has been used in Java and other languages as a data serialization or transmission (SOAP) format. However, it is quite a verbose language because it requires data to be enclosed between two tags and it is not easy to read for a human. Today it is still used as a configuration tool in many languages ​​and operating systems such as Java and Android.</p>

<p>JSON (Javascript Object Notation) is a format created for data transmission between servers and browsers, especially when using the Javascript language. Precisely because it is a format that was created for data transmission, its goal is to be as least verbose as possible and clear in representing the data. For this reason, the format does not support comments. This makes JSON less suitable for representing configuration files and management even though it is used for that purpose in many contexts.</p>

<p>YAML in some ways is a superset of JSON, which means all the features in JSON can be found in YAML. The fact that the format is human-readable and easy to use makes it represent configuration files and management.</p>

<p><img src="/code4projects/assets/img/xml-vs-json-vs-yaml.webp" alt="Comparison Table" width="450" height="225" class="responsive_img" /></p>

<p><em>Photo from YAML Zero to Master Udemy Course</em></p>

<p>The following figure shows an example of the same data structure represented with XML, JSON, and YAML.</p>

<p><img src="/code4projects/assets/img/xml-vs-json-vs-yaml-code.webp" alt="XML vs JSON vs YAML code" width="450" height="225" class="responsive_img" /></p>

<p>Online there are <a href="https://www.json2yaml.com/">a lot of tools</a> that help you to convert one format into another.</p>

<h2 id="yaml-understanding-basic-concepts">YAML: Understanding Basic Concepts</h2>

<p><img src="/code4projects/assets/img/yaml-basic-concepts.webp" alt="YAML Basic Concepts" width="450" height="275" class="responsive_img" /></p>

<p>A YAML format to represent data uses the following data type:</p>

<ul>
  <li><strong>Scalars</strong>: The content is a primitive type like strings, numbers, boolean, and so on.</li>
  <li><strong>Arrays/Lists</strong> (YAML calls them sequences):
The content of a sequence node is an ordered series of zero or more nodes. In particular, a sequence may contain the same node more than once. It could even contain itself.</li>
  <li><strong>Dictionaries</strong> (YAML calls them mappings): the content of a mapping node is an unordered set of key/value node pairs, with the restriction that each of the keys is unique. YAML places no further restrictions on the nodes.</li>
</ul>

<p>In addition to this, YAML supports comments.</p>

<h2 id="representing-scalars-data-in-yaml-key-value-pairs">Representing Scalars Data in YAML: Key-Value Pairs</h2>

<p>YAML files have a series of key-value pairs, which are used to store data. The keys and values are separated by colons and can represent primitive data types such as strings, numbers, and booleans. For example, the following YAML file represents a person’s name and age:</p>

<figure class="highlight"><pre><code class="language-yaml" data-lang="yaml"><span class="na">firstname</span><span class="pi">:</span> <span class="s2">"</span><span class="s">John"</span>
<span class="na">lastname</span><span class="pi">:</span> <span class="s">Doe</span>
<span class="na">middlename</span><span class="pi">:</span> <span class="s1">'</span><span class="s">Sir'</span>
<span class="na">age</span><span class="pi">:</span> <span class="m">30</span>
<span class="na">height</span><span class="pi">:</span> <span class="m">176</span>
<span class="na">weight</span><span class="pi">:</span> <span class="m">75.2</span>
<span class="na">male</span><span class="pi">:</span> <span class="no">true</span>
<span class="na">positive-infinity</span><span class="pi">:</span> <span class="s">.inf</span>
<span class="na">negative-infinity</span><span class="pi">:</span> <span class="s">-.inf</span>
<span class="na">invalid-number</span><span class="pi">:</span> <span class="s">NaN</span>
<span class="na">null-value</span><span class="pi">:</span> <span class="no">null</span>
<span class="na">null-value</span><span class="pi">:</span> <span class="s">~</span>
<span class="na">null-value</span><span class="pi">:</span>
    </code></pre></figure>

<p>In this example, the name is the key, and “John” is the associated value. The name attribute is a string. YAML strings are Unicode. In most situations, you don’t have to specify them in quotes. But if we want escape sequences handled, we need to use double or single quotes. Similarly, age is the key and 30 is an integer value. YAML supports also floating points.</p>

<p>Boolean values are “true” and “false”, but you can use also “yes” and “no” or “on” and “off” because internally YAML converts them into “true” and “false”.</p>

<p>There are special scalar values in YAML you can use like positive and negative infinity numbers, null values, and invalid numbers.</p>

<h2 id="comments">Comments</h2>

<p>You can comment contents of a YAML file using the # character as shown below.</p>

<figure class="highlight"><pre><code class="language-yaml" data-lang="yaml"><span class="c1"># This is a comment on the first.</span>
<span class="c1"># And this is a commented second line.</span>
    </code></pre></figure>

<h2 id="organizing-data-with-sequences-a-guide-to-structuring-arrays">Organizing Data with Sequences: A Guide to Structuring Arrays</h2>

<p>YAML also supports lists and arrays, which can be represented as follows:</p>

<figure class="highlight"><pre><code class="language-yaml" data-lang="yaml"><span class="na">fruits</span><span class="pi">:</span>
  <span class="pi">-</span> <span class="s">apples</span>
  <span class="pi">-</span> <span class="s">bananas</span>
  <span class="pi">-</span> <span class="s">oranges</span>
    </code></pre></figure>

<p>In this example, the key “fruits” is associated with a list of three items: apples, bananas, and oranges. This simple syntax makes YAML easy to read and write for both humans and machines.</p>

<p>There are two styles to represent sequences: block and flow. The following example shows both:</p>

<figure class="highlight"><pre><code class="language-yaml" data-lang="yaml"><span class="c1"># Sequences in Block Style</span>
<span class="na">legumes</span><span class="pi">:</span>
<span class="pi">-</span> <span class="s">peas</span>
<span class="pi">-</span> <span class="s">beans</span>
<span class="pi">-</span> <span class="s">lentils</span>
<span class="na">fruits</span><span class="pi">:</span>
  <span class="pi">-</span> <span class="s">apples</span>
  <span class="pi">-</span> <span class="s">bananas</span>
  <span class="pi">-</span> <span class="s">oranges</span>
<span class="na">fruits</span><span class="pi">:</span>
  <span class="pi">-</span> <span class="s">apples</span>
  <span class="pi">-</span> <span class="s">bananas</span>
  <span class="pi">-</span> <span class="s">oranges</span>
<span class="c1"># Sequences in Flow Style</span>
<span class="na">places</span><span class="pi">:</span> <span class="pi">[</span><span class="nv">sea</span><span class="pi">,</span> <span class="nv">​​mountain</span><span class="pi">,</span> <span class="s2">"</span><span class="s">hill"</span><span class="pi">]</span>
    </code></pre></figure>

<p>It is possible to nest sequences in the element of a sequence as follows. In the example, a company could sell three types of products: Cars, Motorbikes, and Bikes. Then in the Car category, it can sell Jeep, Ferrari, and Lamborghini.</p>

<figure class="highlight"><pre><code class="language-yaml" data-lang="yaml"><span class="c1"># Sequences in Block Style</span>
<span class="na">products</span><span class="pi">:</span>
<span class="pi">-</span> <span class="na">Cars</span><span class="pi">:</span>
  <span class="pi">-</span> <span class="s">Jeep</span>
  <span class="pi">-</span> <span class="s">Ferrari</span>
  <span class="pi">-</span> <span class="s">Lamborghini</span>
<span class="pi">-</span> <span class="na">Motorbikes</span><span class="pi">:</span>
  <span class="pi">-</span> <span class="s2">"</span><span class="s">Harley-Davidson"</span>
  <span class="pi">-</span> <span class="s">Honda</span>
  <span class="pi">-</span> <span class="s">Ducati</span>
<span class="pi">-</span> <span class="na">Bikes</span><span class="pi">:</span>
  <span class="pi">-</span> <span class="s">Mountain Bike</span>
  <span class="pi">-</span> <span class="s2">"</span><span class="s">Trek</span><span class="nv"> </span><span class="s">bike"</span>
    </code></pre></figure>

<h2 id="dictionaries-in-yaml-storing-key-value-pairs-in-a-collection">Dictionaries in YAML: Storing Key-Value Pairs in a Collection</h2>

<p>In YAML, dictionaries are a collection of key-value pairs that are used to store data. YAML calls dictionaries as “mappings” and they are useful to represents complex data structure like Person, Vehicle, Car, etc. An object in YAML is represented using nested key-value pairs, where each key-value pair represents an attribute of the object. For example, consider the following YAML representation of a person object with name and address attributes:</p>

<figure class="highlight"><pre><code class="language-yaml" data-lang="yaml"><span class="na">person</span><span class="pi">:</span>
  <span class="na">name</span><span class="pi">:</span> <span class="s">John Doe</span>
  <span class="na">address</span><span class="pi">:</span>
    <span class="na">street</span><span class="pi">:</span> <span class="s">123 Main St.</span>
    <span class="na">city</span><span class="pi">:</span> <span class="s">Anytown</span>
    <span class="na">state</span><span class="pi">:</span> <span class="s">CA</span>
    <span class="na">zip</span><span class="pi">:</span> <span class="m">90210</span>
    </code></pre></figure>

<p>In YAML, you can organize dictionaries in sequence. For example, if you want to describes a list of three people you can write something like this:</p>

<figure class="highlight"><pre><code class="language-yaml" data-lang="yaml"><span class="na">people</span><span class="pi">:</span>
  <span class="pi">-</span> <span class="na">name</span><span class="pi">:</span> <span class="s">Mary jane</span>
    <span class="na">age</span><span class="pi">:</span> <span class="m">30</span>
    <span class="na">male</span><span class="pi">:</span> <span class="s">No</span>
  <span class="pi">-</span> <span class="na">name</span><span class="pi">:</span> <span class="s">Jane Doe</span>
    <span class="na">age</span><span class="pi">:</span> <span class="m">28</span>
    <span class="na">male</span><span class="pi">:</span> <span class="s">Yes</span>
    </code></pre></figure>

<p>In this example, the key “people” is associated with a dictionary of two key-value pairs, each representing a person with a name and age attribute. This syntax allows for the easy representation of collections of data, such as lists of people, products, or any other type of data.</p>

<p>Dictionaries in YAML are useful for grouping related data together and for easily accessing individual items within the collection. The ability to store data in dictionaries and retrieve it based on the keys makes YAML a powerful and flexible data serialization format.</p>

<h2 id="conclusion">Conclusion</h2>

<p>In conclusion, YAML is a popular and human-readable data serialization format that provides a simple and efficient way to represent data structures and primitive data types. This article covered the basics of YAML, including primitive data types like strings, numbers, and booleans, as well as more complex data structures like dictionaries, sequences, and objects. In the next article, we will cover more advanced concepts about YAML.</p>]]></content><author><name></name></author><category term="Programming" /><summary type="html"><![CDATA[YAML, short for Yet Another Markup Language, is a popular data serialization format. This article will discuss its baasic concepts.]]></summary><media:thumbnail xmlns:media="http://search.yahoo.com/mrss/" url="https://sasadangelo.github.io/code4projects/assets/img/yaml-logo.webp" /><media:content medium="image" url="https://sasadangelo.github.io/code4projects/assets/img/yaml-logo.webp" xmlns:media="http://search.yahoo.com/mrss/" /></entry><entry><title type="html">The Top Programming Languages to Learn in 2023: A Comprehensive Guide</title><link href="https://sasadangelo.github.io/code4projects/best-programming-languages-2023/" rel="alternate" type="text/html" title="The Top Programming Languages to Learn in 2023: A Comprehensive Guide" /><published>2023-01-29T00:00:00+00:00</published><updated>2023-01-29T00:00:00+00:00</updated><id>https://sasadangelo.github.io/code4projects/best-programming-languages-2023</id><content type="html" xml:base="https://sasadangelo.github.io/code4projects/best-programming-languages-2023/"><![CDATA[<p><img src="/code4projects/assets/img/top-programming-languages-2023.webp" alt="The Top Programming Languages to Learn in 2023" width="454" height="200" class="responsive_img" /></p>

<h1 id="the-top-programming-languages-to-learn-in-2023-a-comprehensive-guide">The Top Programming Languages to Learn in 2023: A Comprehensive Guide</h1>

<p><em>Posted on <strong>29 Jan 2023</strong></em></p>

<h2 id="programming-languages-to-watch-out-for-in-2023">Programming languages to watch out for in 2023</h2>

<p>The world of programming is constantly evolving, and new languages, frameworks, and technologies are being introduced all the time. With so many options to choose from, it can be difficult to decide which programming languages to learn and invest your time in.</p>

<p>In this article, I will discuss some of the best programming languages to study in 2023, and provide an overview of each language, including its uses, applications, and pros and cons.</p>

<p>The languages that will be covered in this article are:</p>
<ul>
  <li>Python</li>
  <li>C</li>
  <li>C++</li>
  <li>Java</li>
  <li>JavaScript</li>
  <li>PHP</li>
  <li>C#</li>
  <li>Visual Basic</li>
  <li>Go</li>
</ul>

<p>These languages are considered to be among the most in-demand and widely used programming languages in the industry and are great choices for different use cases.</p>

<p>This list was compiled using a mix of the <a href="https://www.tiobe.com/tiobe-index/">TIOBE index</a> and my experience in the industry. TIOBE is a measure of the popularity of programming languages. It is calculated based on the number of search engine results for queries of programming language tutorials, courses, and examples. I’ve been working in the IT branch for over 24 years and I want to give my point of view on why these languages ​​can be worth studying.</p>

<h2 id="python-the-swiss-army-knife-of-programming-languages">Python: The Swiss Army Knife of Programming Languages</h2>

<p><img src="/code4projects/assets/img/python-logo.webp" alt="Python Language" width="300" height="329" class="responsive_img" /></p>

<p><em>Photo from <a href="https://commons.wikimedia.org/wiki/File:Python-logo-notext.svg">Wikimedia</a></em></p>

<p>Python is a high-level, general-purpose programming language that is widely used for web development, data analysis, artificial intelligence, and scientific computing. It was first released in 1991 by Guido van Rossum, and has since grown to become one of the most popular and widely used programming languages in the world.</p>

<p>One of the main reasons for Python’s popularity is its simple and easy-to-read syntax, which makes it a great choice for beginners. Python code is often described as “readable” and “expressive”, which makes it easy to understand and write, even for those with little programming experience. Moreover, Python supports various programming styles, including object-oriented programming (OOP) through the use of objects and classes.</p>

<p>Python is also known for its vast ecosystem of libraries and frameworks, which makes it a versatile language that can be used for a wide range of applications. Some of the most popular libraries and frameworks include NumPy and SciPy for scientific computing, Pandas for data analysis, and Django and Flask for web development.</p>

<p>Python is also supported by a large and active community of developers, which means that there are plenty of resources available for learning and development, including tutorials, documentation, and forums. This makes it easy for developers to find the help and support they need when working with Python. Additionally, the syntax of python is similar to the English language, making it easy to read and understand, which can make the debugging process much easier.</p>

<p>In terms of drawbacks, Python is not the best choice for applications that require low-level memory manipulation or high-performance computing, as its interpreted nature can cause it to be slower than other languages like C++ or Rust. However, Python’s simplicity and readability make it a great choice for beginners and it’s also a great choice for small to medium-sized projects.</p>

<p>In my daily job, I used Python a lot of the time, <a href="https://github.com/zalando/patroni">Patroni</a> is a Python cluster manager that I use to create highly available PostgreSQL clusters for my company solutions. I use Python to monitor <a href="https://github.com/sasadangelo/finance">my investments in ETFs</a> and several other projects.</p>

<h2 id="c-the-language-of-systems-and-embedded-applications">C: The Language of Systems and Embedded Applications</h2>

<p><img src="/code4projects/assets/img/c-language-logo.webp" alt="The C Language" width="300" height="331" class="responsive_img" /></p>

<p><em>Photo from <a href="https://commons.wikimedia.org/wiki/File:C_Programming_Language.svg">Wikimedia</a></em></p>

<p>C is a general-purpose, low-level programming language that was first developed in the early 1970s by Dennis Ritchie at Bell Labs. C is a highly efficient language that is well-suited for systems programming and embedded applications. It is a compiled language, which means that the code is translated into machine code before it is executed, making it faster than interpreted languages like Python or JavaScript.</p>

<p>C is widely used for developing operating systems, device drivers, and embedded systems. It is also commonly used in the development of low-level libraries and frameworks, such as the C Standard Library, which provides a set of standard functions for input/output, math, and string manipulation. C is also commonly used in the development of game engines, as well as in the implementation of other performance-critical systems.</p>

<p>C is a powerful language that provides low-level access to the computer’s hardware, which allows for fine-grained control over the system’s resources. However, this low-level access also means that C is a complex language that requires a deeper understanding of the system’s architecture and can be more prone to errors if not used correctly.</p>

<p>Even if C has been around for several decades, it is a timeless language because it always manages to carve out a niche where performance is a must. The C language was the second programming language I learned in the last years of ‘80. I used it to create games, small libraries, <a href="https://github.com/sasadangelo/gollumix">small kernels</a>, client applications, and so on.</p>

<h2 id="c-the-language-of-object-oriented-systems-and-high-performance-applications">C++: The Language of Object-Oriented Systems and High-Performance Applications</h2>

<p><img src="/code4projects/assets/img/c++-logo.webp" alt="C++ Language" width="300" height="337" class="responsive_img" /></p>

<p><em>Photo from <a href="https://it.m.wikipedia.org/wiki/File:ISO_C%2B%2B_Logo.svg">Wikipedia</a></em></p>

<p>C++ is an extension of the C programming language, developed by Bjarne Stroustrup in the early 1980s. It is a general-purpose, high-level programming language that is widely used for systems programming, and for creating high-performance applications such as video games, simulations, and scientific applications. C++ is a compiled language, which means that the code is translated into machine code before it is executed, making it faster than interpreted languages like Python or JavaScript.</p>

<p>C++ is an object-oriented language, which means that it allows developers to define and manipulate objects, which are instances of classes. This feature allows for the creation of reusable and modular code, making it easier to maintain and develop complex systems. C++ also offers a wide range of features such as templates and overloading operators, which make it more powerful than C.</p>

<p>C++ is widely used in game development, as well as in the creation of other high-performance applications such as simulations, financial modeling and scientific calculations. C++ also has a wide range of libraries and frameworks, such as the Standard Template Library (STL) and Boost, that provide a set of standard functions for input/output, math, and data structures.</p>

<p>C++ is a complex language that requires a deeper understanding of the system’s architecture and can be more prone to errors if not used correctly. Additionally, the use of pointers and manual memory management can make it more prone to security vulnerabilities.</p>

<p>I started using this language as a hobby by creating <a href="https://github.com/sasadangelo/javacompiler">small compilers</a>. It was the first programming language I used when I started working in 1999. I remember that my first job was to develop an encryption library, then I developed other libraries in the configuration, networking, and directory services areas.</p>

<h2 id="java-the-language-of-enterprise-applications-and-android-development">Java: The Language of Enterprise Applications and Android Development</h2>

<p><img src="/code4projects/assets/img/java-logo.webp" alt="Java Language" width="300" height="184" class="responsive_img" /></p>

<p><em>Photo from <a href="https://it.wikipedia.org/wiki/File:Java_Logo.svg">Wikipedia</a></em></p>

<p>Java is a general-purpose, high-level programming language that was first developed by James Gosling at Sun Microsystems in the early 1990s. It is a compiled language, which means that the code is translated into machine code before it is executed, making it faster than interpreted languages like Python or JavaScript.</p>

<p>Java is an object-oriented language, which means that it allows developers to define and manipulate objects, which are instances of classes. This feature allows for the creation of reusable and modular code, making it easier to maintain and develop complex systems. Java also offers a wide range of features such as automatic memory management and exception handling, which make it more powerful than C++.</p>

<p>It is widely used in enterprise application development, as well as in the creation of Android mobile applications. Java also has a wide range of libraries and frameworks, such as the Java Standard Library and Spring, that provide a set of standard functions for input/output, math, and data structures.</p>

<p>Java is a popular language for building enterprise applications, due to its cross-platform compatibility, and its ability to scale to large systems. Additionally, Java has a large and active community of developers and a wide range of libraries and frameworks that make it easier to build robust and secure applications.</p>

<p>The language may present some drawbacks such as its verbosity, and the fact that it can be less efficient than other languages like C++ when it comes to performance-critical applications.</p>

<p>Working in a big company this is the language I used the most especially to create server-side applications using web containers. However, <a href="https://github.com/sasadangelo/Bazaar">I used it a lot also for hobbies</a>.</p>

<h2 id="javascript-the-language-of-the-web">JavaScript: The Language of the Web</h2>

<p><img src="/code4projects/assets/img/javascript-logo.webp" alt="JavaScript: The Language of the Web" width="300" height="168" class="responsive_img" /></p>

<p><em>Photo from <a href="https://www.freepnglogos.com/pics/javascript">Freepnglogos.com</a></em></p>

<p>JavaScript is a high-level, dynamic programming language that is widely used for building interactive and responsive web applications. It was first created in 1995 by Brendan Eich and has since become one of the most widely used programming languages in the world. JavaScript is primarily used in the browser, but can also be used to write code on the server side using Node.js.</p>

<p>JavaScript is a versatile language that can be used for a wide range of applications, including front-end web development, server-side development, and mobile app development. It is particularly well-suited for building interactive and responsive web applications, as it allows developers to create dynamic user interfaces and add interactive elements to web pages, such as drop-down menus, sliders, and pop-ups.</p>

<p>JavaScript is also supported by a large and active community of developers, which means that there are plenty of resources available for learning and development, including tutorials, documentation, and forums. Additionally, JavaScript has a wide range of libraries and frameworks, such as React, Angular, and Vue.js, that make it easier to build complex web applications.</p>

<p>When using JavaScript on the server-side using Node.js, developers can build scalable and high-performance web applications, as Node.js uses an event-driven, non-blocking I/O model. This makes it easy to handle multiple requests simultaneously and allows for faster server-side processing, making Node.js a popular choice for building real-time web applications and APIs.</p>

<p>One of the main drawbacks of JavaScript is that it is a loosely typed language, which can make it more prone to errors and harder to debug. Additionally, JavaScript’s dynamic nature can make it difficult to catch errors at compile time, and it can also lead to unexpected behavior.</p>

<p>In my career, I have worked a lot as a back-end developer and very little on front-end activities. The latter I mostly worked on hobby businesses like <a href="https://github.com/sasadangelo/runningcalculators">this calculator</a> or this website.</p>

<h2 id="c-the-language-of-windows-and-unity-development">C#: The Language of Windows and Unity Development</h2>

<p><img src="/code4projects/assets/img/c-sharp-logo.png" alt="C# Language" width="300" height="337" class="responsive_img" /></p>

<p><em>Photo from <a href="https://seeklogo.com/vector-logo/363285/c-sharp-c">Seeklogo.com</a></em></p>

<p>C# is a modern, object-oriented programming language developed by Microsoft in 2000 as part of its .NET Framework. The language is designed for building Windows desktop applications and games, as well as for developing apps for Windows, Android, and iOS using the Xamarin framework. C# is a statically-typed language, which means that variables must be declared with a specific type before they can be used. This provides a level of type safety and can help prevent bugs during the development process.</p>

<p>C# is a versatile language that can be used for a wide range of tasks, including web development, database programming, and game development. C# has a large and active community of developers, and the .NET framework provides a wealth of libraries and frameworks that make it easier to build robust and secure applications. Additionally, C# has a strong focus on developer productivity, providing features such as automatic memory management and support for functional programming.</p>

<p>C# is particularly well-suited for Windows desktop development and Windows Store app development. It is also popular among game developers, as it is the primary language used for Unity, one of the most popular game engines in the market.</p>

<p>However, C# can be less efficient than other languages like C++ when it comes to performance-critical applications, and its use is limited to Windows development.</p>

<h2 id="visual-basic-the-language-of-rapid-application-development">Visual Basic: The Language of Rapid Application Development</h2>

<p><img src="/code4projects/assets/img/visual-basic-logo.webp" alt="Visual Basic" width="300" height="300" class="responsive_img" /></p>

<p><em>Photo from <a href="https://it.wikipedia.org/wiki/Visual_Basic_.NET">Wikipedia</a></em></p>

<p>Visual Basic (VB) is a programming language developed by Microsoft in 1991. It is a high-level, object-oriented language that is designed to make it easy to build Windows desktop applications and scripts. VB is a language that is easy to learn and use, making it a popular choice for beginners and those who need to quickly create simple applications.</p>

<p>Visual Basic is often used for rapid application development (RAD) and is well-suited for creating simple and small applications, including business applications and scripts. It is particularly useful for creating applications that have a simple user interface, such as forms and dialog boxes, and it is also often used for automating Microsoft Office applications.</p>

<p>One of the main strengths of Visual Basic is its simple and intuitive nature. It is a language that is easy to learn and use, and its drag-and-drop interface makes it easy to create graphical user interfaces (GUIs) quickly and efficiently. Additionally, VB has a wide range of libraries and tools that can be used to create Windows applications and automate tasks.</p>

<p>However, Visual Basic has been largely replaced by .NET languages like C# and VB.NET in recent years, and its use is limited to maintaining legacy applications and automating tasks on Microsoft Office.</p>

<h2 id="php-the-language-of-web-development">PHP: The Language of Web Development</h2>

<p><img src="/code4projects/assets/img/php-logo.webp" alt="PHP: The Language of Web Development" width="300" height="162" class="responsive_img" /></p>

<p><em>Photo from <a href="https://en.wikipedia.org/wiki/PHP">Wikipedia</a></em></p>

<p>PHP is a server-side scripting language that was first created by Rasmus Lerdorf in the mid-1990s. It is a popular language for web development, as it is designed to work seamlessly with HTML, CSS, and JavaScript to create dynamic and interactive web pages. PHP is an interpreted language, which means that the code is read and executed line by line at runtime, making it slower than compiled languages like C or Java.</p>

<p>PHP is a versatile language that can be used for a wide range of web development tasks, such as creating dynamic content, handling forms, and working with databases. PHP also has a wide range of libraries and frameworks, such as Laravel and CodeIgniter, that provide a set of standard functions for web development and make it easier to build robust and secure web applications.</p>

<p>PHP is a popular choice for web development, due to its simplicity and ease of use. Additionally, the majority of web servers support PHP, which makes it easy to deploy and run web applications. PHP also has a large and active community of developers, which provides a wealth of resources and support for developers. Moreover, PHP is the WordPress programming language that is the most popular CMS in the world. Statistics mention that WordPress manages the 43% of websites around the world (810 million).</p>

<p>However, PHP has some limitations as a language, and its performance can be affected when working with large amounts of data or high traffic. Additionally, it is not a particularly good choice when it comes to complex and large-scale applications.</p>

<p>I have been running a WordPress blog since 2006 and have written several <a href="https://github.com/sasadangelo/vantage-child">PHP codes to customize my websites</a>. Unfortunately, today I have few opportunities to work on this language because I migrated my sites to Jekyll.</p>

<h2 id="go-a-high-performance-language-for-modern-applications">Go: A High-Performance Language for Modern Applications</h2>

<p><img src="/code4projects/assets/img/golang.webp" alt="Go Language" width="300" height="150" class="responsive_img" /></p>

<p><em>Photo from <a href="https://www.vectorlogo.zone/logos/golang/index.html">https://www.vectorlogo.zone/</a></em></p>

<p>Go, also known as Golang, is a programming language developed by Google in 2009. It is designed to be simple, efficient, and easy to learn. Go is particularly well-suited for building high-performance network services and distributed systems. It also has built-in garbage collection, concurrency support, and strict typing. This makes it a great choice for building modern, scalable, and efficient applications.</p>

<p>Go is an open-source language and has a growing community, this makes it easy to find tutorials, libraries, and frameworks to start developing. It’s also used by many big companies such as Google, Uber, Netflix, and others.</p>

<p>One of the main advantages of Go is its built-in concurrency support through goroutines, which are lightweight threads that can run concurrently with other goroutines. This makes it easy to handle multiple requests simultaneously and allows for faster server-side performance. Go also has a strong focus on simplicity and minimalism, making it a great choice for beginners and experienced developers alike.</p>

<p>One downside of Go is that it doesn’t have built-in support for generics, which is a feature that allows a function or a data type to work with multiple types of data. This can make some tasks more complex to implement, and it’s something that developers have to take into account when choosing this language.</p>

<p>Overall, Go is a high-performance language that is well-suited for building modern, scalable, and efficient applications. With its built-in concurrency support, garbage collection, and strict typing, it’s a great choice for building high-performance network services and distributed systems.</p>

<p>The Go language occupies a not-too-high position in the TIOBE index, however, I wanted to add this language to this list because I notice that more and more it is used to write code for Cloud services and all the applications where performance is a MUST.</p>

<h2 id="conclusions">Conclusions</h2>

<p>In conclusion, the programming landscape is constantly evolving, and the choice of which language to learn depends on the specific needs and goals of the developer. In this article, we have discussed some of the most popular and widely-used programming languages that are worth studying in 2023. We have explored the strengths and weaknesses of each language and highlighted the types of applications for which they are best suited.</p>

<p>With my point of view from inside the IT world I also wanted to give a contribution to the languages ​​that I have noticed are most used in this industry.</p>

<p>Ultimately, the best language to learn is the one that meets your specific needs and goals. It’s important to consider the types of projects you want to work on and the industries you want to work in, as well as the resources available in your community. With the right language and the right resources, you can achieve your goals and build the applications you’ve always dreamed of building. Whether you are a beginner or an experienced developer, there is a programming language out there for you.</p>]]></content><author><name></name></author><category term="Programming" /><summary type="html"><![CDATA[This article lists the best programming languages to learn in 2023 for beginners and experienced developers.]]></summary><media:thumbnail xmlns:media="http://search.yahoo.com/mrss/" url="https://sasadangelo.github.io/code4projects/assets/img/top-programming-languages-2023.webp" /><media:content medium="image" url="https://sasadangelo.github.io/code4projects/assets/img/top-programming-languages-2023.webp" xmlns:media="http://search.yahoo.com/mrss/" /></entry><entry><title type="html">Getting Started with HTML: A Beginner’s Guide</title><link href="https://sasadangelo.github.io/code4projects/getting-started-with-html/" rel="alternate" type="text/html" title="Getting Started with HTML: A Beginner’s Guide" /><published>2023-01-23T00:00:00+00:00</published><updated>2023-01-23T00:00:00+00:00</updated><id>https://sasadangelo.github.io/code4projects/getting-started-with-html</id><content type="html" xml:base="https://sasadangelo.github.io/code4projects/getting-started-with-html/"><![CDATA[<p><img src="/code4projects/assets/img/html.webp" alt="Getting Started with HTML: A Beginner's Guide" width="356" height="200" class="responsive_img" /></p>

<h1 id="getting-started-with-html-a-beginners-guide">Getting Started with HTML: A Beginner’s Guide</h1>
<p><em>Posted on <strong>23 Jan 2023</strong></em></p>

<p>In this article, I will talk about HTML, the language that forms the foundation of the web. By the end of this guide, I will create step by step a website with five pages containing paragraphs, headlines, links, images, text, and so on.</p>

<p>You can find the source code of this guide in the part-1 folder of <a href="https://github.com/sasadangelo/html-hero/tree/master/part-1">this repository</a>. This guide covers the first 10 lessons.</p>

<h2 id="what-is-html">What is HTML?</h2>

<p><strong>Hypertext Markup Language</strong> (<strong>HTML</strong>) is the language used for creating web pages and applications. It allows developers to create web pages with with paragraphs, headings, links, images, video, and more.</p>

<p>HTML uses a series of Elements each one composed of two Tags. Tags are enclosed in angle brackets and typically come in pairs, with an opening and closing tag. The content goes between them. For example, the opening tag &lt;p&gt; represents a paragraph, and the closing tag &lt;/p&gt; indicates the end of the paragraph.</p>

<p>By using HTML, developers can create rich, interactive, and engaging web pages that can be accessed by users across the world.</p>

<h2 id="a-bit-of-history">A bit of History</h2>

<p>HTML was initially developed to provide a way to share scientific research and information over the internet. As the World Wide Web grew in popularity, the need for a more advanced and user-friendly language for creating web pages became evident. Over the years, HTML has undergone several revisions and updates to add new features and capabilities.</p>

<p>Today, HTML is the backbone of the World Wide Web, and almost all websites and web applications use HTML in some form or another. It is a powerful and versatile language that continues to evolve and improve, providing new and exciting ways for developers to create dynamic and interactive web content.</p>

<p><img src="/code4projects/assets/img/html-history.webp" alt="HTML History" width="450" height="215" class="responsive_img" /></p>

<p>Over the years, different HTML versions were released. Here is a brief overview of these versions and the key features and improvements they introduced:</p>

<ul>
  <li>
    <p><strong>HTML 1.0</strong>: This was the first version of HTML, developed in 1990 by Tim Berners-Lee. It provided a basic set of tags for creating simple web pages, including tags for headings, paragraphs, lists, and links.</p>
  </li>
  <li>
    <p><strong>HTML 2.0</strong>: This version of HTML was released in 1995 and added support for tables, text formatting, and additional multimedia elements like images and audio files.</p>
  </li>
  <li>
    <p><strong>HTML 3.2</strong>: The third version of HTML, released in 1997, introduced support for forms, scripts, and other advanced features. It also added support for style sheets, which allowed developers to separate the presentation of a web page from its content.</p>
  </li>
  <li>
    <p><strong>HTML 4.01</strong>: This version of HTML, released in 1999, added support for more multimedia elements and introduced new tags for creating interactive web applications. It also added support for internationalization and the ability to use XML-based languages like MathML and SVG.</p>
  </li>
  <li>
    <p><strong>HTML 5</strong>: The latest version of HTML, released in 2014, added many new features and capabilities, including support for video and audio playback, local storage, and offline web applications. It also introduced a new approach to web development called “responsive design”, which allows web pages to adapt to different screen sizes and devices.</p>
  </li>
</ul>

<p>The history of HTML, however, has not always been linear. At a certain point, the W3C competition decided to embark on a new path which, over time, has proved unsuccessful. This path involved the development of XHTML as a natural succession of HTML 4.0.</p>

<p>XHTML, which stands for Extensible Hypertext Markup Language, is a markup language that is based on HTML but uses stricter syntax rules. It was developed in the late 1990s as a way to make HTML more consistent and compatible with other XML-based languages.</p>

<ul>
  <li>
    <p><strong>XHTML 1.0</strong>, the first version of XHTML, was released in 2000 and was based on HTML 4.0. It introduced several changes to the HTML language, including the use of lowercase tags, the requirement for all tags to be closed, and the requirement to use quotation marks around attribute values.</p>
  </li>
  <li>
    <p><strong>XHTML 1.1</strong>, released in 2001, added support for additional modules, such as ruby annotations and bidirectional text, and introduced additional rules for creating well-formed documents.</p>
  </li>
  <li>
    <p><strong>XHTML 2.0</strong>, which was under development for several years but was never completed or released, would have introduced even more significant changes to the HTML language. However, this version of XHTML was eventually abandoned in favor of a new approach called HTML5.</p>
  </li>
</ul>

<p>Today, XHTML is not as widely used as it once was, but it continues to be supported by many web browsers and is still used by some developers for creating web pages.</p>

<h2 id="the-html-basic-structure">The HTML Basic structure</h2>

<p>A basic HTML document has a very simple structure and consists of the following elements:</p>

<ul>
  <li>A <strong>DOCTYPE</strong> declaration specifies the version of HTML that the document uses.</li>
  <li>The <strong>html</strong> element is the root element of the document and encloses all other elements.</li>
  <li>A <strong>head</strong> element contains metadata about the document, such as the title, character set, styles, and scripts.</li>
  <li>A <strong>body</strong> element contains the main content of the document, such as headings, paragraphs, images, and links.</li>
</ul>

<p>Here is an example of a basic HTML document:</p>

<figure class="highlight"><pre><code class="language-html" data-lang="html"><span class="cp">&lt;!DOCTYPE html&gt;</span>
<span class="nt">&lt;html&gt;</span>
<span class="nt">&lt;head&gt;</span>
    <span class="nt">&lt;title&gt;</span>My Document Title<span class="nt">&lt;/title&gt;</span>
<span class="nt">&lt;/head&gt;</span>
<span class="nt">&lt;body&gt;</span>
    <span class="nt">&lt;h1&gt;</span>Hello, World!<span class="nt">&lt;/h1&gt;</span>
    <span class="nt">&lt;p&gt;</span>This is my first web page.<span class="nt">&lt;/p&gt;</span>
<span class="nt">&lt;/body&gt;</span>
<span class="nt">&lt;/html&gt;</span>
    </code></pre></figure>

<p>As you can see, the DOCTYPE declaration, the HTML element, the head element, and the body element are all nested within each other, with the DOCTYPE declaration at the top, and the body element at the bottom. The head element contains metadata about the document, and the body element contains the main content.</p>

<p>Download your first HTML document of <a href="https://github.com/sasadangelo/html-hero/blob/master/part-1/lesson-01/index.html">lesson 1</a>. Its name is index.html and you can open it with your browser (Chrome, Firefox, Microsoft Edge, Internet Explorer, or Safari) by clicking on File-&gt;Open File… to render it. Here is the result.</p>

<p><img src="/code4projects/assets/img/my-first-html-file.webp" alt="My First HTML File" width="450" height="195" class="responsive_img" /></p>

<h2 id="html-elements-tags-and-attributes">HTML Elements, Tags, and Attributes</h2>

<p>In HTML, elements are the basic building blocks used to create a web page. These elements are represented by tags, which are keywords surrounded by angle brackets. For example, the p tag is used to create a paragraph element, and the h1 tag is used to create a heading element.</p>

<p>Here is an example of a simple HTML tag:</p>

<figure class="highlight"><pre><code class="language-html" data-lang="html"><span class="nt">&lt;p&gt;</span>This is a paragraph.<span class="nt">&lt;/p&gt;</span>
    </code></pre></figure>

<p>In this example, the &lt;p&gt; tag is used to mark up a paragraph of text. The &lt;p&gt; tag has an opening tag &lt;p&gt; and a closing tag &lt;/p&gt;, with the content in between.</p>

<p>In addition to the basic structure provided by tags, HTML also supports the use of attributes. Attributes are used to provide additional information about an element. They are added to the opening tag of an element and consist of a name and a value, separated by an equals sign. For example, the src attribute is used to specify the source of an image, and the href attribute is used to specify a link.</p>

<p>Here is an example of an HTML tag with an attribute:</p>

<figure class="highlight"><pre><code class="language-html" data-lang="html"><span class="nt">&lt;a</span> <span class="na">href=</span><span class="s">"http://www.example.com"</span><span class="nt">&gt;</span>This is a link.<span class="nt">&lt;/a&gt;</span>
    </code></pre></figure>

<p>In this example, the <strong>&lt;a&gt;</strong> tag is used to create a link to another web page. The href attribute is used to specify the URL of the page that the link should go to.</p>

<p>So, to sum up, Elements are used to structure and format the content of a web page. Each Element is enclosed in an open and closed Tag. Attributes are used to provide additional information or to modify the behavior of a tag. Together, elements. tags and attributes form the basic building blocks of an HTML document.</p>

<h2 id="the-head-tag">The head tag</h2>

<p>The &lt;head&gt; element is a container for HTML metadata (data about the document, such as its title, character set, styles, and scripts). The metadata is not displayed on the page but is used by browsers and search engines to understand the content of the page.</p>

<p>The &lt;head&gt; element should be placed at the beginning of the &lt;html&gt; element and must contain a &lt;title&gt; element, which specifies the title of the document. The &lt;head&gt; element can also include other elements, such as &lt;style&gt; for styling the page with CSS, &lt;link&gt; for linking to external resources, and &lt;meta&gt; for defining metadata, such as the character set, keywords, and description of the page.</p>

<p>Here is an example of an &lt;head&gt; element that includes a &lt;title&gt; element and a &lt;meta&gt; element:</p>

<figure class="highlight"><pre><code class="language-html" data-lang="html"><span class="nt">&lt;head&gt;</span>
    <span class="nt">&lt;meta</span> <span class="na">charset=</span><span class="s">"utf-8"</span><span class="nt">&gt;</span>
    <span class="nt">&lt;title&gt;</span>My Document Title<span class="nt">&lt;/title&gt;</span>
<span class="nt">&lt;/head&gt;</span>
    </code></pre></figure>

<p>As you can see, the &lt;title&gt; element appears within the &lt;head&gt; element and specifies the title of the page, and the &lt;meta&gt; element appears within the &lt;head&gt; element and defines the character set of the page.</p>

<h2 id="the-body-tag">The body tag</h2>

<p>The &lt;body&gt; element is a container for the main content of an HTML. The content of the &lt;body&gt; element is displayed in the main window or viewport of the browser.</p>

<p>The &lt;body&gt; element should be placed after the &lt;head&gt; element and can contain any type of content, such as headings, paragraphs, lists, images, links, and more. This content is rendered by the browser according to the styles and layout defined by the document or by external stylesheets.</p>

<p>Here is an example of a &lt;body&gt; element that contains a heading and a paragraph:</p>

<figure class="highlight"><pre><code class="language-html" data-lang="html"><span class="nt">&lt;body&gt;</span>
    <span class="nt">&lt;h1&gt;</span>Hello World!<span class="nt">&lt;/h1&gt;</span>
    <span class="nt">&lt;p&gt;</span>This is my first web page.<span class="nt">&lt;/p&gt;</span>
<span class="nt">&lt;/body&gt;</span>
    </code></pre></figure>

<p>As you can see, the <strong>&lt;h1&gt;</strong> element and the <strong>&lt;p&gt;</strong> element are nested within the <strong>&lt;body&gt;</strong> element, and their content is displayed on the page. The <strong>&lt;h1&gt;</strong> element represents a heading, and the <strong>&lt;p&gt;</strong> element represents a paragraph.</p>

<h2 id="headlines">Headlines</h2>

<p>In HTML, a headline is a piece of text that is used to indicate the importance or relevance of the content that follows. Headlines are typically larger and bolder than the surrounding text, and they may also be styled differently to make them stand out. There are several different levels of headlines in HTML, ranging from level 1 (the most important) to level 6 (the least important). The level of a headline is indicated by the use of a specific HTML tag, such as &lt;h1&gt; for a level 1 headline or &lt;h2&gt; for a level 2 headline. For example, the following code would create a level 2 headline that says “Introduction”:</p>

<figure class="highlight"><pre><code class="language-html" data-lang="html"><span class="nt">&lt;h2&gt;</span>Introduction<span class="nt">&lt;/h2&gt;</span>
    </code></pre></figure>

<p>Headlines are used to organize and structure the content of a webpage, making it easier for readers to navigate and understand the information being presented. They also help search engines understand the hierarchy and organization of a webpage, which can improve its visibility and ranking in search results.</p>

<p>Download the <strong>index.html</strong> file of <a href="https://github.com/sasadangelo/html-hero/blob/master/part-1/lesson-02/index.html">lesson 2</a> and open it with your browser. Here is the result.</p>

<p><img src="/code4projects/assets/img/html-headlines.webp" alt="HTML Headlines" width="450" height="574" class="responsive_img" /></p>

<h2 id="paragraphs">Paragraphs</h2>

<p>In HTML, the <strong>&lt;p&gt;</strong> tag is used to define a paragraph of text. The &lt;p&gt; tag tells the web browser that the enclosed text should be treated as a paragraph, and it automatically adds some extra space before and after the paragraph to help separate it from other content on the page. The &lt;p&gt; tag is an example of an “inline” element, which means that it can be used within a block-level element such as a &lt;div&gt; or a &lt;section&gt; to add structure and organization to the content of a webpage. Here is an example of how the &lt;p&gt; tag might be used:</p>

<figure class="highlight"><pre><code class="language-html" data-lang="html"><span class="nt">&lt;p&gt;</span>This is the first paragraph of text on the page.<span class="nt">&lt;/p&gt;</span>
<span class="nt">&lt;p&gt;</span>This is the second paragraph of text on the page.<span class="nt">&lt;/p&gt;</span>
    </code></pre></figure>

<p>In the example above, the first and second paragraphs of text are each enclosed within their own &lt;p&gt; tags. This tells the web browser to treat each paragraph as a distinct block of text and to add the appropriate amount of space between them. The &lt;p&gt; tag is a very common and useful element in HTML, and it is used on almost every webpage to structure the content and make it easier to read.</p>

<h2 id="an-example-of-an-html-document">An example of an HTML document</h2>

<p>Here is an example of how you might use headlines and paragraphs together in an HTML document:</p>

<figure class="highlight"><pre><code class="language-html" data-lang="html"><span class="nt">&lt;h1&gt;</span>Introduction<span class="nt">&lt;/h1&gt;</span>
<span class="nt">&lt;p&gt;</span>This is the first paragraph of the introduction, which provides a brief overview of the topic.<span class="nt">&lt;/p&gt;</span>
<span class="nt">&lt;p&gt;</span>This is the second paragraph of the introduction, which expands on the ideas introduced in the first paragraph.<span class="nt">&lt;/p&gt;</span>
<span class="nt">&lt;h2&gt;</span>Background Information<span class="nt">&lt;/h2&gt;</span>
<span class="nt">&lt;p&gt;</span>This is the first paragraph of the background section, which provides additional context and detail about the topic.<span class="nt">&lt;/p&gt;</span>
<span class="nt">&lt;p&gt;</span>This is the second paragraph of the background section, which continues to build on the information from the first paragraph.<span class="nt">&lt;/p&gt;</span>
<span class="nt">&lt;h3&gt;</span>Key Points<span class="nt">&lt;/h3&gt;</span>
<span class="nt">&lt;p&gt;</span>This is the first paragraph of the key points section, which summarizes the most important information from the article.<span class="nt">&lt;/p&gt;</span>
<span class="nt">&lt;p&gt;</span>This is the second paragraph of the key points section, which provides a concise overview of the key ideas discussed in the article.<span class="nt">&lt;/p&gt;</span>
    </code></pre></figure>

<p>In this example, the &lt;h1&gt; tag is used to create a level 1 headline for the introduction, the &lt;h2&gt; tag is used to create a level 2 headline for the background information, and the &lt;h3&gt; tag is used to create a level 3 headline for the key points. Each of these headlines is followed by one or more paragraphs of text, which provide more details and information about the topic. The use of headlines and paragraphs helps to organize the content of the webpage and make it easier for readers to understand and navigate.</p>

<h2 id="lorem-ipsum-placeholder-text">Lorem Ipsum placeholder text</h2>

<p><strong>Lorem Ipsum</strong> is a placeholder text that is often used by designers and printers to fill in space in a document or website. It is a dummy text that is used to give an idea of what the final content will look like, without actually having to come up with real content. At the <a href="https://www.loremipzum.com/en/text-generator">following link</a>, you can use an online generator to create dummy text for your website.</p>

<p>Download the index.html file of <a href="https://github.com/sasadangelo/html-hero/blob/master/part-1/lesson-03/index.html">lesson 3</a> and open it with your browser. Here is the result.</p>

<p><img src="/code4projects/assets/img/html-paragraph.webp" alt="HTML Paragraph" width="450" height="370" class="responsive_img" /></p>

<h2 id="organizing-content-with-html-sections">Organizing Content with HTML Sections</h2>

<p>A section in HTML refers to a distinct part of a web page that can be defined by a headline and one or more paragraphs. These sections can be used to organize and divide content on a web page into logical groups, making it easier for users to understand and navigate the page.</p>

<p>For example, a web page about a news article can have multiple sections: one for the introduction, one for the main body of the article, and another for the conclusion. Each section would have its headline, which can be created using one of the heading elements (&lt;h1&gt; to &lt;h6&gt;), and one or more paragraphs, which can be created using the &lt;p&gt; element.</p>

<figure class="highlight"><pre><code class="language-html" data-lang="html"><span class="nt">&lt;h1&gt;</span>My Article Title<span class="nt">&lt;/h1&gt;</span>
<span class="nt">&lt;p&gt;</span>This is the first paragraph of the introduction, which provides a brief overview of the topic.<span class="nt">&lt;/p&gt;</span>
<span class="nt">&lt;p&gt;</span>This is the second paragraph of the introduction, which expands on the ideas introduced in the first paragraph.<span class="nt">&lt;/p&gt;</span>
<span class="nt">&lt;h2&gt;</span>My 1st section headline<span class="nt">&lt;/h2&gt;</span>
<span class="nt">&lt;p&gt;</span>This is the first paragraph of the 1st section, which provides additional context and detail about the topic.<span class="nt">&lt;/p&gt;</span>
<span class="nt">&lt;p&gt;</span>This is the second paragraph of the 1st section, which continues to build on the information from the first paragraph.<span class="nt">&lt;/p&gt;</span>
<span class="nt">&lt;h2&gt;</span>My 2nd section headline<span class="nt">&lt;/h2&gt;</span>
<span class="nt">&lt;p&gt;</span>This is the first paragraph of the 2nd section, which summarizes the most important information from the article.<span class="nt">&lt;/p&gt;</span>
<span class="nt">&lt;p&gt;</span>This is the second paragraph of the 2nd section, which provides a concise overview of the key ideas discussed in the article.<span class="nt">&lt;/p&gt;</span>
    </code></pre></figure>

<p>It’s worth noting that before HTML 5, there were no specific tags to create sections. In this guide, I just showed a way of organizing the content in a logical way. You can use any tags that you think will be more appropriate to create sections.</p>

<p>Download the index.html file of <a href="https://github.com/sasadangelo/html-hero/blob/master/part-1/lesson-04/index.html">lesson 4</a>, <a href="https://github.com/sasadangelo/html-hero/blob/master/part-1/lesson-05/index.html">lesson 5</a>, and <a href="https://github.com/sasadangelo/html-hero/blob/master/part-1/lesson-06/index.html">lesson 6</a> and open them with your browser. You will see a complete web page built progressively, section by section, where each section contains a headline and one or more paragraphs.</p>

<h2 id="text-formatting-with-bold-italic-and-underline">Text Formatting with bold, italic, and underline</h2>

<p>HTML supports several ways to format text, including bold, italic, and underline. Here’s how to use each one. To make text bold, you can use the &lt;strong&gt; or &lt;b&gt; tag. For example:</p>

<figure class="highlight"><pre><code class="language-html" data-lang="html"><span class="nt">&lt;p&gt;</span>This text is <span class="nt">&lt;strong&gt;</span>bold<span class="nt">&lt;/strong&gt;&lt;/p&gt;</span>
    </code></pre></figure>

<p>To make text italic, you can use the &lt;em&gt; or &lt;i&gt; tag. For example:</p>

<figure class="highlight"><pre><code class="language-html" data-lang="html"><span class="nt">&lt;p&gt;</span>This text is <span class="nt">&lt;em&gt;</span>italic<span class="nt">&lt;/em&gt;&lt;/p&gt;</span>
    </code></pre></figure>

<p>To underline text, you can use the &lt;u&gt; tag. For example:</p>

<figure class="highlight"><pre><code class="language-html" data-lang="html"><span class="nt">&lt;p&gt;</span>This text is <span class="nt">&lt;u&gt;</span>underlined<span class="nt">&lt;/u&gt;&lt;/p&gt;</span>
    </code></pre></figure>

<p>It’s important to note that these tags are just a way to add formatting to your text. They don’t change the meaning of the text itself, and they don’t necessarily affect how the text is read by a screen reader or other assistive technology. If you want to convey the meaning or importance of your text, it’s often better to use semantic HTML tags like &lt;strong&gt; or &lt;em&gt; rather than visual tags like &lt;b&gt; or &lt;u&gt;.</p>

<p>Download the <strong>index.html</strong> file of <a href="https://github.com/sasadangelo/html-hero/blob/master/part-1/lesson-07/index.html">lesson 7</a> and open it with your browser. You will see the document built on lesson 6 with bold, italic, and underlined formatting.</p>

<h2 id="creating-hyperlinks-in-html">Creating Hyperlinks in HTML</h2>

<p>A link, or hyperlink, is a way to navigate between web pages on the internet. In HTML, a link is created using the &lt;a&gt; tag, which stands for “anchor”. The &lt;a&gt; tag is used to define the start and end of a link, and the href attribute is used to specify the destination of the link.</p>

<p>Here’s an example of a basic HTML link:</p>

<figure class="highlight"><pre><code class="language-html" data-lang="html"><span class="nt">&lt;a</span> <span class="na">href=</span><span class="s">"https://www.example.com"</span><span class="nt">&gt;</span>This is a link<span class="nt">&lt;/a&gt;</span>
    </code></pre></figure>

<p>When this link is clicked, the user’s web browser will navigate to the URL specified in the href attribute (in this case, “https://www.example.com”). The text between the &lt;a&gt; and &lt;/a&gt; tags (in this case, “This is a link”) is what the user will see and click on.</p>

<p>You can also use the target attribute to specify how the link should be opened. For example, you can use target=”_blank” to open the link in a new tab or window.</p>

<figure class="highlight"><pre><code class="language-html" data-lang="html"><span class="nt">&lt;a</span> <span class="na">href=</span><span class="s">"https://www.example.com"</span> <span class="na">target=</span><span class="s">"_blank"</span><span class="nt">&gt;</span>This is a link that opens in a new tab<span class="nt">&lt;/a&gt;</span>
    </code></pre></figure>

<p>In addition to linking to other web pages, you can also use the &lt;a&gt; tag to create links within the same page. This is known as an “anchor” link, and it’s created by using the id attribute to give an element a unique name and then using that name as the destination of the link.</p>

<p>Here’s an example:</p>

<figure class="highlight"><pre><code class="language-html" data-lang="html"><span class="nt">&lt;h1</span> <span class="na">id=</span><span class="s">"section1"</span><span class="nt">&gt;</span>This is a heading<span class="nt">&lt;/h1&gt;</span>
<span class="nt">&lt;p&gt;</span>Here's a link to <span class="nt">&lt;a</span> <span class="na">href=</span><span class="s">"#section1"</span><span class="nt">&gt;</span>the heading above<span class="nt">&lt;/a&gt;&lt;/p&gt;</span>
    </code></pre></figure>

<p>When this link is clicked, the user’s web browser will jump to the element with the id of “section1” (in this case, the &lt;h1&gt; heading). This can be useful for creating a table of contents or for allowing users to quickly navigate to different sections of a page.</p>

<p>In <a href="https://github.com/sasadangelo/html-hero/tree/master/part-1/lesson-08">lesson 08</a> I added four new HTML files similar to index.html. Navigation through the five pages is accomplished by five links placed at the beginning of each file using code like this.</p>

<figure class="highlight"><pre><code class="language-html" data-lang="html"><span class="nt">&lt;a</span> <span class="na">href=</span><span class="s">"index.html"</span><span class="nt">&gt;</span>Click here to go to the first page<span class="nt">&lt;/a&gt;&lt;br/&gt;</span>
<span class="nt">&lt;a</span> <span class="na">href=</span><span class="s">"second_page.html"</span><span class="nt">&gt;</span>Click here to go to the second page<span class="nt">&lt;/a&gt;&lt;br/&gt;</span>
<span class="nt">&lt;a</span> <span class="na">href=</span><span class="s">"third_page.html"</span><span class="nt">&gt;</span>Click here to go to the third page<span class="nt">&lt;/a&gt;&lt;br/&gt;</span>
<span class="nt">&lt;a</span> <span class="na">href=</span><span class="s">"fourth_page.html"</span><span class="nt">&gt;</span>Click here to go to the fourth page<span class="nt">&lt;/a&gt;&lt;br/&gt;</span>
<span class="nt">&lt;a</span> <span class="na">href=</span><span class="s">"fifth_page.html"</span><span class="nt">&gt;</span>Click here to go to the fifth page<span class="nt">&lt;/a&gt;&lt;br/&gt;</span>
    </code></pre></figure>

<h2 id="creating-lists-with-html-ordered-and-unordered-lists">Creating Lists with HTML: Ordered and Unordered Lists</h2>

<p>HTML provides two types of lists for displaying content: ordered lists and unordered lists.</p>

<p>An ordered list is created using the &lt;ol&gt; element and is used to display a list of items in a specific order. Each item in the list is represented by a &lt;li&gt; element and is automatically numbered.</p>

<figure class="highlight"><pre><code class="language-html" data-lang="html"><span class="nt">&lt;ol&gt;</span>
  <span class="nt">&lt;li&gt;</span>First item<span class="nt">&lt;/li&gt;</span>
  <span class="nt">&lt;li&gt;</span>Second item<span class="nt">&lt;/li&gt;</span>
  <span class="nt">&lt;li&gt;</span>Third item<span class="nt">&lt;/li&gt;</span>
<span class="nt">&lt;/ol&gt;</span>
    </code></pre></figure>

<p>An unordered list is created using the &lt;ul&gt; element and is used to display a list of items that do not need to be in a specific order. Each item in the list is represented by a &lt;li&gt; element and is typically displayed with bullet points.</p>

<figure class="highlight"><pre><code class="language-html" data-lang="html"><span class="nt">&lt;ul&gt;</span>
  <span class="nt">&lt;li&gt;</span>First item<span class="nt">&lt;/li&gt;</span>
  <span class="nt">&lt;li&gt;</span>Second item<span class="nt">&lt;/li&gt;</span>
  <span class="nt">&lt;li&gt;</span>Third item<span class="nt">&lt;/li&gt;</span>
<span class="nt">&lt;/ul&gt;</span>
    </code></pre></figure>

<p>You can also nest lists within lists by using &lt;ol&gt; or &lt;ul&gt; elements inside the &lt;li&gt; elements.</p>

<figure class="highlight"><pre><code class="language-html" data-lang="html"><span class="nt">&lt;ul&gt;</span>
  <span class="nt">&lt;li&gt;</span>First item<span class="nt">&lt;/li&gt;</span>
  <span class="nt">&lt;li&gt;</span>Second item
    <span class="nt">&lt;ul&gt;</span>
      <span class="nt">&lt;li&gt;</span>Sub-item 1<span class="nt">&lt;/li&gt;</span>
      <span class="nt">&lt;li&gt;</span>Sub-item 2<span class="nt">&lt;/li&gt;</span>
    <span class="nt">&lt;/ul&gt;</span>
  <span class="nt">&lt;/li&gt;</span>
  <span class="nt">&lt;li&gt;</span>Third item<span class="nt">&lt;/li&gt;</span>
<span class="nt">&lt;/ul&gt;</span>
    </code></pre></figure>

<p>It’s worth noting that, like many other elements in HTML, lists are semantic elements, meaning they provide information about the content they contain but do not affect the appearance of the content. You can use CSS to control the appearance of lists and list items, such as changing the bullet point or numbering style.</p>

<p>In <a href="https://github.com/sasadangelo/html-hero/tree/master/part-1/lesson-09">lesson 9</a> I used the unordered list to create a menu at the beginning of each page. This menu will contain the five links introduced in lesson 8. Here is the result.</p>

<p><img src="/code4projects/assets/img/html-menu.webp" alt="HTML Menu" width="450" height="466" class="responsive_img" /></p>

<p>In addition, I created, randomly, an ordered list in each page. Here the result.</p>

<p><img src="/code4projects/assets/img/html-ordered-list.webp" alt="HTML Ordered List" width="450" height="179" class="responsive_img" /></p>

<h2 id="enhancing-your-webpage-with-images-the-img-tag">Enhancing Your Webpage with Images: The &lt;img&gt; Tag</h2>

<p>HTML provides a way to embed images into a webpage using the &lt;img&gt; tag. The &lt;img&gt; tag is a self-closing tag, meaning it does not have a closing tag, and is used to specify the source of the image, as well as various other attributes.</p>

<p>The two main attributes used when adding an image to an HTML document are the src and alt attributes.</p>

<p>The src attribute is used to specify the URL or file path of the image file. This attribute is required for the &lt;img&gt; tag to function correctly.</p>

<p>The alt attribute is used to provide a text description of the image, which can be displayed if the image is not available or cannot be displayed for some reason. The alt attribute is also used by screen readers for accessibility purposes.</p>

<figure class="highlight"><pre><code class="language-html" data-lang="html"><span class="nt">&lt;img</span> <span class="na">src=</span><span class="s">"image.jpg"</span> <span class="na">alt=</span><span class="s">"A beautiful landscape"</span><span class="nt">&gt;</span>
    </code></pre></figure>

<p>As with text, even for images you can use fake images to create your website. For example, you can use the <a href="https://picsum.photos/">Lorem Picsum</a> website and with a URL like this <a href="https://picsum.photos/200/300">https://picsum.photos/200/300</a> you can create a 200x300 pixels image. If, on the other hand, you want a square image of 200 pixels just use the URL <a href="https://picsum.photos/200">https://picsum.photos/200</a>.</p>

<p>For our example website I created two to four images for each page and placed them in an img folder. In the pages, I have referenced these images with the &lt;img&gt; tag as shown in the example above. The result can be seen below. The source code can be found in the <a href="https://github.com/sasadangelo/html-hero/tree/master/part-1/lesson-10">lesson-10</a> folder of our git project.</p>

<p><img src="/code4projects/assets/img/html-images.webp" alt="HTML Images" width="450" height="451" class="responsive_img" /></p>

<h2 id="conclusion-building-a-basic-website-with-html">Conclusion: Building a Basic Website with HTML</h2>

<p>In this article, we have covered the basics of building a website using HTML. We began by discussing the structure of a basic HTML document and the importance of the &lt;head&gt; and &lt;body&gt; tags. We then moved on to the different elements, tags, and attributes that are used to create the content of a web page, including headlines, paragraphs, links, lists, and images.</p>

<p>By following the step-by-step instructions provided in this article, you should now have a basic understanding of how to create a simple website using HTML. However, there is still much more to learn. In the next article, we will continue to build upon the skills learned here by adding quotes, and justified paragraphs and we will style our pages using CSS.</p>

<p>In conclusion, HTML is the backbone of any website and it is important to understand its basics and structure. With the knowledge of HTML and CSS, you will be able to create dynamic and visually appealing websites. Stay tuned for the next article where we will dive deeper into CSS and how to style our HTML documents.</p>]]></content><author><name></name></author><category term="Programming" /><summary type="html"><![CDATA[In this article, I would like to give you a brief introduction to Kubernetes and how to deploy applications on it.]]></summary><media:thumbnail xmlns:media="http://search.yahoo.com/mrss/" url="https://sasadangelo.github.io/code4projects/assets/img/html.webp" /><media:content medium="image" url="https://sasadangelo.github.io/code4projects/assets/img/html.webp" xmlns:media="http://search.yahoo.com/mrss/" /></entry><entry><title type="html">A Step by step Amazon Relational Database Service tutorial</title><link href="https://sasadangelo.github.io/code4projects/a-step-by-step-amazon-relational-database-service-tutorial/" rel="alternate" type="text/html" title="A Step by step Amazon Relational Database Service tutorial" /><published>2021-07-26T00:00:00+00:00</published><updated>2021-07-26T00:00:00+00:00</updated><id>https://sasadangelo.github.io/code4projects/a-step-by-step-amazon-relational-database-service-tutorial</id><content type="html" xml:base="https://sasadangelo.github.io/code4projects/a-step-by-step-amazon-relational-database-service-tutorial/"><![CDATA[<p><img src="/code4projects/wp-content/uploads/rds-logo.png" alt="A Step by step Amazon Relational Database Service tutorial" width="393" height="200" class="responsive_img" /></p>

<h1 id="a-step-by-step-amazon-relational-database-service-tutorial">A Step by step Amazon Relational Database Service tutorial</h1>
<p><em>Posted on <strong>26 Jul 2021</strong></em></p>

<p>This is a step-by-step Relational Database Service tutorial to show you how you can easily create a database with the Amazon platform. In the <a href="/code4projects/relational-database-service/">previous article</a>, I showed you the theory behind the Relational Database Service (RDS), here I will show you how to put those concepts into practice.</p>

<h2 id="how-to-create-a-mysql-database">How to Create a MySQL database</h2>

<h3 id="create-the-mysql-database">Create the MySQL database</h3>

<p>From the Management Console search bar, type the word “RDS” and select the <strong>Managed Relational Database Service</strong>. Click the orange button <strong>Create database</strong>.</p>

<p><img src="/code4projects/wp-content/uploads/1-RDS-Create-database.png" alt="Relational Database Service tutorial" width="450" height="260" class="responsive_img" /></p>

<p>The RDS service provides two ways to create a database, an easy way with very few options and a standard way where you can configure every detail. Select the <strong>Standard Create</strong> radio button.</p>

<p><img src="/code4projects/wp-content/uploads/2-RDS-Create-Database-Standard.png" alt="RDS Create Database Standard" width="450" height="170" class="responsive_img" /></p>

<p>In the <strong>Engine Options,</strong> select the MySQL database engine. MySQL is eligible for free-tier so this tutorial will cost you no money.</p>

<p><img src="/code4projects/wp-content/uploads/3-Create-MySQL-Database.png" alt="Create MySQL Database" width="450" height="226" class="responsive_img" /></p>

<p>Choose the latest MySQL version.</p>

<p><img src="/code4projects/wp-content/uploads/4-RDS-Select-MySQL-Version.png" alt="RDS Select MySQL Version" width="450" height="209" class="responsive_img" /></p>

<p>Now you can choose to deploy a production-ready, a dev/test database, or one eligible for free-tier. Since this is just a demonstration I suggest you select the <strong>Free-Tier</strong> radio button.</p>

<p><img src="/code4projects/wp-content/uploads/5-RDS-Select-Free-Tier.png" alt="RDS Select Free Tier" width="450" height="144" class="responsive_img" /></p>

<p>You can insert the name and the credentials of your database.</p>

<h3 id="configure-the-database-credentials">Configure the database credentials</h3>

<p><img src="/code4projects/wp-content/uploads/6-RDS-Insert-DBName-andCredentials.png" alt="RDS Insert D Name and Credentials" width="450" height="365" class="responsive_img" /></p>

<p>Now you can select the DB Instance class. Basically, this is the EC2 instance type on top of which the database is deployed. Since we are using the Free-Tier the only EC2 instance we can use is the t2.micro that here is called <strong>db.t2.micro</strong>.</p>

<p><img src="/code4projects/wp-content/uploads/7-RDS-Select-DBInstance-Class.png" alt="RDS Select DB Instance Class" width="450" height="228" class="responsive_img" /></p>

<h3 id="configure-the-database-hardware">Configure the database hardware</h3>

<p>Amazon RDS allows you to select the storage that will store your database. For our demo, a generic <strong>General Purpose SSD</strong> disk of 5 Gb is enough.</p>

<p><img src="/code4projects/wp-content/uploads/8-RDS-Choose-Storage.png" alt="RDS Choose Storage" width="450" height="231" class="responsive_img" /></p>

<p>The RDS service allows you to create a Multi-AZ configuration, however, in the Free-Tier this option is disabled. For our purpose, a Single-AZ deployment is fine.</p>

<p><img src="/code4projects/wp-content/uploads/9-RDS-Configure-Multi-AZ.png" alt="RDS Configure Multi AZ" width="450" height="135" class="responsive_img" /></p>

<p>You can configure the <strong>Connectivity</strong> for your database. For example, you can choose the VPC and Subnet where to deploy the database. moreover, you can decide if the Subnet should be public or private. In a <a href="/code4projects/relational-database-service/">typical scenario</a> the EC2 instance application will live in a public subnet while the database will live in the same VPC but a private Subnet.</p>

<p><img src="/code4projects/wp-content/uploads/10-RDS-Configure-Connectivity.png" alt="RDS Configure Connectivity" width="450" height="304" class="responsive_img" /></p>

<h3 id="configure-the-database-security-and-authentication">Configure the database security and authentication</h3>

<p>You can declare <strong>Security Group</strong> to allow only traffic coming from a given IP or another Security Group to access the database. This option is particularly useful in the <a href="/code4projects/relational-database-service/">typical scenario</a> to allow only the application EC2 instance to access the database. This is another security best practice to avoid hacking your database instance.</p>

<p><img src="/code4projects/wp-content/uploads/11-RDS-Configure-Security-Group.png" alt="RDS Configure Security Group" width="450" height="226" class="responsive_img" /></p>

<p>In the previous article, I mentioned two authentication methods on RDS: password and IAM;  There is a third method called <strong>Password and Kerberos authentication</strong>, however, to make things simple just select the <strong>Password authentication</strong> radio button. Click the <strong>Create Database</strong> button.</p>

<p><img src="/code4projects/wp-content/uploads/12-RDS-Choose-Authentication-Method.png" alt="RDS Choose Authentication Method" width="450" height="181" class="responsive_img" /></p>

<h3 id="explore-your-new-mysql-database">Explore your new MySQL Database</h3>

<p>In the Databases dashboard, you can see the new database. You can click on it to see details about it.</p>

<p><img src="/code4projects/wp-content/uploads/13-RDS-View-Databases.png" alt="RDS View Databases" width="450" height="120" class="responsive_img" /></p>

<p>You can see the Summary with information about the database name, the status, the hardware, the engine, region, and so on.</p>

<p><img src="/code4projects/wp-content/uploads/14-RDS-Database-Summary.png" alt="RDS Database Summary" width="450" height="134" class="responsive_img" /></p>

<p>There is information about Connectivity &amp; Security and much more.</p>

<p><img src="/code4projects/wp-content/uploads/15-RDS-Connectivity-and-Security.png" alt="RDS Connectivity and Security" width="450" height="205" class="responsive_img" /></p>

<h2 id="conclusion">Conclusion</h2>

<p>In this article, I showed a step-by-step Relational Database Service tutorial to easily create your next MySQL database on the Amazon platform. The <a href="/code4projects/relational-database-service/">previous article</a> and this tutorial complete our discussion about the Amazon RDS service. For more details, you can check out the <a href="https://docs.aws.amazon.com/it_it/AmazonRDS/latest/UserGuide/Welcome.html">official documentation</a>.</p>]]></content><author><name></name></author><category term="Cloud" /><summary type="html"><![CDATA[In this article, I would like to give you a brief introduction to Kubernetes and how to deploy applications on it.]]></summary><media:thumbnail xmlns:media="http://search.yahoo.com/mrss/" url="https://sasadangelo.github.io/code4projects/wp-content/uploads/rds-logo.png" /><media:content medium="image" url="https://sasadangelo.github.io/code4projects/wp-content/uploads/rds-logo.png" xmlns:media="http://search.yahoo.com/mrss/" /></entry><entry><title type="html">Relational Database Service (RDS) - What Is It and How Does It Work?</title><link href="https://sasadangelo.github.io/code4projects/relational-database-service/" rel="alternate" type="text/html" title="Relational Database Service (RDS) - What Is It and How Does It Work?" /><published>2021-07-18T00:00:00+00:00</published><updated>2021-07-18T00:00:00+00:00</updated><id>https://sasadangelo.github.io/code4projects/relational-database-service</id><content type="html" xml:base="https://sasadangelo.github.io/code4projects/relational-database-service/"><![CDATA[<p><img src="/code4projects/wp-content/uploads/Amazon-RDS.png" alt="Relational Database Service (RDS): What Is It and How Does It Work?" width="200" height="200" class="responsive_img" /></p>

<h1 id="relational-database-service-rds-what-is-it-and-how-does-it-work">Relational Database Service (RDS): What Is It and How Does It Work?</h1>
<p><em>Posted on <strong>18 Jul 2021</strong></em></p>

<p>In this article, I am going to discuss Amazon Relational Database Service, a managed service to quickly deploy a database for your application. You will learn what is available in the AWS platform and how you can reduce your application time to market.</p>

<p>Amazon Relational Database Service (RDS) is a managed database service that allows, with a single click, to create a database, configure it (also in HA), and manage backups automatically. If you have experience in building applications you know that you can keep data in several places (file, remote storage, etc.) included a database. However, managing the database infrastructure is not easy. You need to manage the following items:</p>

<ol>
  <li>server hardware (cable, power, network, disks, etc.);</li>
  <li>operating system (install, upgrade, and patches);</li>
  <li>database engine software (install, upgrade, and patches);</li>
  <li>create and manage the database containing data (create, data optimization, etc.);</li>
  <li>create and manage backups for disaster recovery;</li>
  <li>manage security;</li>
  <li>if you need high availability you need to replicate the above effort for a number of replicas you need to manage.</li>
</ol>

<p>You can install your own database service on an EC2 instance, however, you save only items 1 and partially 2, but you still need to manage items 3-7.</p>

<h2 id="amazon-rds-configuration">Amazon RDS Configuration</h2>

<p>The basic idea of the Amazon RDS is to let the customer choose the database to create its engine (i.e. PostgreSQL, MySQL, MariaDB, etc), configure it for disaster recovery, and high availability with a few mouse clicks. The application can live inside Amazon Cloud or outside it, it depends on the customer’s choice. The goal here is that customers focus on their own applications letting Amazon manage the whole database infrastructure.</p>

<p><img src="/code4projects/wp-content/uploads/2021/01/Screenshot-2021-01-21-at-09.46.47.png" alt="Amazon Relational Database Service" width="450" height="193" class="responsive_img" /></p>

<p><em>Photo from <a href="https://aws.amazon.com/it/training/course-descriptions/cloud-practitioner-essentials/">AWS Cloud Practitioner Essentials (2nd Edition)</a> course</em></p>

<p>RDS service will provide the following benefits:</p>

<ul>
  <li>automatic provisioning and OS patching;</li>
  <li>continuos backup and restore to specific timestamp (Point in Time Restore);</li>
  <li>monitoring dashboard;</li>
  <li>read replica configuration for horizontal scalability;</li>
  <li>multi AZs setup for high availability;</li>
  <li>quick restore from backup for disaster recovery;</li>
  <li>horizontal and vertical scaling;</li>
  <li>Storage on EBS.</li>
</ul>

<p>The only limit is that you cannot SSH on the EC2 instance where the service is deployed.</p>

<p>In order to create a database in Amazon RDS, you need to create a database instance. Basically, you need to define the <strong>DB Instance Class</strong> where you choose the number of CPUs, the memory, and the network performance of the EC2 machine hosting the instance. Then, you need to define the DB Instance Storage, for example, the disk type (SSD gp1 or io1). Amazon RDS supports six Db engines: MySQL, Amazon Aurora, SQL Server, PostgreSQL, MariaDB, and Oracle. Depending on how you configure the DB Instance class and storage and the DB Engine the price change.</p>

<p><img src="/code4projects/wp-content/uploads/2021/01/Amazon-RDS-Instance.png" alt="Amazon Relational Database Service Instance" width="450" height="224" class="responsive_img" /></p>

<p><em>Photo from <a href="https://aws.amazon.com/it/training/course-descriptions/cloud-practitioner-essentials/">AWS Cloud Practitioner Essentials (2nd Edition)</a> course</em></p>

<h2 id="amazon-rds-typical-scenario">Amazon RDS typical scenario</h2>

<p>In a typical scenario, you should deploy your application and the database service on the same VPC, in a single AZ, on different subnets. Traffic from the Internet only reaches the application subnet that must be public, while the database subnet is private. Usually, you have to configure the private subnet to only accept connections from the public subnet.</p>

<p><img src="/code4projects/wp-content/uploads/2021/01/Amazon-RDS-VPC.png" alt="Amazon Relational Database Service in a VPC" width="450" height="256" class="responsive_img" /></p>

<p><em>Photo from <a href="https://aws.amazon.com/it/training/course-descriptions/cloud-practitioner-essentials/">AWS Cloud Practitioner Essentials (2nd Edition)</a> course</em></p>

<h2 id="amazon-rds-in-high-availability-ha-scenario">Amazon RDS in High Availability (HA) scenario</h2>

<h3 id="amazon-rds-multi-az-configuration">Amazon RDS Multi-AZ configuration</h3>

<p>You can configure Amazon RDS to work in HA, in this case, you will have a DB Replica on a different AZ connected in Synchronous mode to the master database. In this way, you will not have any data loss because a transaction is closed only if it is present on both the DB Instance.</p>

<p><img src="/code4projects/wp-content/uploads/2021/01/Amazon-RDS-HA.png" alt="Amazon RDS HA" width="450" height="288" class="responsive_img" /></p>

<p><em>Photo from <a href="https://aws.amazon.com/it/training/course-descriptions/cloud-practitioner-essentials/">AWS Cloud Practitioner Essentials (2nd Edition)</a> course</em></p>

<p>If for some reason the Amazon RDS master copy is unavailable, the application automatically connects to the Synchronous instance.</p>

<p><img src="/code4projects/wp-content/uploads/2021/01/Amazon-RDS-Failover.png" alt="Amazon RDS Failover" width="450" height="286" class="responsive_img" /></p>

<p><em>Photo from <a href="https://aws.amazon.com/it/training/course-descriptions/cloud-practitioner-essentials/">AWS Cloud Practitioner Essentials (2nd Edition)</a> course</em></p>

<h3 id="amazon-rds-from-single-az-to-multi-az">Amazon RDS from Single-AZ to Multi-AZ</h3>

<p>It is possible to move the RDS Database instance from a Single-AZ to a Multi-AZ configuration with few clicks of the mouse. Here is what happens behind the scene:</p>

<ol>
  <li>the RDS service creates a snapshot of the Master database.</li>
  <li>the snapshot is restored in another AZ of the same Region.</li>
  <li>the Master starts to replicate itself on the Replica node.</li>
</ol>

<p><img src="/code4projects/wp-content/uploads/Move-RDS-Cross-AZ.png" alt="Move RDS Cross AZ" width="450" height="462" class="responsive_img" /></p>

<h2 id="relational-database-service-in-scalability-scenario">Relational Database Service in Scalability scenario</h2>

<p>Amazon RDS supports also Read Replica for MySQL, PostgreSQL, MariaDB, Amazon Aurora DB engines. Basically, the service automatically uses the standby copy for read-only queries. This allows splitting the read database traffic on both nodes. Updates are available only on the master node. This configuration is particularly useful on massive database read applications. However, the stand-by node works in an asynchronous mode so if you want to promote it to master a manual action is required.</p>

<p>You can configure up to 5 Read Replicas, within the same AZ, cross AZ, or cross Region.</p>

<p><img src="/code4projects/wp-content/uploads/2021/01/Amazon-RDS-Read-Replica.png" alt="Amazon RDS Read Replica" width="450" height="409" class="responsive_img" /></p>

<p><em>Photo from <a href="https://aws.amazon.com/it/training/course-descriptions/cloud-practitioner-essentials/">AWS Cloud Practitioner Essentials (2nd Edition)</a> course</em></p>

<p>Usually, there is a network cost when your data goes from one AZ to another. However, for managed services like RDS if the traffic is inside the same region no extra fees are applied.</p>

<p>A typical application of the Read Replica scenario is when you have an application working with a database and you want to add an analysis service that only needs to read data from it. In this scenario, you create a replica node and your analysis service only reads data from it.</p>

<h2 id="amazon-rds-backup-and-snapshot">Amazon RDS Backup and Snapshot</h2>

<p>When you create a Database instance it enables automatically the backup feature. Every day an automatic full backup runs and every 5 minutes it saves transaction logs. Full backup and transaction logs allow you to restore the backup at any point in time with the granularity of 5 minutes. By default, the retention policy is 7 days but you can increment up to 35 days.</p>

<p>In RDS there is also the concept of a Database snapshot. The main difference with backup is that users can trigger it manually and retention policy can be as long as you want.</p>

<h2 id="relational-database-service-storage-autoscaling">Relational Database Service Storage Autoscaling</h2>

<p>This feature helps you to increase the storage of your RDS instance dynamically. When RDS detects you are running out of free space, it scales the size automatically. In order to have this feature working you need to set a Maximum Storage Threshold (max limit for DB storage) then RDS scales automatically when:</p>

<ol>
  <li>free space &lt; 10% of the allocated storage;</li>
  <li>low storage lasts at least 5 minutes;</li>
  <li>6 hours passed since the last modification;</li>
</ol>

<p>This feature is supported on MariaDB, MySQL, PostgreSQL, SQL Server, and Oracle.</p>

<h2 id="relational-database-service-security">Relational Database Service Security</h2>

<h3 id="database-encryption">Database encryption</h3>

<p>You can secure your data into the database mainly using two types of encryption:</p>

<ul>
  <li><strong>at rest encryption</strong>;</li>
  <li><strong>in-flight encryption</strong>;</li>
</ul>

<p>With the at-rest encryption, you encrypt data into your database and its replica. You can do that at launch time with few mouse clicks using AWS KMS AES 256 encryption. You can encrypt Replicas only if the Master is encrypted too. Transparent Data Encryption (TDE) is only available for Oracle and SQL Server database engines.</p>

<p>Moreover, you can encrypt data that your application sends to the database service using SSL certificates. When the application connects to the database its should provide options to configure SSL certificates and this varies from a database engine to another.</p>

<h3 id="how-to-encrypt-an-unencrypted-database">How to encrypt an unencrypted database?</h3>

<p>Before I said that you can encrypt a database only at launch time. However, what I can do to encrypt an already existing unencrypted database? Suppose your requirements change and you need to encrypt your database. Amazon RDS service doesn’t provide a direct way to do this, however, you can achieve the same result using a very simple procedure.</p>

<p>First of all, you need to remember some critical rules:</p>

<ul>
  <li>snapshots of an unencrypted database are unencrypted;</li>
  <li>snapshots of an encrypted database are encrypted;</li>
  <li>you can convert an unencrypted snapshot into an encrypted one;</li>
</ul>

<p>With these elements in mind, it’s easy to figure out the procedure to encrypt an already existing not encrypted database. Here is the procedure:</p>

<ul>
  <li>stop your existing database instance;</li>
  <li>create a snapshot of your unencrypted master database;</li>
  <li>convert the snapshot into an encrypted one;</li>
  <li>restore the snapshot into a new database instance;</li>
  <li>start your new database instance;</li>
  <li>eventually start replica nodes;</li>
  <li>move the application to the new database instance.</li>
</ul>

<p><img src="/code4projects/wp-content/uploads/RDS-Encrypt-Database.png" alt="RDS Encrypt Database" width="450" height="462" class="responsive_img" /></p>

<h3 id="network-security">Network Security</h3>

<p>At the beginning of this article, I showed a typical scenario of an application that uses a database instance. Usually, while the application lives in a public subnet because it must be accessible from the outside, the database usually lives in a private subnet in the same VPC in order to protect data from unauthorized access.</p>

<p>The second level of protection of your database instance is through the use of <strong>Security Groups</strong>. You can use Security Group with RDS instance in the same way you use them with EC2 instance. For example, you can specify the IP or Security Group that can access your database instance.</p>

<p><img src="/code4projects/wp-content/uploads/2021/01/Amazon-RDS-VPC.png" alt="Amazon RDS in a VPC" width="450" height="256" class="responsive_img" /></p>

<p><em>Photo from <a href="https://aws.amazon.com/it/training/course-descriptions/cloud-practitioner-essentials/">AWS Cloud Practitioner Essentials (2nd Edition)</a> course</em></p>

<h3 id="access-management">Access Management</h3>

<p>Another level of security is to control who can access the RDS instance. In the AWS platform, you can implement this through the IAM policies and RDS APIs. Another alternative is to use a traditional username and password.</p>

<p>Database engines like MySQL and PostgreSQL support IAM-based authentication. You can do this simply using a Role and a token retrieved from RDS API calls. This token will have a lifetime of 15 seconds. The benefits of this approach are to leverage IAM and Roles for user management.</p>

<p><img src="/code4projects/wp-content/uploads/RDS-IAM-Authentication.png" alt="RDS IAM Authentication" width="450" height="513" class="responsive_img" /></p>

<h2 id="amazon-aurora">Amazon Aurora</h2>

<p>The list of DB engines mentioned above contains open-source (i.e. MySQL, MariaDB, and PostgreSQL) and commercial databases (i.e. Oracle and SQL Server), the only exception is Aurora an Amazon proprietary database engine that works like a PostgreSQL or MySQL database.</p>

<p>It is a Cloud-optimized database engine and claims a 5x performance improvement over MySQL on RDS and over 3x the performance of PostgreSQL on RDS. The database size grows from 10 GB up to 64 TB with an increment of 10 GB.</p>

<p>This database engine is HA native and automatic failover is instantaneous, it supports up to 15 replicas with a lag of less than 10 ms. In the figure below you can see that each data (i.e. block blue) is replicated 6 times across 3 AZs. Self-healing is achieved with peer-to-peer replication.</p>

<p><img src="/code4projects/wp-content/uploads/Amazon-Aurora-Architecture.png" alt="Amazon Aurora Architecture" width="450" height="341" class="responsive_img" /></p>

<p>As a Database Cluster Amazon Aurora has only one master that writes the data and multiple replicas that read them. In order to establish connections with these databases, there are two endpoints: one for the master and another one to load balance all the replicas. You can imagine these Writer/Reader endpoints like DNS names to use to write/read data into/from the databases. Adding and removing replicas is as easy as click a button.</p>

<p><img src="/code4projects/wp-content/uploads/Amazon-Aurora-DB-Cluster.png" alt="Amazon Aurora DB Cluster" width="450" height="224" class="responsive_img" /></p>

<p>Moreover, there are other features like backup and restore, isolation and security, industry compliance, automatic patching with zero downtime, advanced monitoring, backtrack (restore data at any point in time without using backups).</p>

<p>All of these features come at a cost as Amazon Aurora costs, on average, 20% more than Amazon RDS.</p>

<h2 id="conclusion">Conclusion</h2>

<p>In this article, I explained how to use Amazon RDS to easily deploy a database for your application.  I discussed several typical deployments you could find useful for your scenarios. In the next article, I will show you a step-by-step tutorial to use this service in practice.</p>]]></content><author><name></name></author><category term="Cloud" /><summary type="html"><![CDATA[In this article, I would like to give you a brief introduction to Kubernetes and how to deploy applications on it.]]></summary><media:thumbnail xmlns:media="http://search.yahoo.com/mrss/" url="https://sasadangelo.github.io/code4projects/wp-content/uploads/Amazon-RDS.png" /><media:content medium="image" url="https://sasadangelo.github.io/code4projects/wp-content/uploads/Amazon-RDS.png" xmlns:media="http://search.yahoo.com/mrss/" /></entry></feed>